

Who can do this: Four permissions, set on each security role:
- Manage AI Agents: create and set up agents.
- Assign AI Agents: turn agents on for a job req and assign candidates to them. Turning an agent on for a job req also needs Manage Job Req Settings.
- Approve AI Agent Actions: approve, edit or reject the messages agents propose.
- View AI Agent Tasks: see what agents have done, read-only.
How an agent works
On its schedule, and whenever something happens to a candidate (they apply, finish an activity or move to a new step), the agent looks at each candidate assigned to it:- Where they are: their current step, and which activities in it are theirs to do, like screening questions, an assessment, a typing test, an interview they’ve been invited to book, or an onboarding form that’s been sent to them.
- What’s already been said: every email and text in their history, from anyone on your team, your automation rules or the agent itself.
What an agent never does
These rules are always on and can’t be turned off. Most of them are also listed under Guardrails in every agent’s settings.- It only acts on candidates you’ve assigned to it.
- It never messages a closed application: hired, rejected or withdrawn. It never messages a blocked candidate.
- It only texts or WhatsApps candidates who have opted in to that channel. Email doesn’t need an opt-in.
- It’s outbound only. Sending messages is the only action it takes. It can’t change a candidate’s step, reject them, score them or assign them.
- It works only from hiring workflow data, never protected characteristics like age, gender or race.
- It leaves offers and background checks alone. To remind a candidate about an offer, see E-signatures.
- Every action is logged, with the agent’s reasoning.
Before you start
- Turn on AI agents. Ask your Customer Success Manager.
- Give people the permissions. Go to Settings, then Security, and turn on the AI Agents permissions for the right roles. See Security roles.
- Set up texting, if you want it. Email works right away. To let an agent send texts or WhatsApp messages, your account needs a number for that channel in Settings, then Phone Numbers, and WhatsApp messages also need approved WhatsApp templates. See Text messages and WhatsApp.
- Check your AI credits. See AI credits.
Create an agent
1
Open AI Agents
Go to Settings, then AI Agents, and click New agent.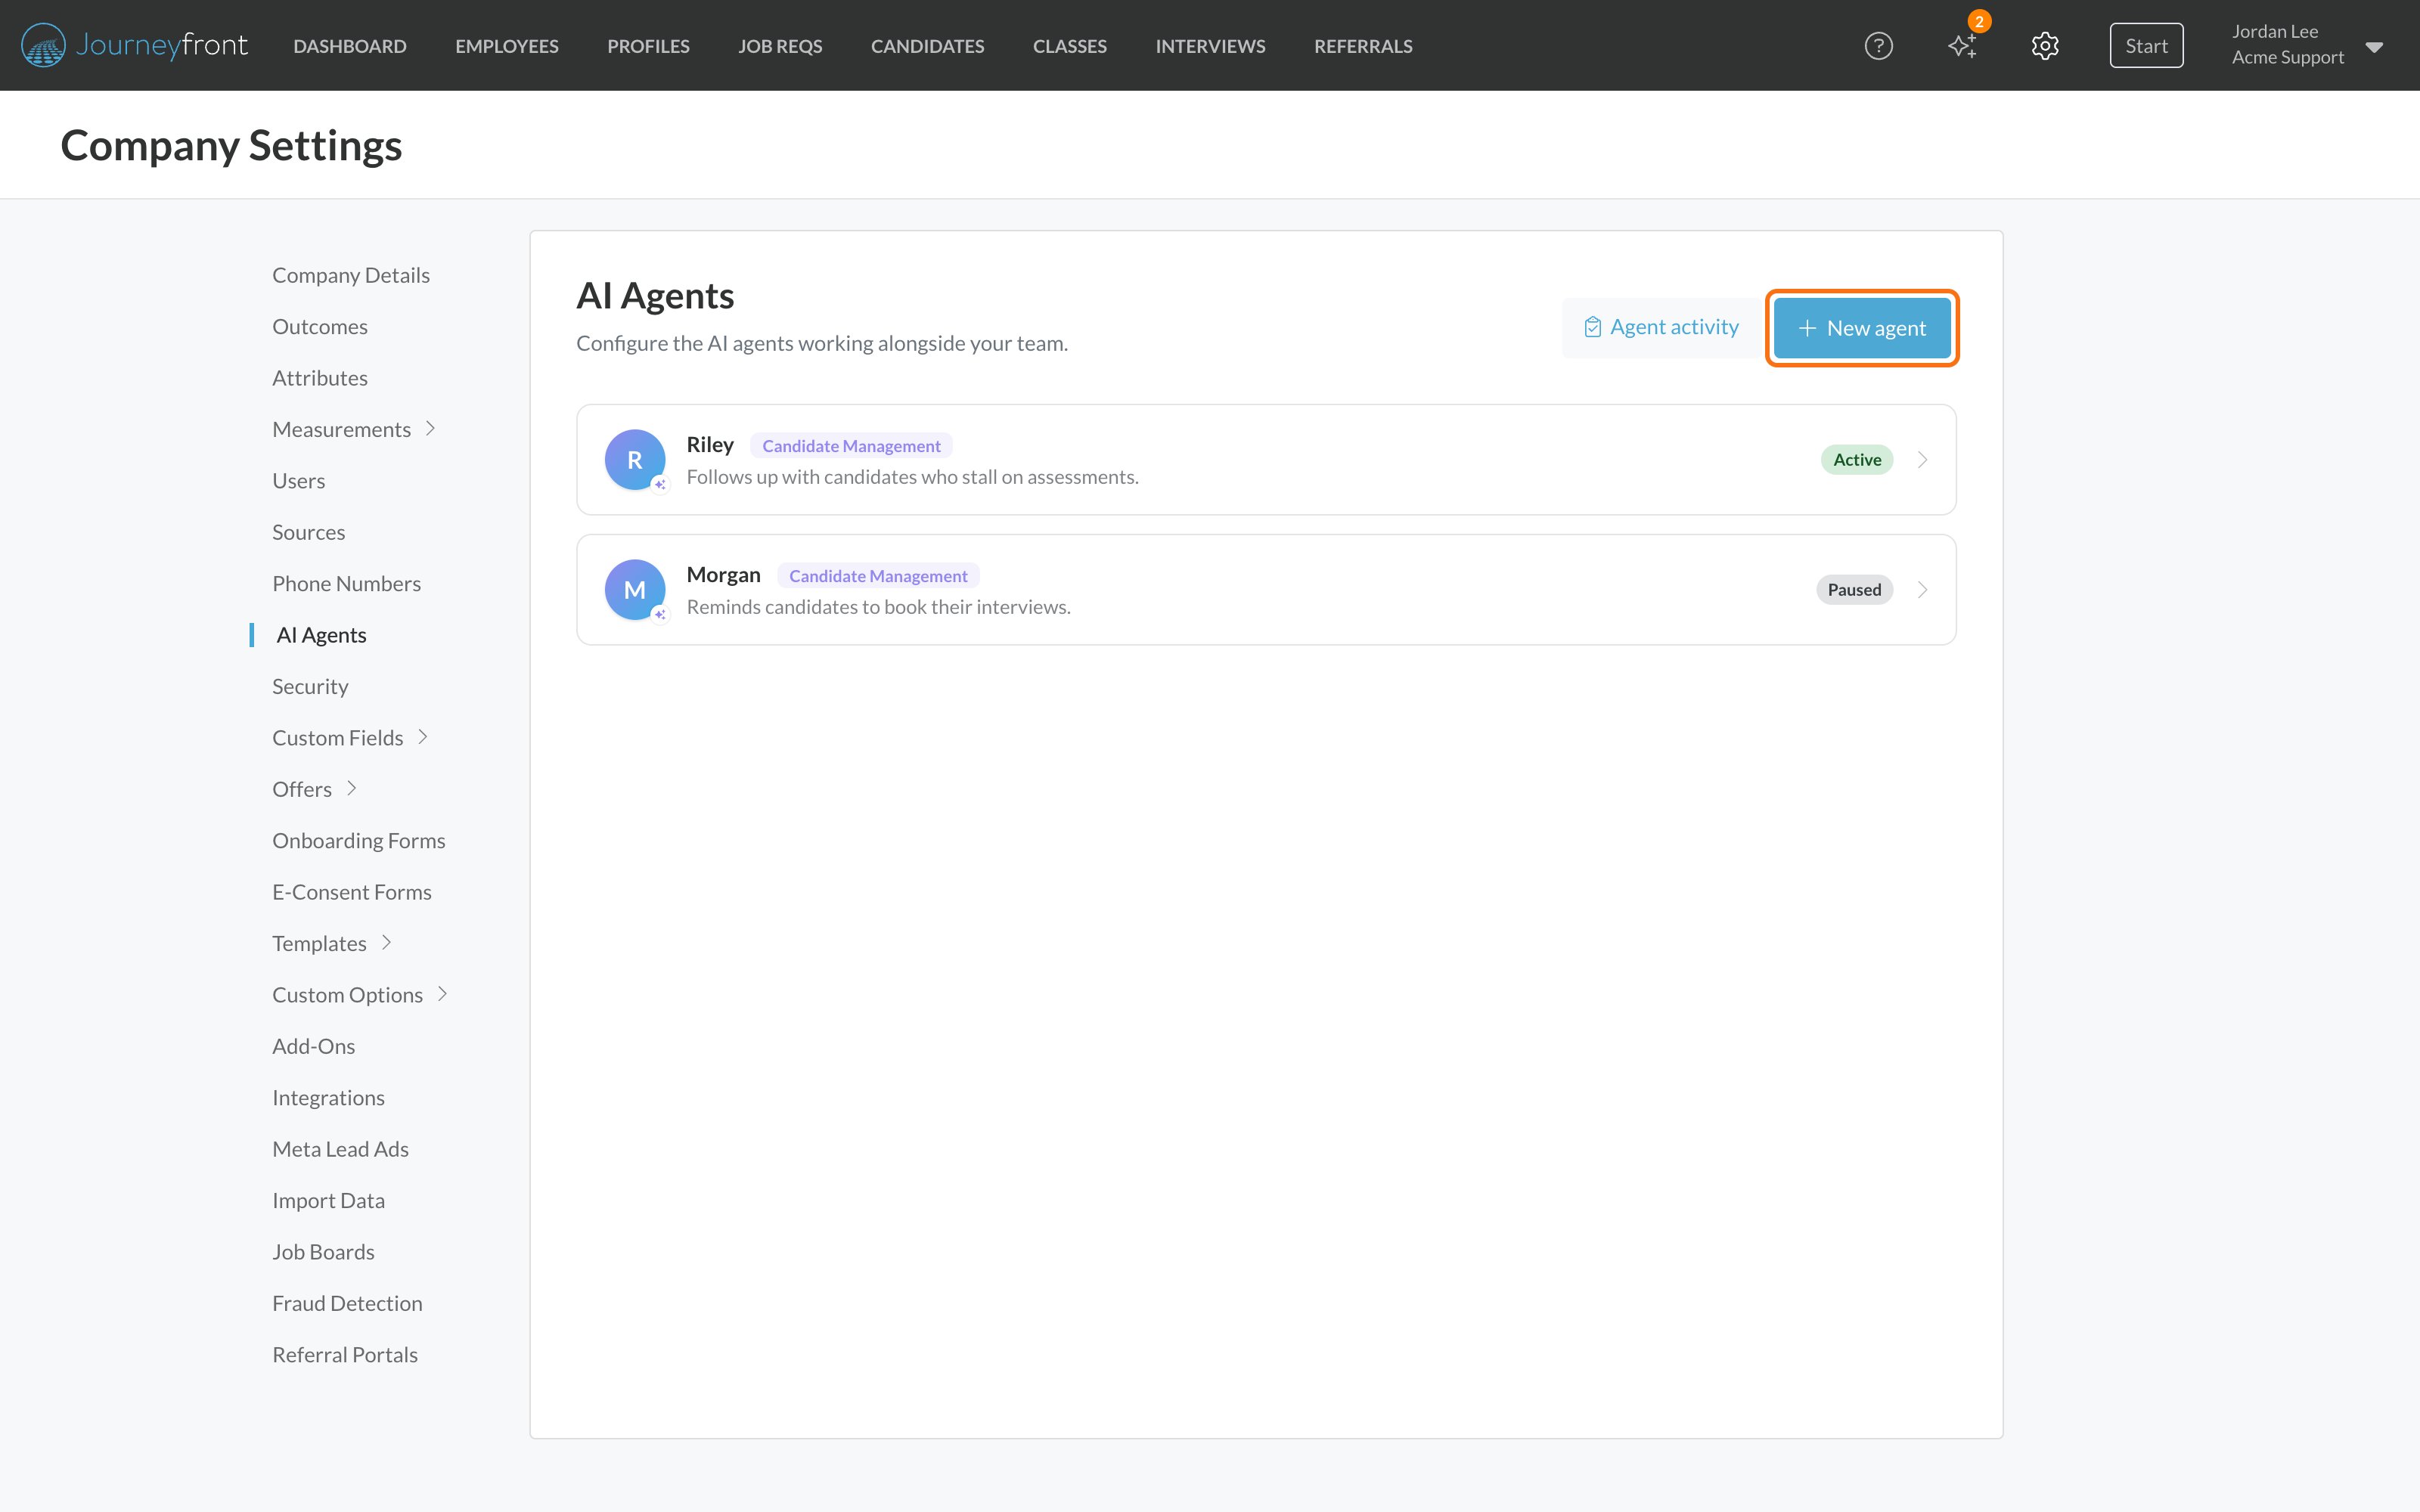
2
Choose the type and name it
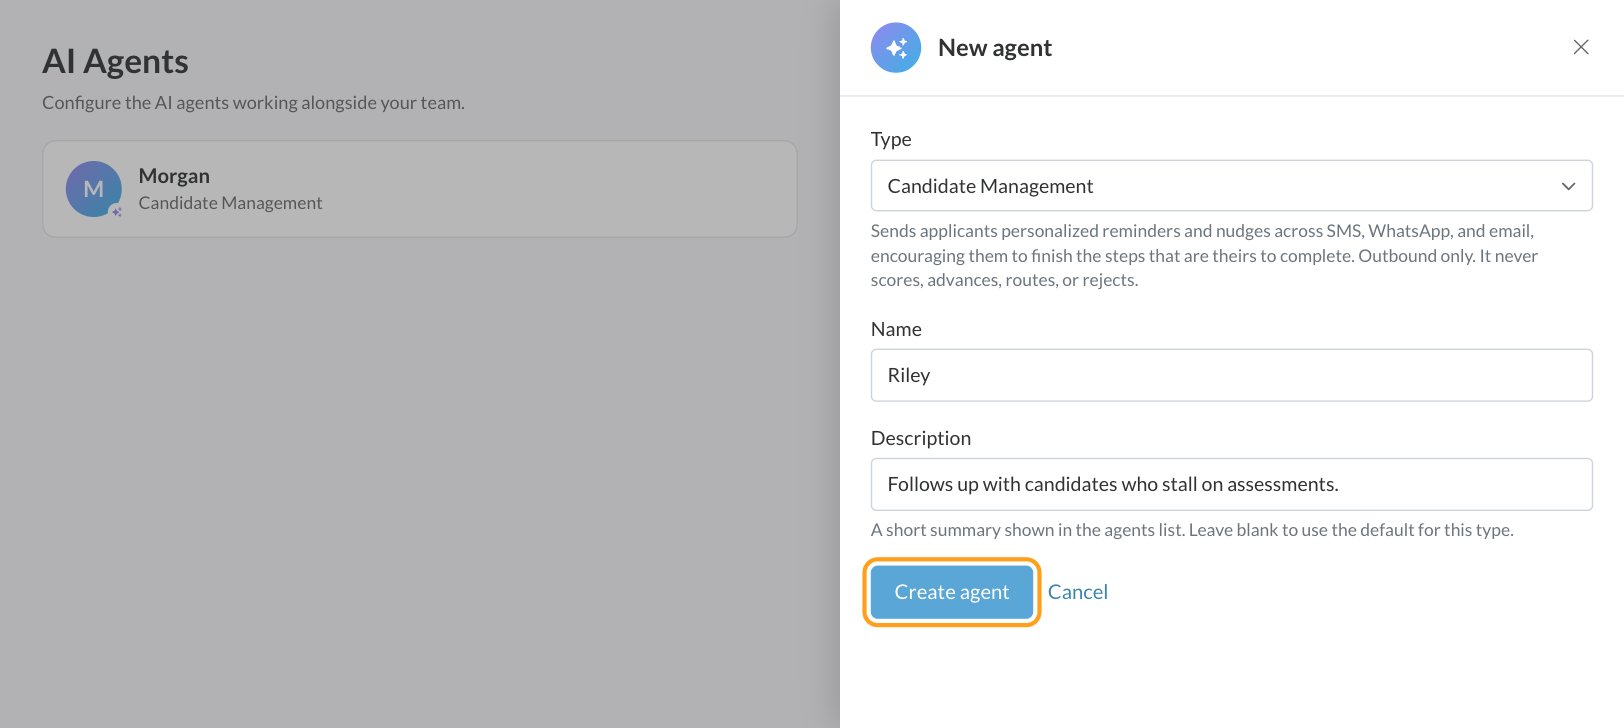
Choose the Type: Candidate Management sends candidates reminders and nudges to finish the steps that are theirs to complete. Give the agent a Name and, if you like, a short Description for the agents list.
3
Click Create agent
The agent is created Paused, and its settings open so you can finish setting it up.
Set up the agent
Click an agent in the list to open its settings.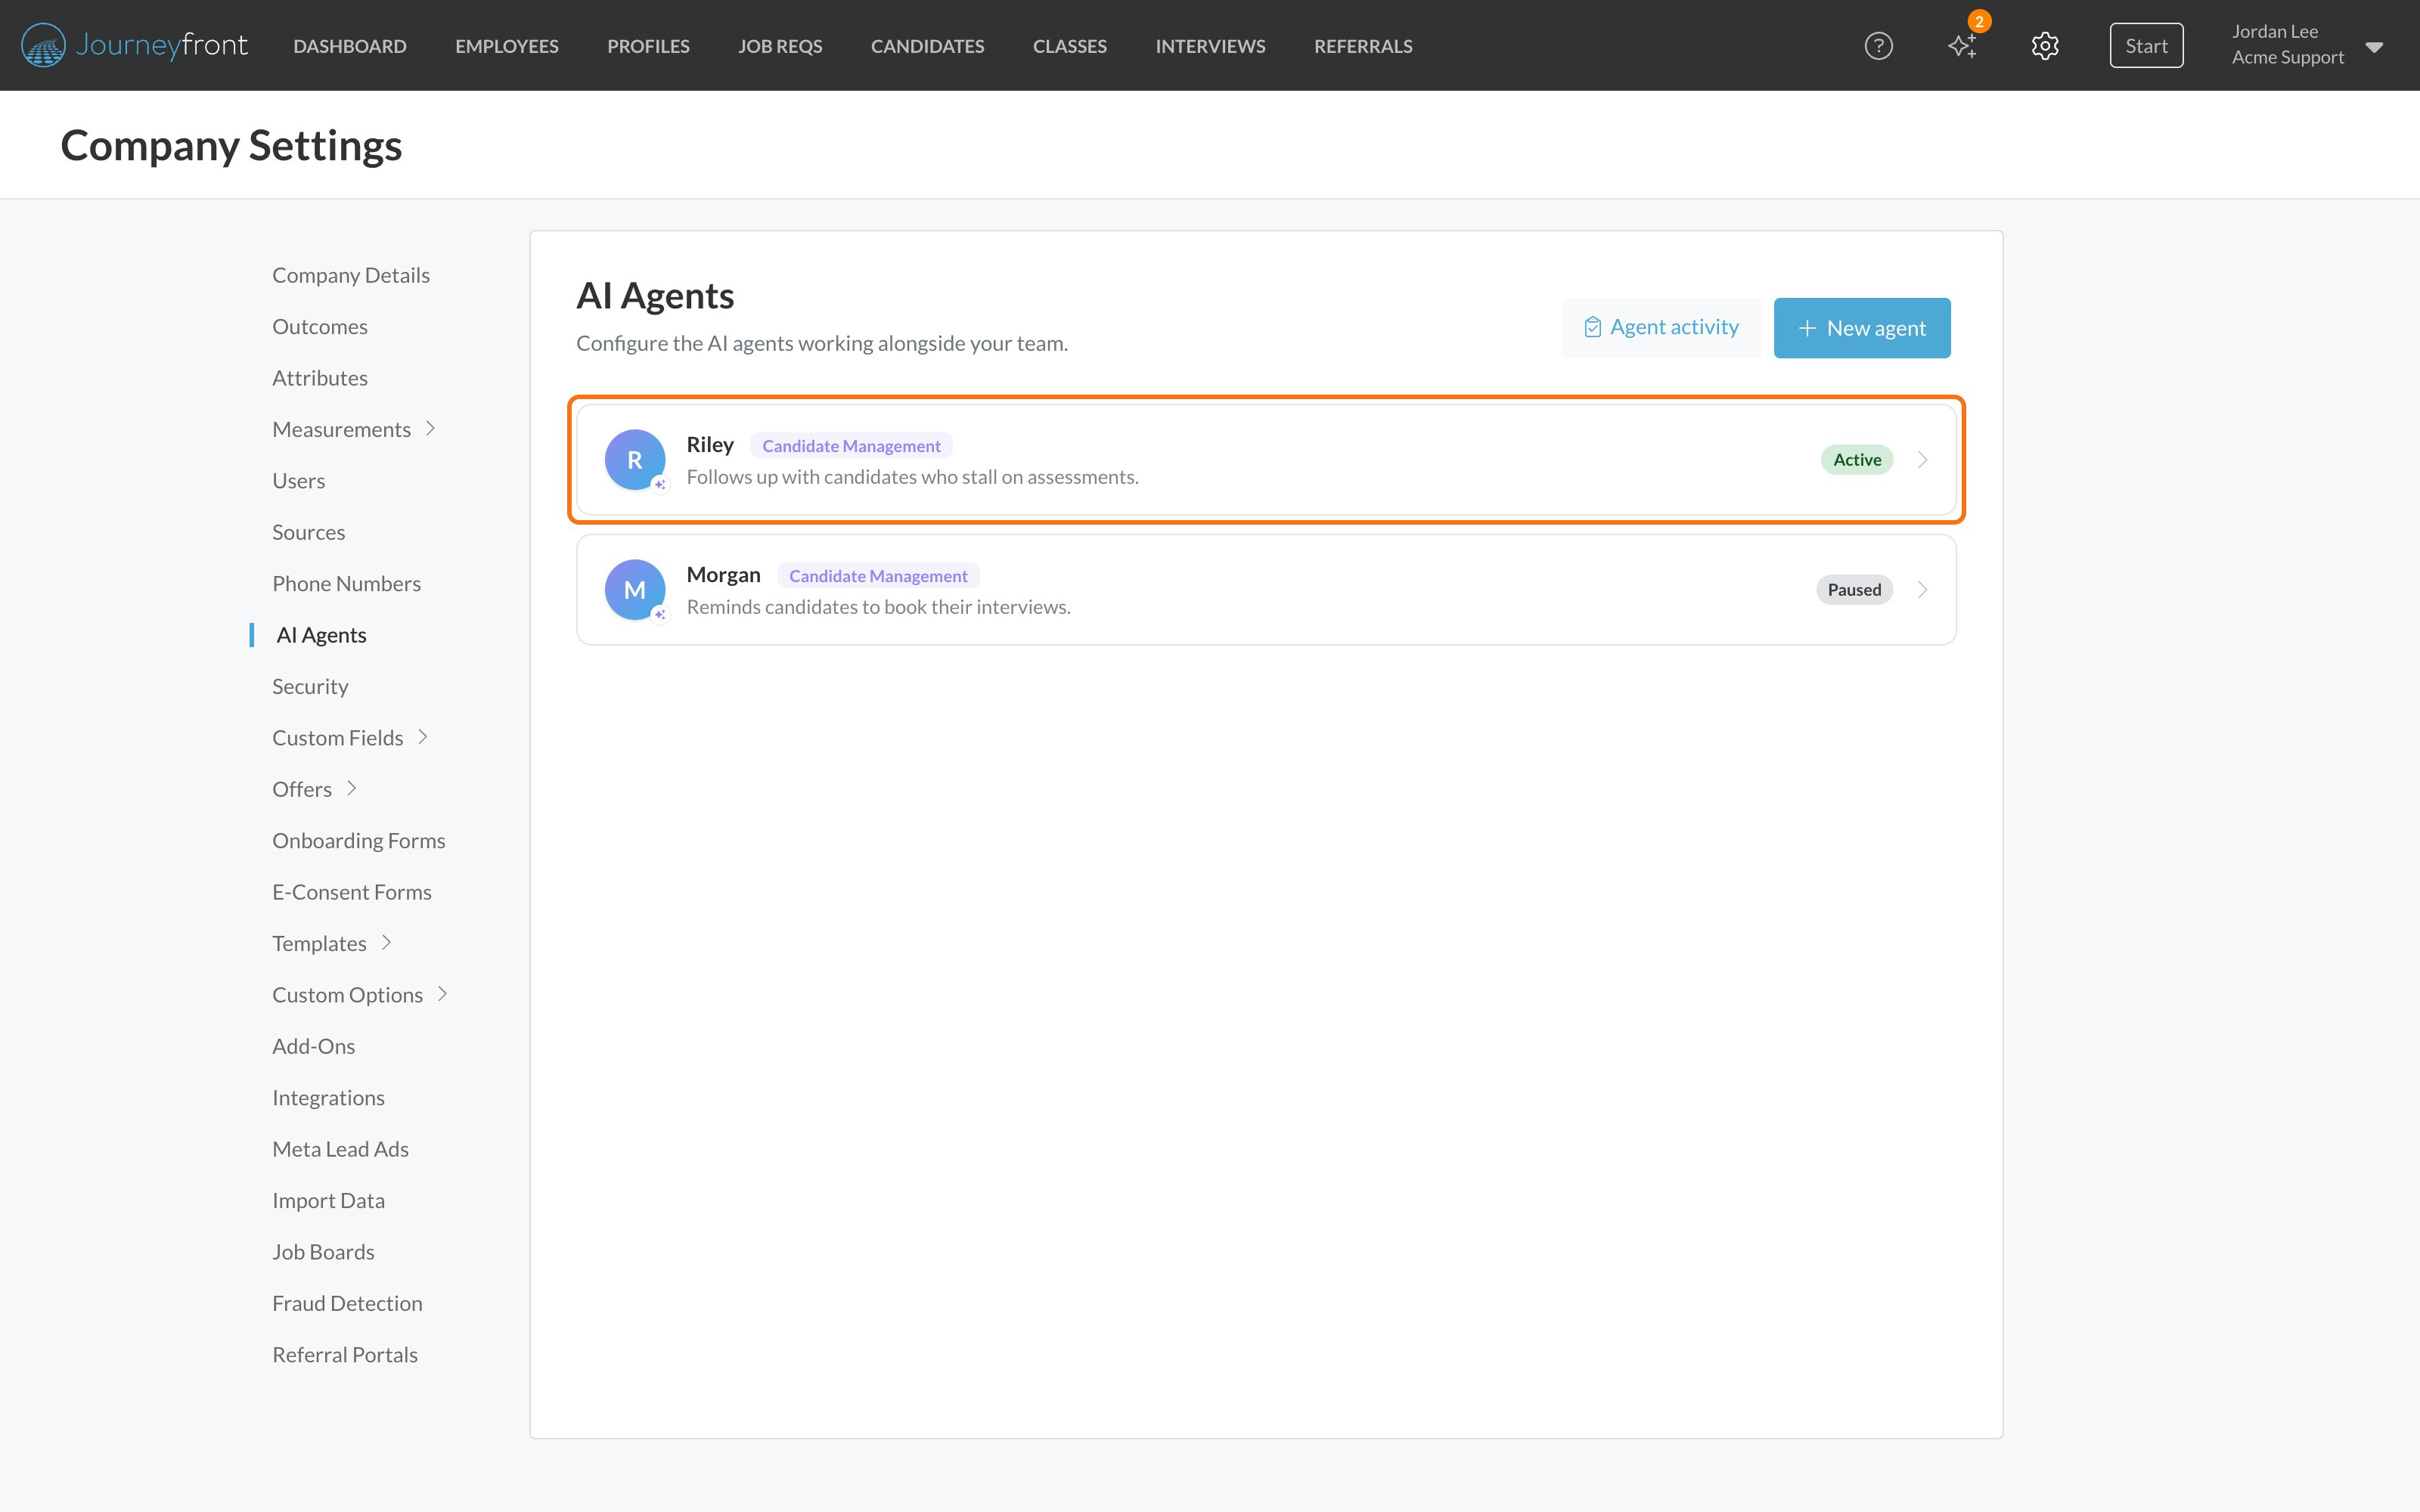
- Name and Description.
- Instructions: your own guidance on top of the agent’s built-in role, such as tone, things to mention, or things to avoid. For example: “Keep messages warm and concise. Mention our 24-hour response promise.” Instructions can narrow what the agent does; they can’t switch off its guardrails.
- Tools: what the agent is allowed to do. Read candidate process is always on. Turn Send SMS, Send WhatsApp and Send email on or off, and choose when each needs your approval (see Approval settings).
- Send settings for each channel:
- Send SMS and Send WhatsApp: Send from, the number the agent messages from.
- Send email: From name, the sender name candidates see (your company name if you leave it empty), and Reply-to email, where candidate replies go: the default address, or a Custom email address.
- How often should the agent run: Every hour, Every 2 hours, Every 4 hours (the default), Every 6 hours, Every 12 hours or Once a day. This is how often it looks over its candidates, not how often it messages them.
Approval settings
For each channel, When should this need your approval?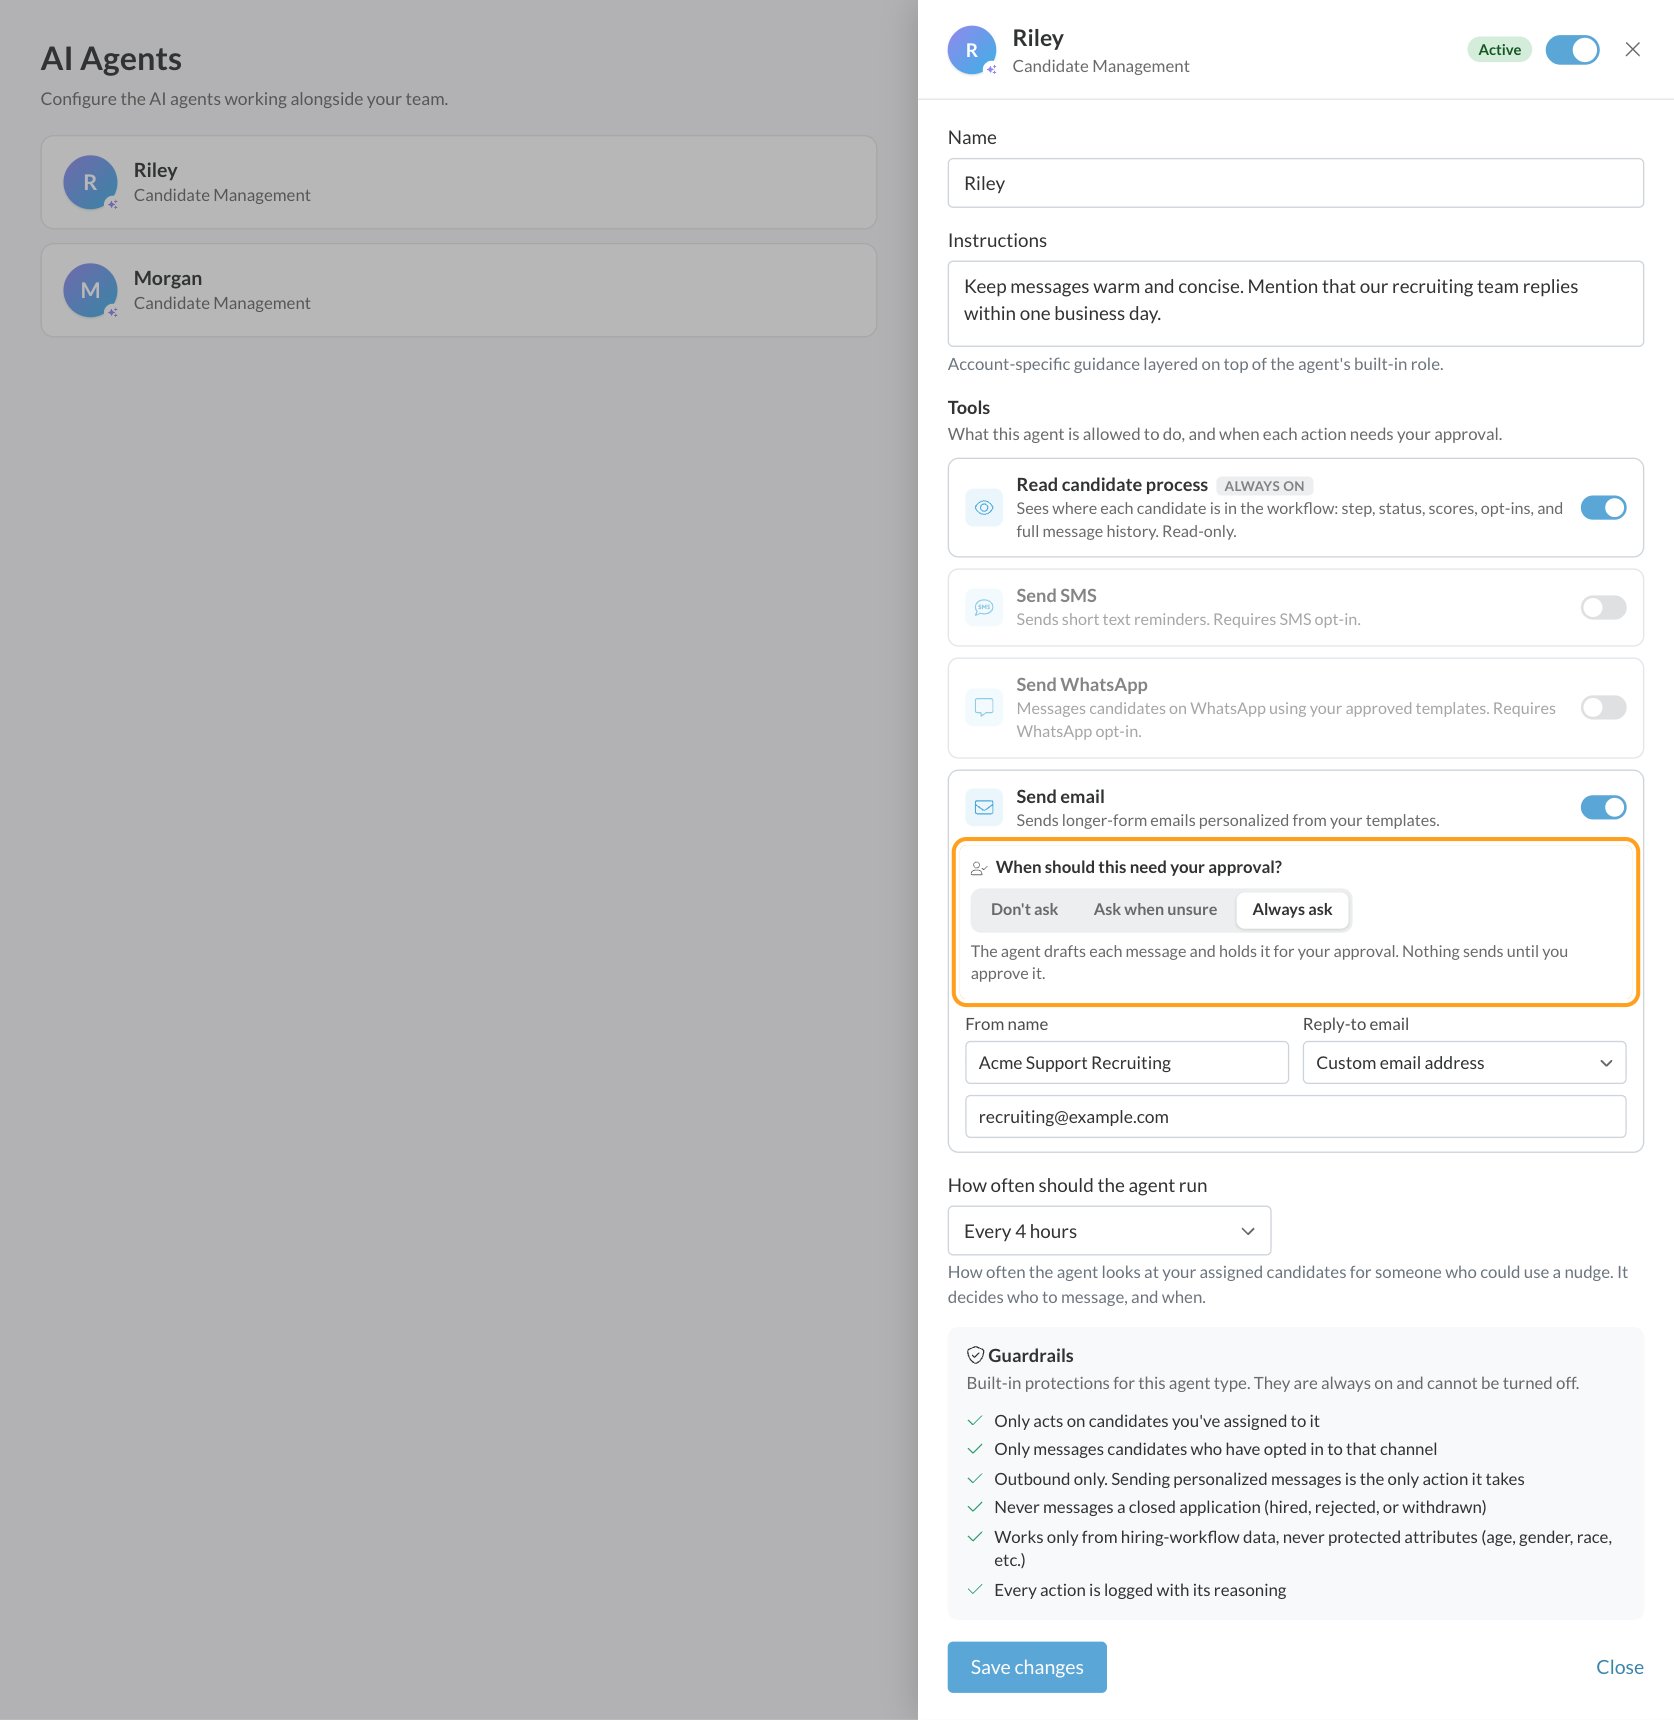
Until you click Save changes on a new agent’s settings, it holds every message for approval, the same as Always ask.
Turn an agent on for a job req
An agent only works on job reqs where it’s turned on.1
Open the job req's AI Agents settings
Open the job req and go to Setup, then AI Agents. Each agent shows Enabled or Off for this job req.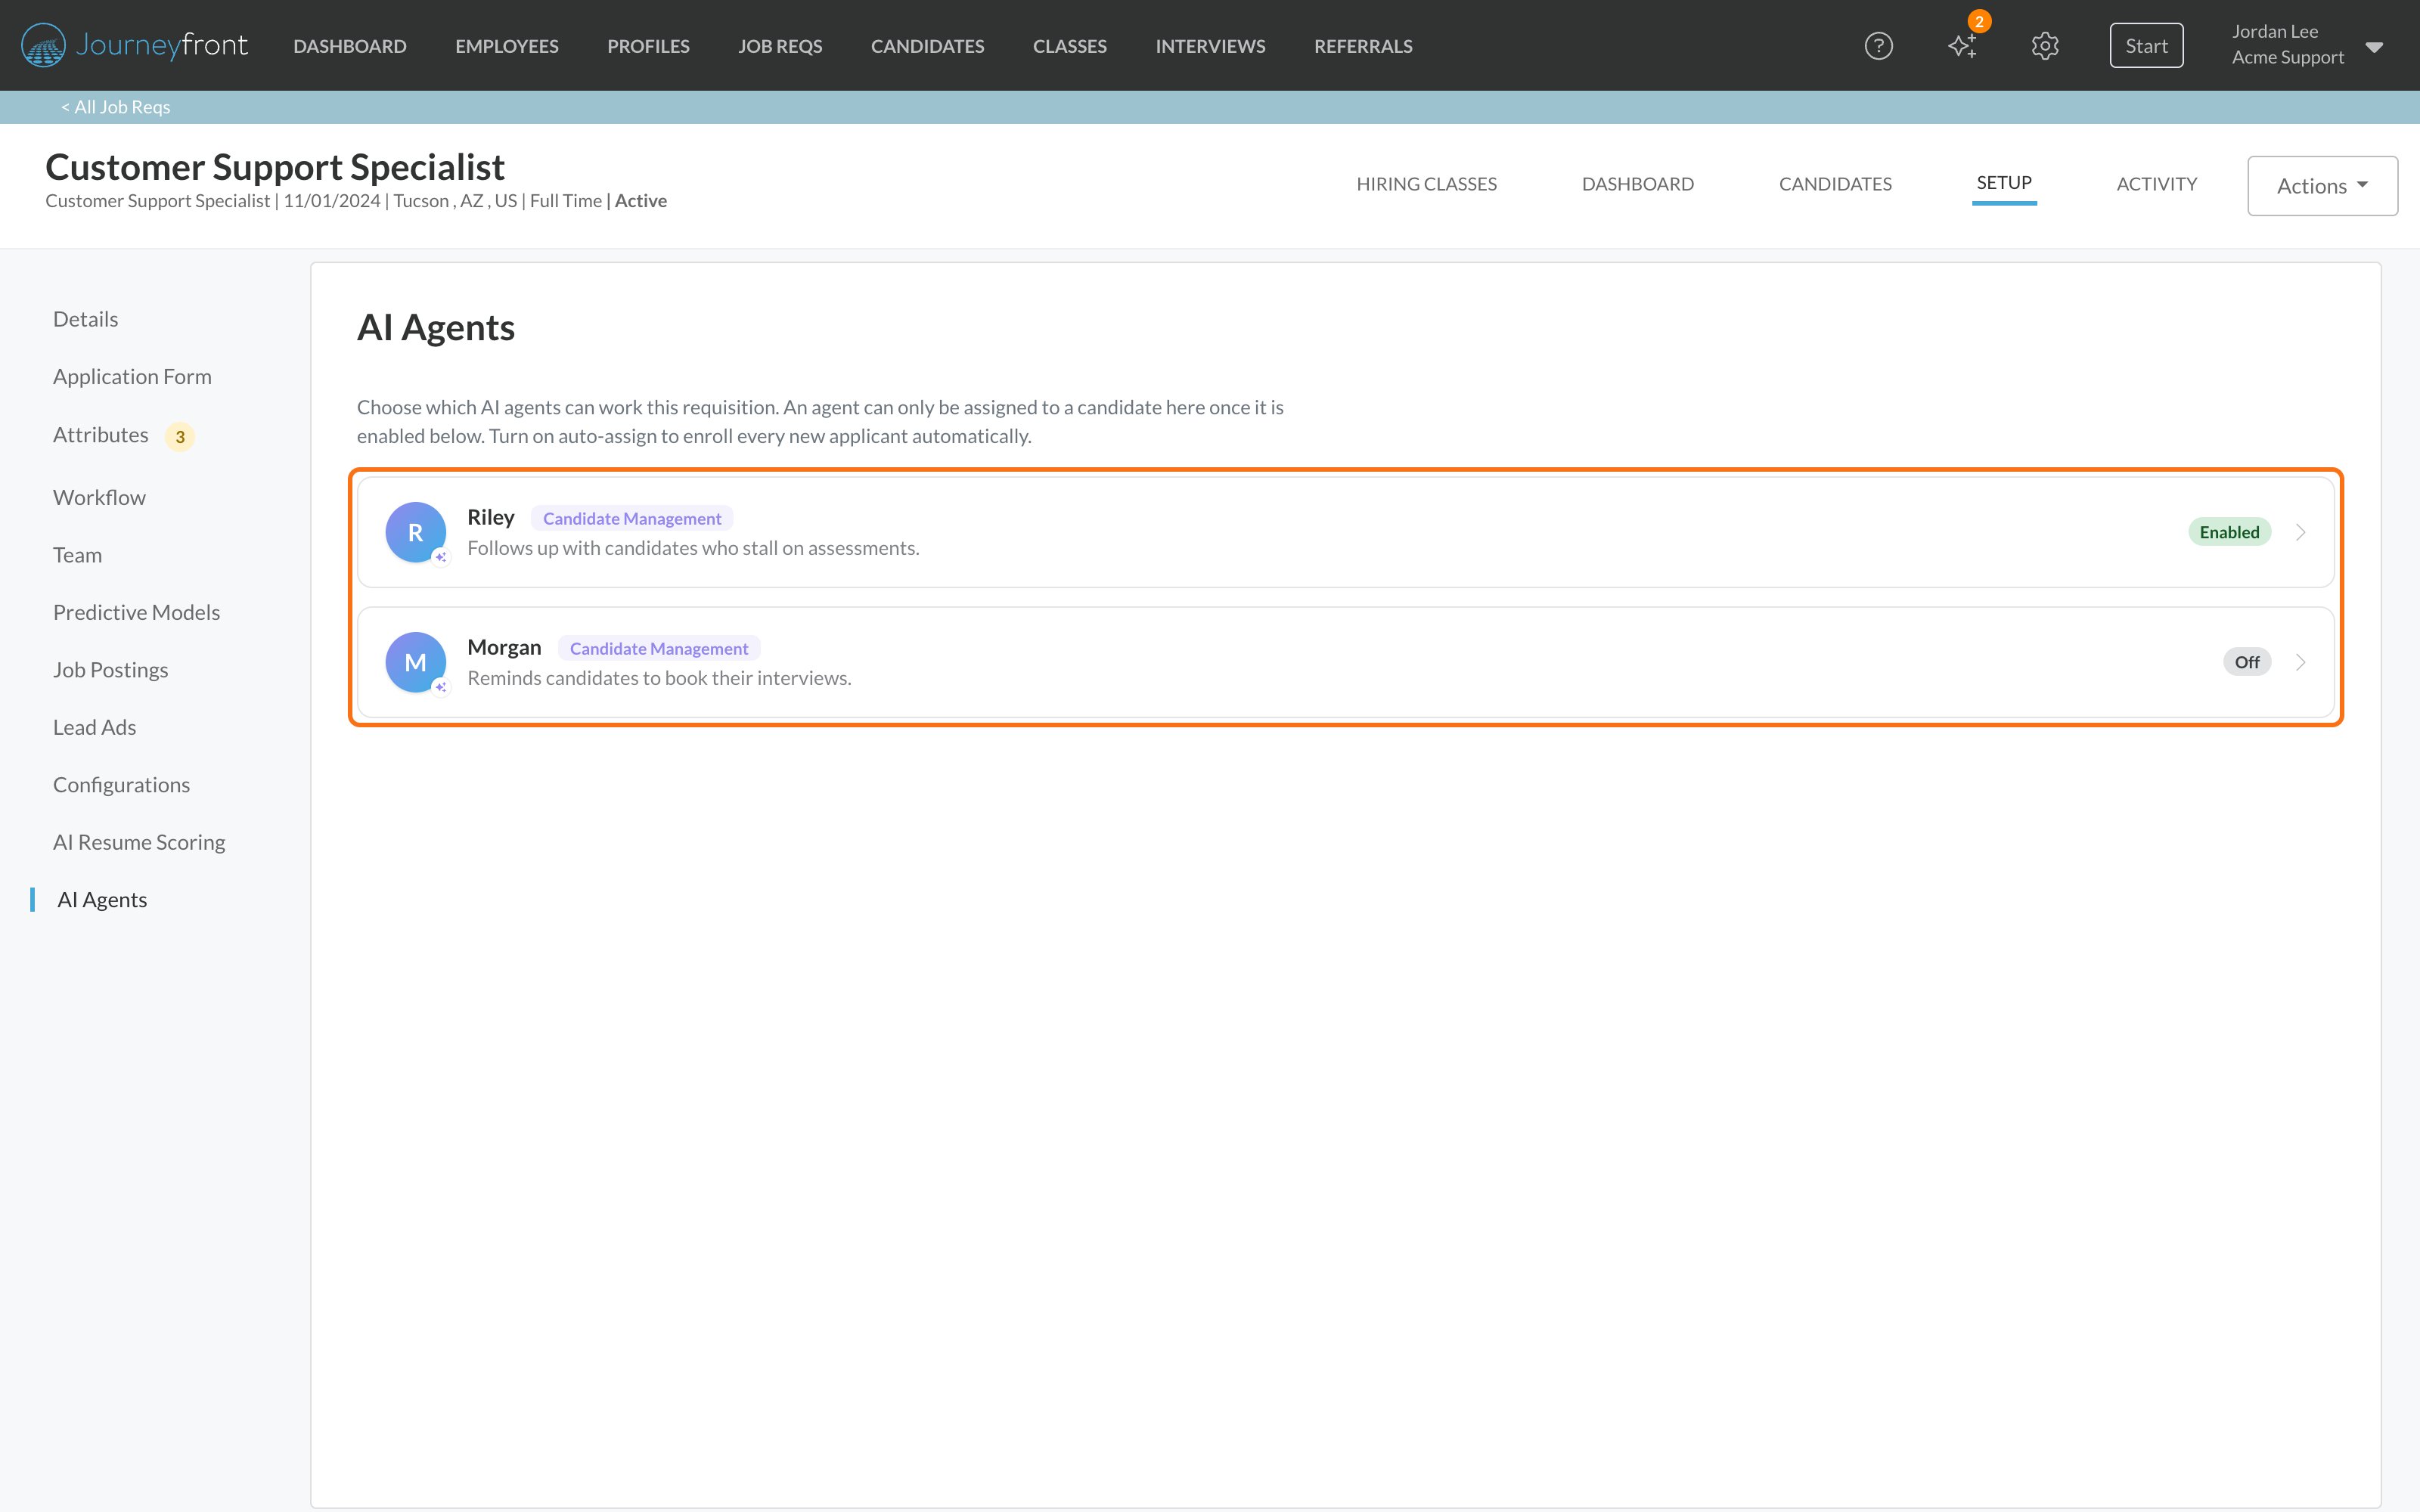
2
Turn the agent on
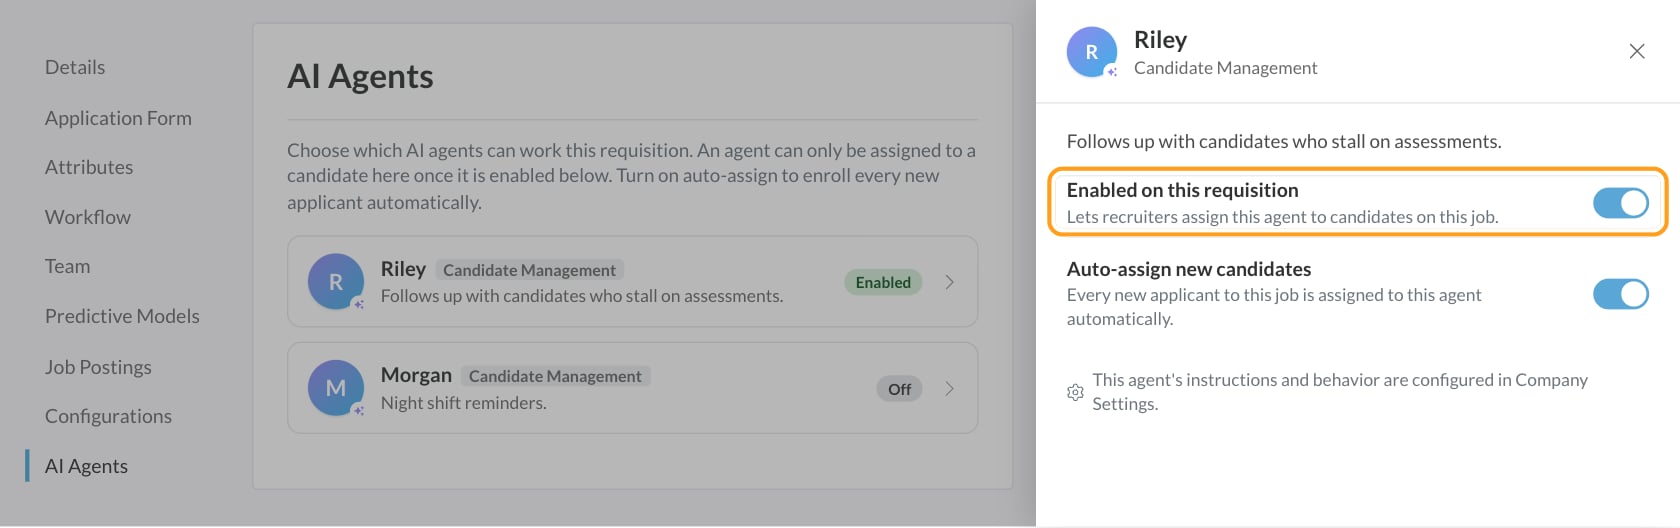
Click the agent and turn on Enabled on this requisition.
3
Choose auto-assign (optional)
Turn on Auto-assign new candidates to assign every new applicant to this job req to the agent automatically.
Assign candidates
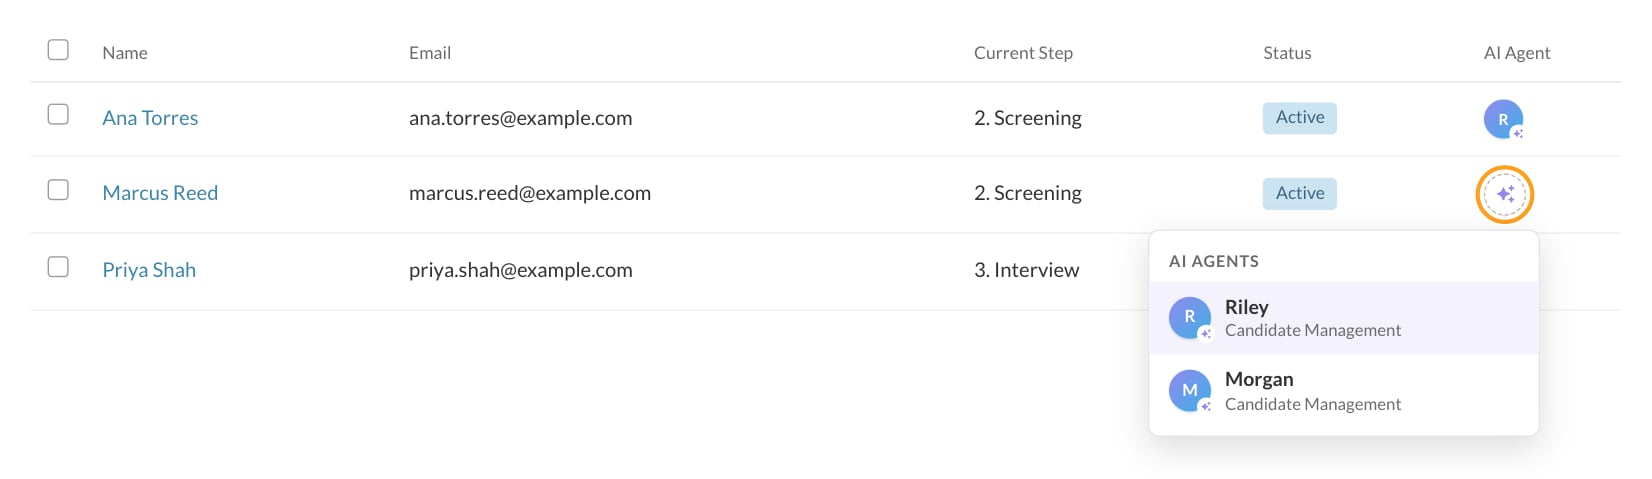
An agent only works on the candidates assigned to it. A candidate can have more than one agent.- One candidate, from the list: on the job req’s Candidates tab, click the sparkle in the candidate’s AI Agent column and pick an agent. Pick it again to unassign it. If you don’t see the column, add it with Edit Columns.
- One candidate, from their application: open the Candidate Application and click the AI Tasks tab. AI agents on this candidate lets you add or remove agents.
- Many candidates at once: on the job req’s Candidates tab, switch to the classic layout with Back to Classic, select the candidates, click Assign AI Agent, choose the agent, and click the Assign to button, which shows how many candidates you selected.
- Every new candidate: turn on Auto-assign new candidates for the job req.
Review and approve
Everything agents do, or want to do, is on the AI Agent Tasks page. Click the sparkle icon in the top navigation (a number shows how many messages are waiting), or Agent activity in Settings, then AI Agents.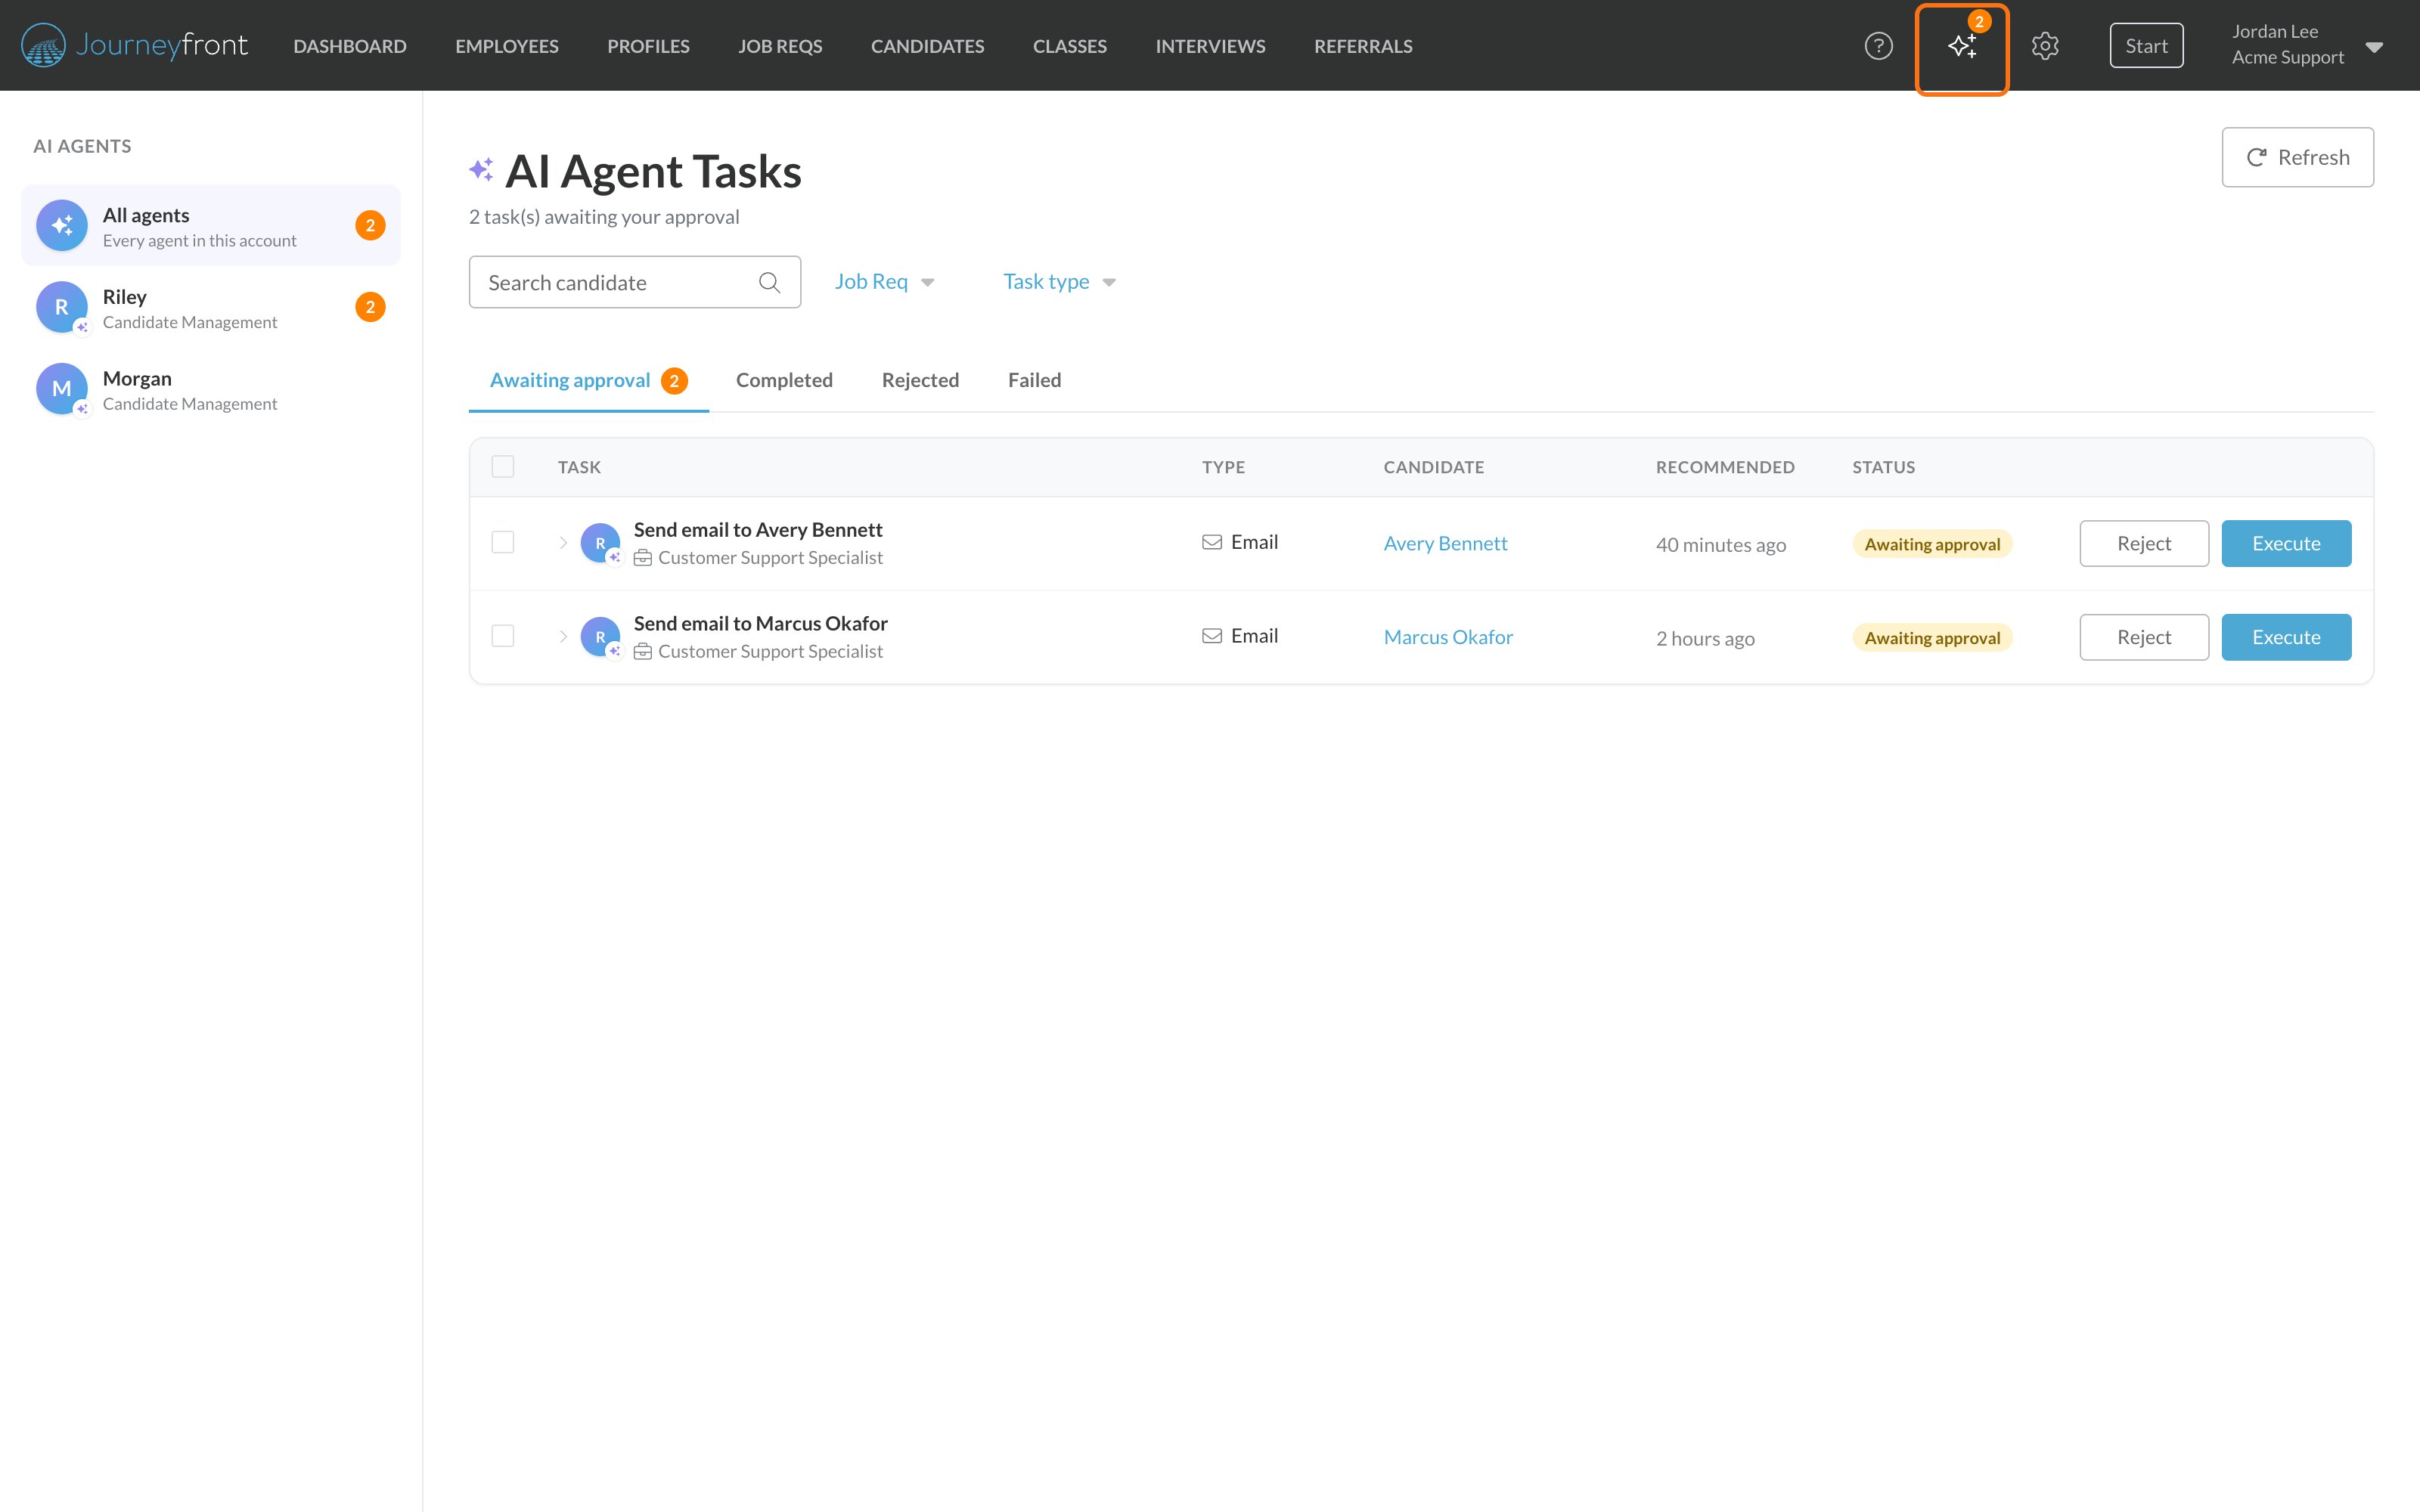
1
Pick an agent
The list on the left shows All agents and each agent, with how many of its messages are waiting. Narrow the list with Search candidate, Job Req and Task type (Email, Text or WhatsApp).
2
Open a message
On the Awaiting approval tab, click a task to see Why the agent recommends this and the draft.
3
Edit it if you like
Change the Message, and for emails the Subject, From name and Reply-to email. Add an Approval note (optional) for the record. Reset to draft puts back the agent’s version.
4
Approve or reject
Click Execute to send the message, or Reject to drop it. To decide on several at once, tick them and click Approve selected or Reject selected.
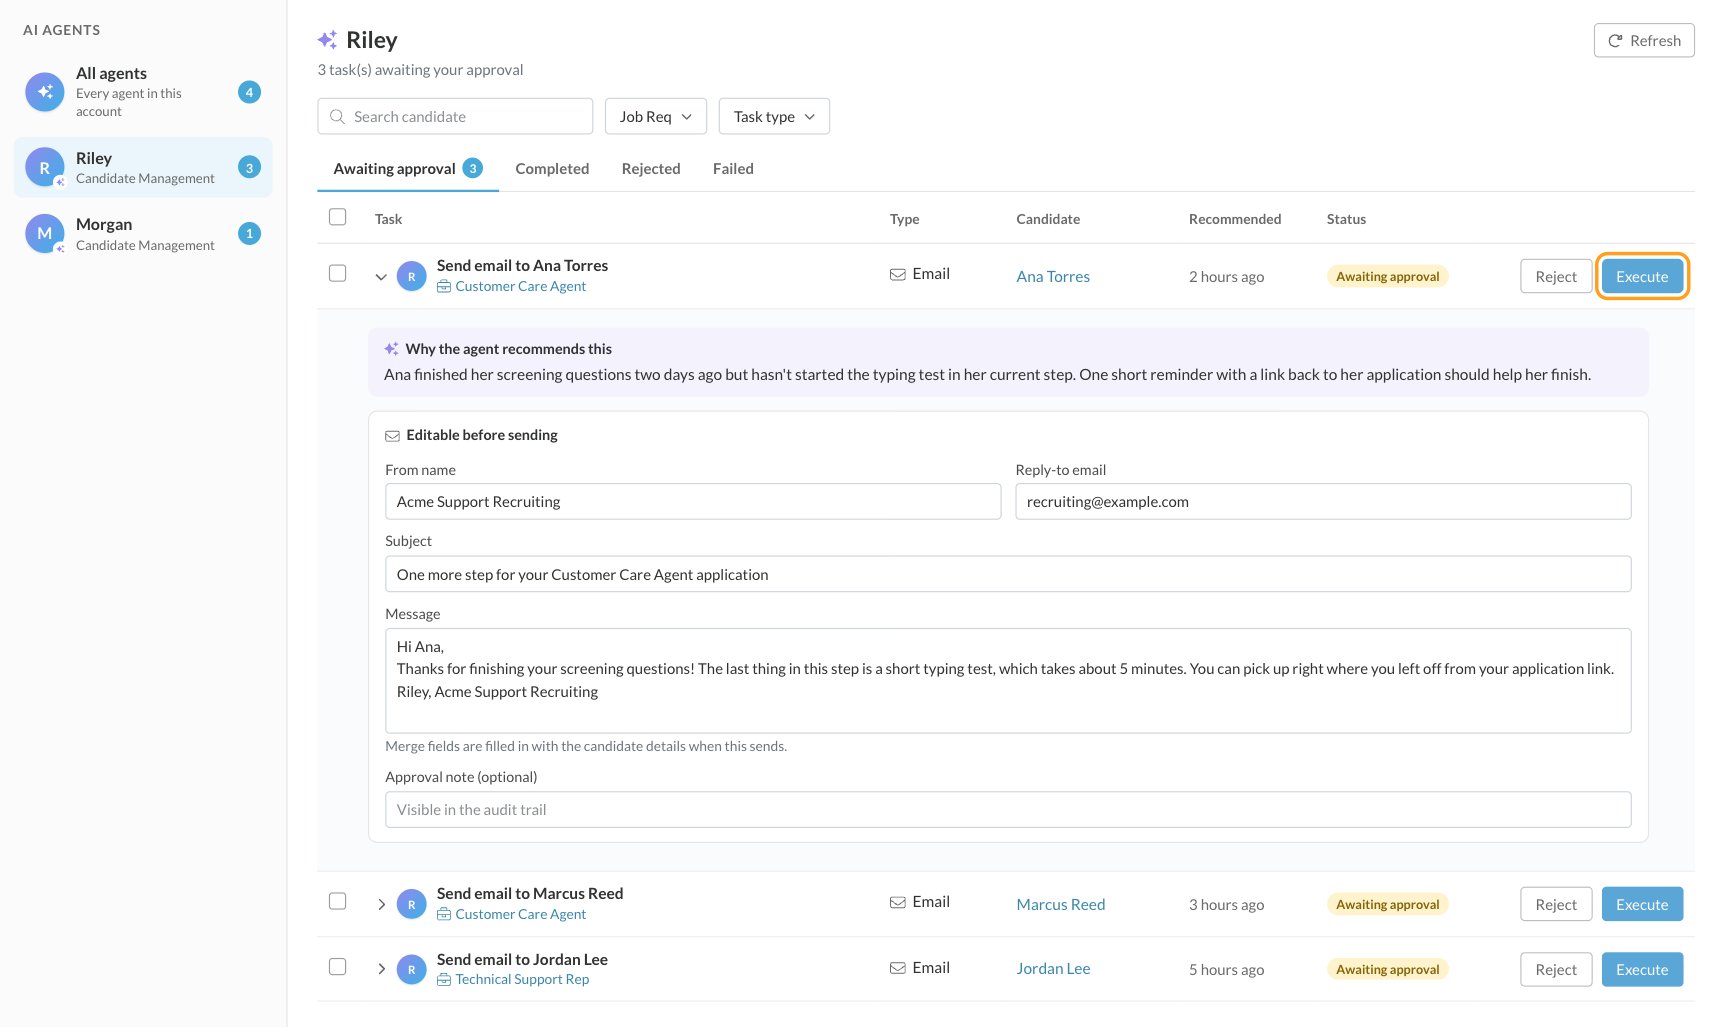
While a message for a candidate is waiting for approval, the agent doesn’t propose another one for them. The same list for one candidate is on the AI Tasks tab of their Candidate Application, with a count of messages waiting.
People with View AI Agent Tasks but not Approve AI Agent Actions see the same pages without the approve and reject controls.
What candidates see
Candidates get an ordinary email, text or WhatsApp message from your company: the email from the agent’s From name, texts from your number. Messages usually include a link straight back to what they need to do, like their application or their interview booking link. Every message an agent sends appears in the candidate’s history on the Comments & Activities tab, with the agent’s name and avatar, just like messages from your team. Messages waiting for approval don’t appear until they’re sent. Agents don’t hold conversations. Candidate replies come to your team as usual: texts in the message panel, and emails at the Reply-to email address. When a candidate needs a person, for example because they replied with a question, the agent is built to hand them off to your team instead of answering.AI credits
Each message an agent lines up uses one AI credit, whether it sends on its own or waits for approval. Rejecting a message doesn’t give the credit back. When an agent looks at a candidate and decides nothing is needed, or hands a candidate off to your team, no credit is used. When your AI credits run out, agents stop lining up new messages until more credits are added. To see your balance and which agent is using credits, go to Settings, then Add-Ons, then AI Credits. See Add-ons and credits.AI agents and automation rules
They work well together.
Use automation rules for the steps every candidate should go through the same way, and agents for the follow-ups that need judgment. See Automation rules.
FAQ
Can an agent reject or move candidates?
Can an agent reject or move candidates?
No. Sending messages is the only thing it can do. When a candidate needs a decision, it’s built to hand them off to your team, and you’ll see them on the Completed tab marked Escalated.
Will an agent message candidates we've hired or rejected?
Will an agent message candidates we've hired or rejected?
No. It never messages a hired, rejected or withdrawn application.
Will it text candidates who haven't opted in?
Will it text candidates who haven't opted in?
No. Texts and WhatsApp messages only go to candidates who opted in to that channel. Email doesn’t need an opt-in.
Why isn't my agent doing anything?
Why isn't my agent doing anything?
Check that:
- The agent is Active, not Paused.
- It’s Enabled on this requisition for the job req.
- Candidates are assigned to it.
- At least one send tool is on, and for texts, the candidates have opted in.
- The candidates have something left to do in their current step. Waiting on your team isn’t something to nudge about.
- There isn’t a message for them already waiting on the Awaiting approval tab.
- You have AI credits left.
Can I change a message before it goes out?
Can I change a message before it goes out?
Yes, when it’s waiting for approval. Edit it on the AI Agent Tasks page or the candidate’s AI Tasks tab, then click Execute.
How often will a candidate hear from the agent?
How often will a candidate hear from the agent?
There’s no fixed schedule. The agent reads each candidate’s history, including messages from your team, and is built to space follow-ups further apart over time and to stop when a candidate doesn’t respond. To control every message, use Always ask.
Why don't I see AI Agents?
Why don't I see AI Agents?
AI agents need to be turned on for your account, and each part needs its permission: Settings, then AI Agents for Manage AI Agents, the job req’s Setup, then AI Agents and the AI Agent column for Assign AI Agents, and the AI Agent Tasks page for View AI Agent Tasks or Approve AI Agent Actions.
Related
Automation rules
Fixed rules that act on every candidate the same way.
Text messages
Phone numbers, opt-in and message templates.
Add-ons and credits
Your AI credit balance and usage.
Security roles
Give people the AI Agents permissions.