

Who can do this: Everyone on your hiring team. You see candidates on the job reqs you’re on, or on every job req if your security role has All Job Req Access.
Open the Candidates page
Click Candidates in the top navigation. The page opens on All Candidates: every Candidate Application on the job reqs you can access. Your saved views sit in tabs next to it.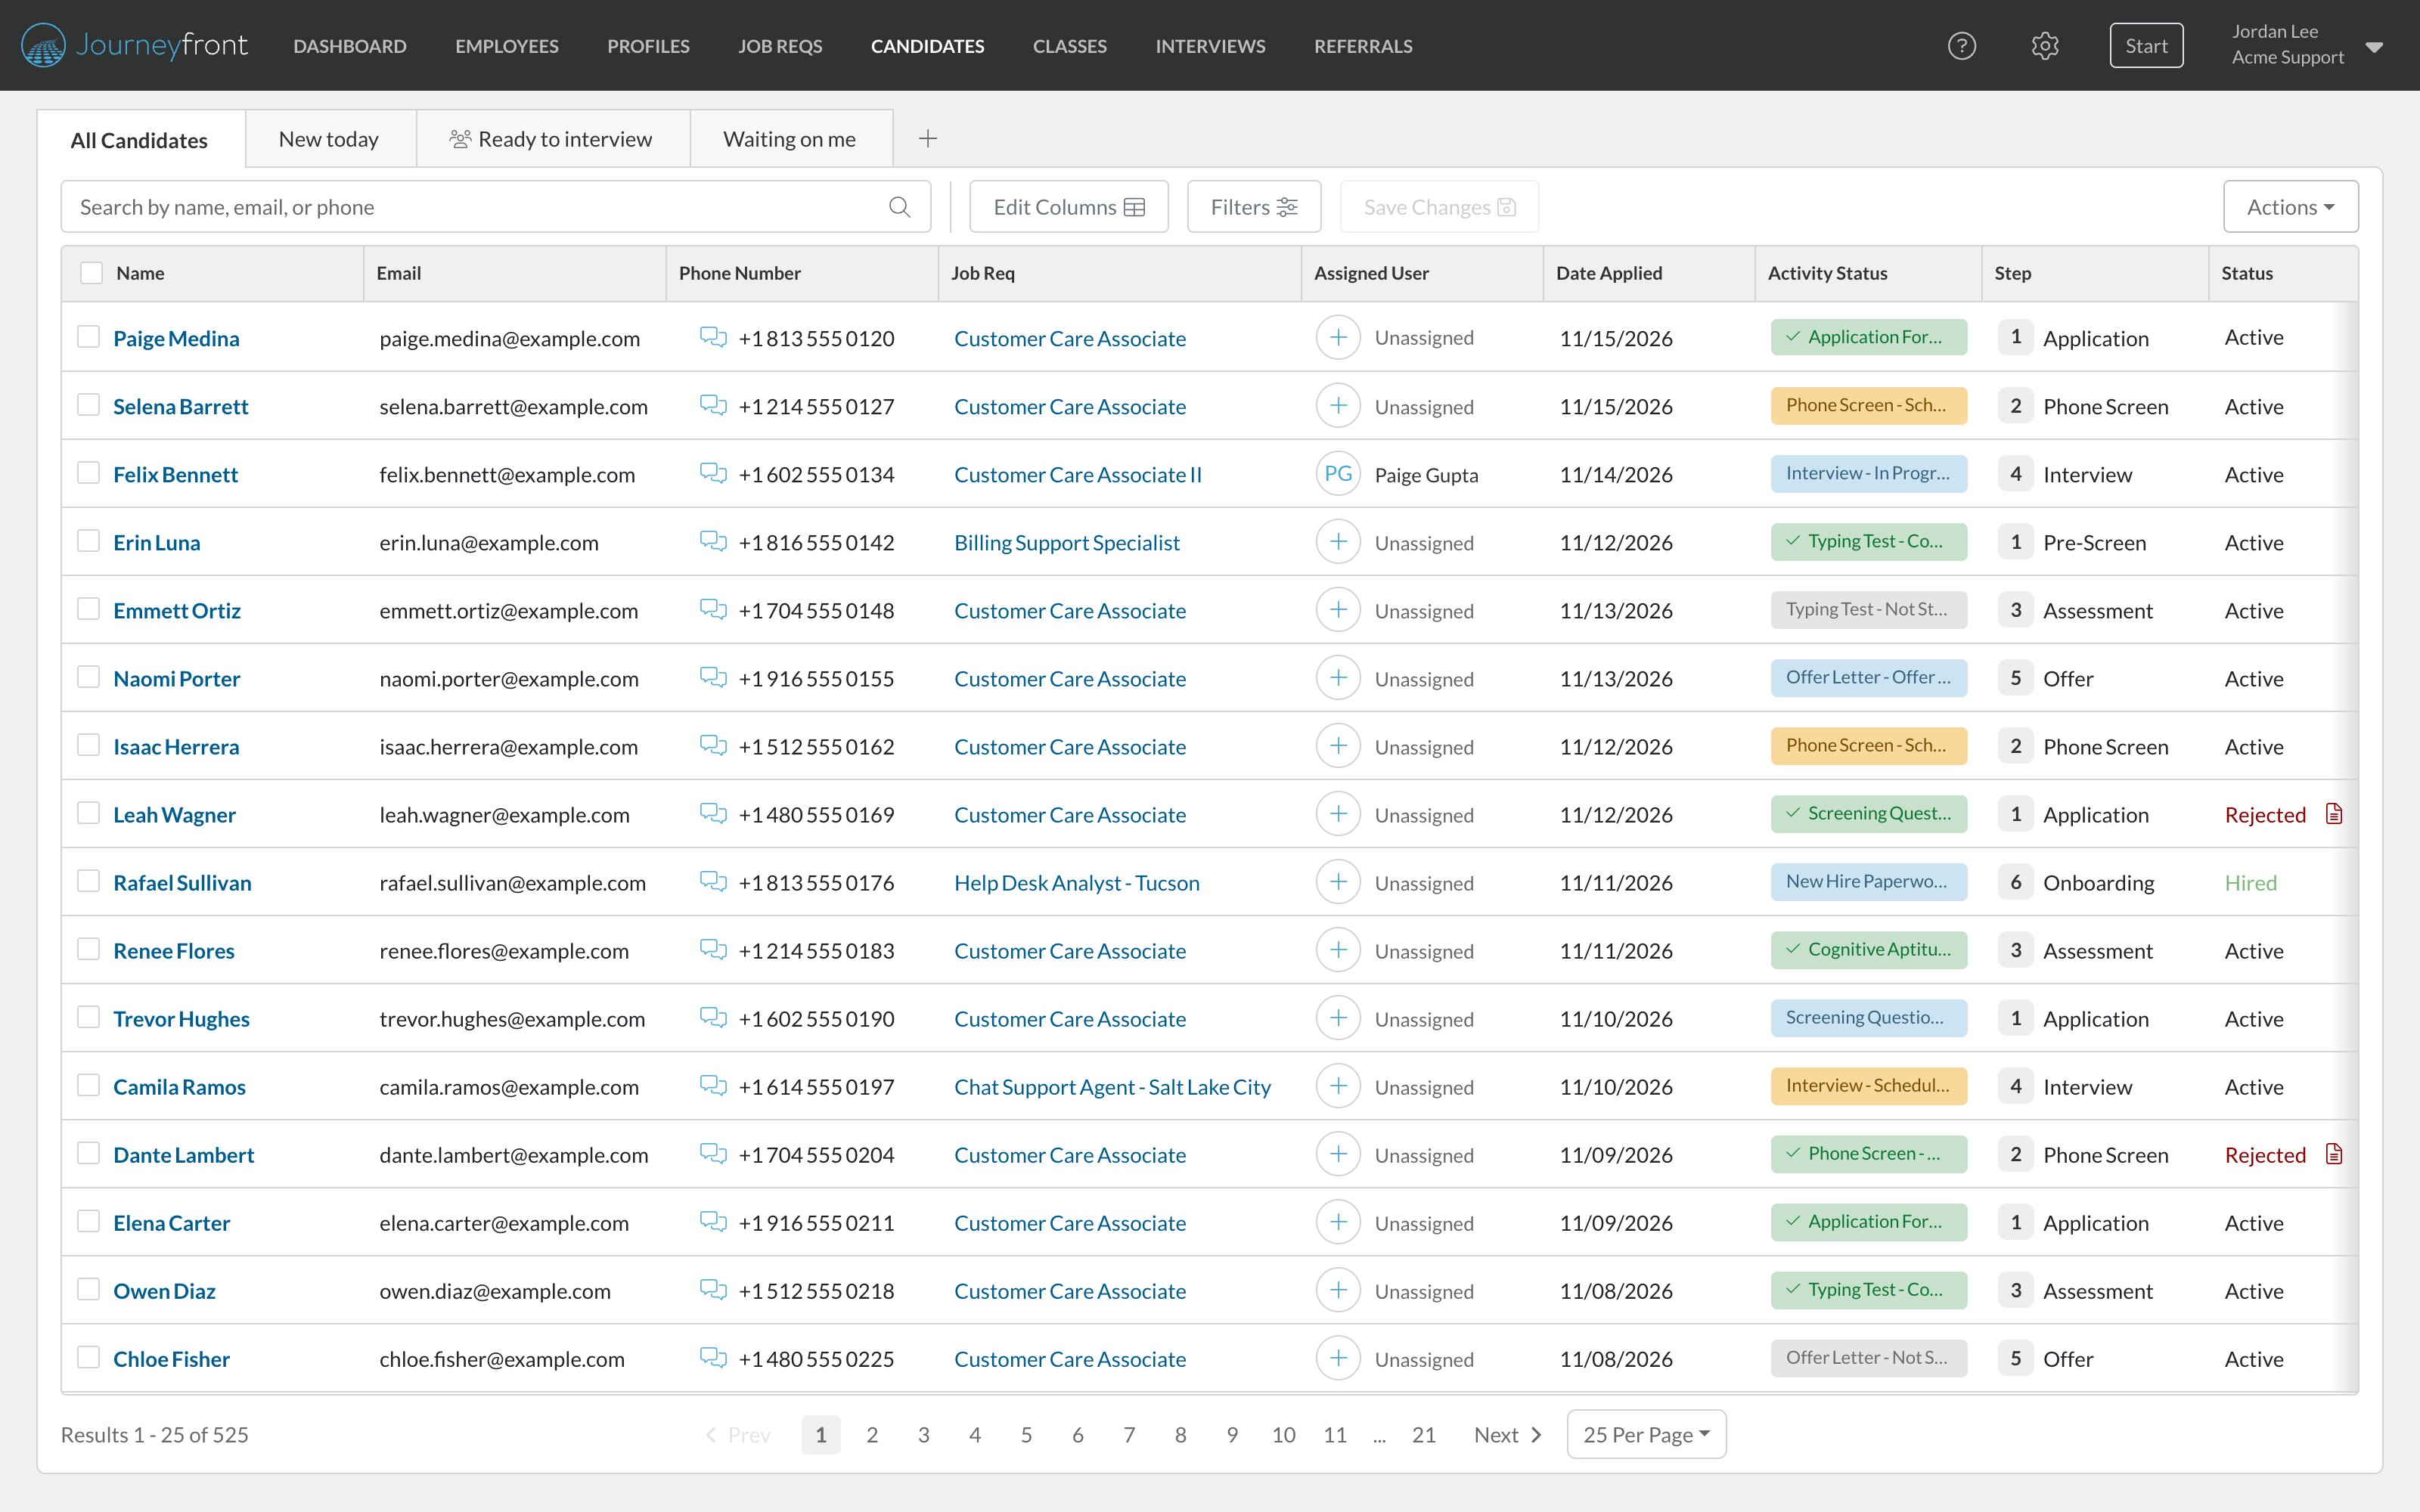
The tabs on a job req
Open a job req to work its candidates by status and step.
Search
Type in the search box (Search by name, email, or phone) and press Enter. Search works together with your filters and the tab you’re on.Filter
Click Filters (1) to open the filter bar (2). These filters are always there:- Job Req
- Current Step
- Activity Status
- Status
- Hiring Class
- Assigned User
- Rejection Reasons
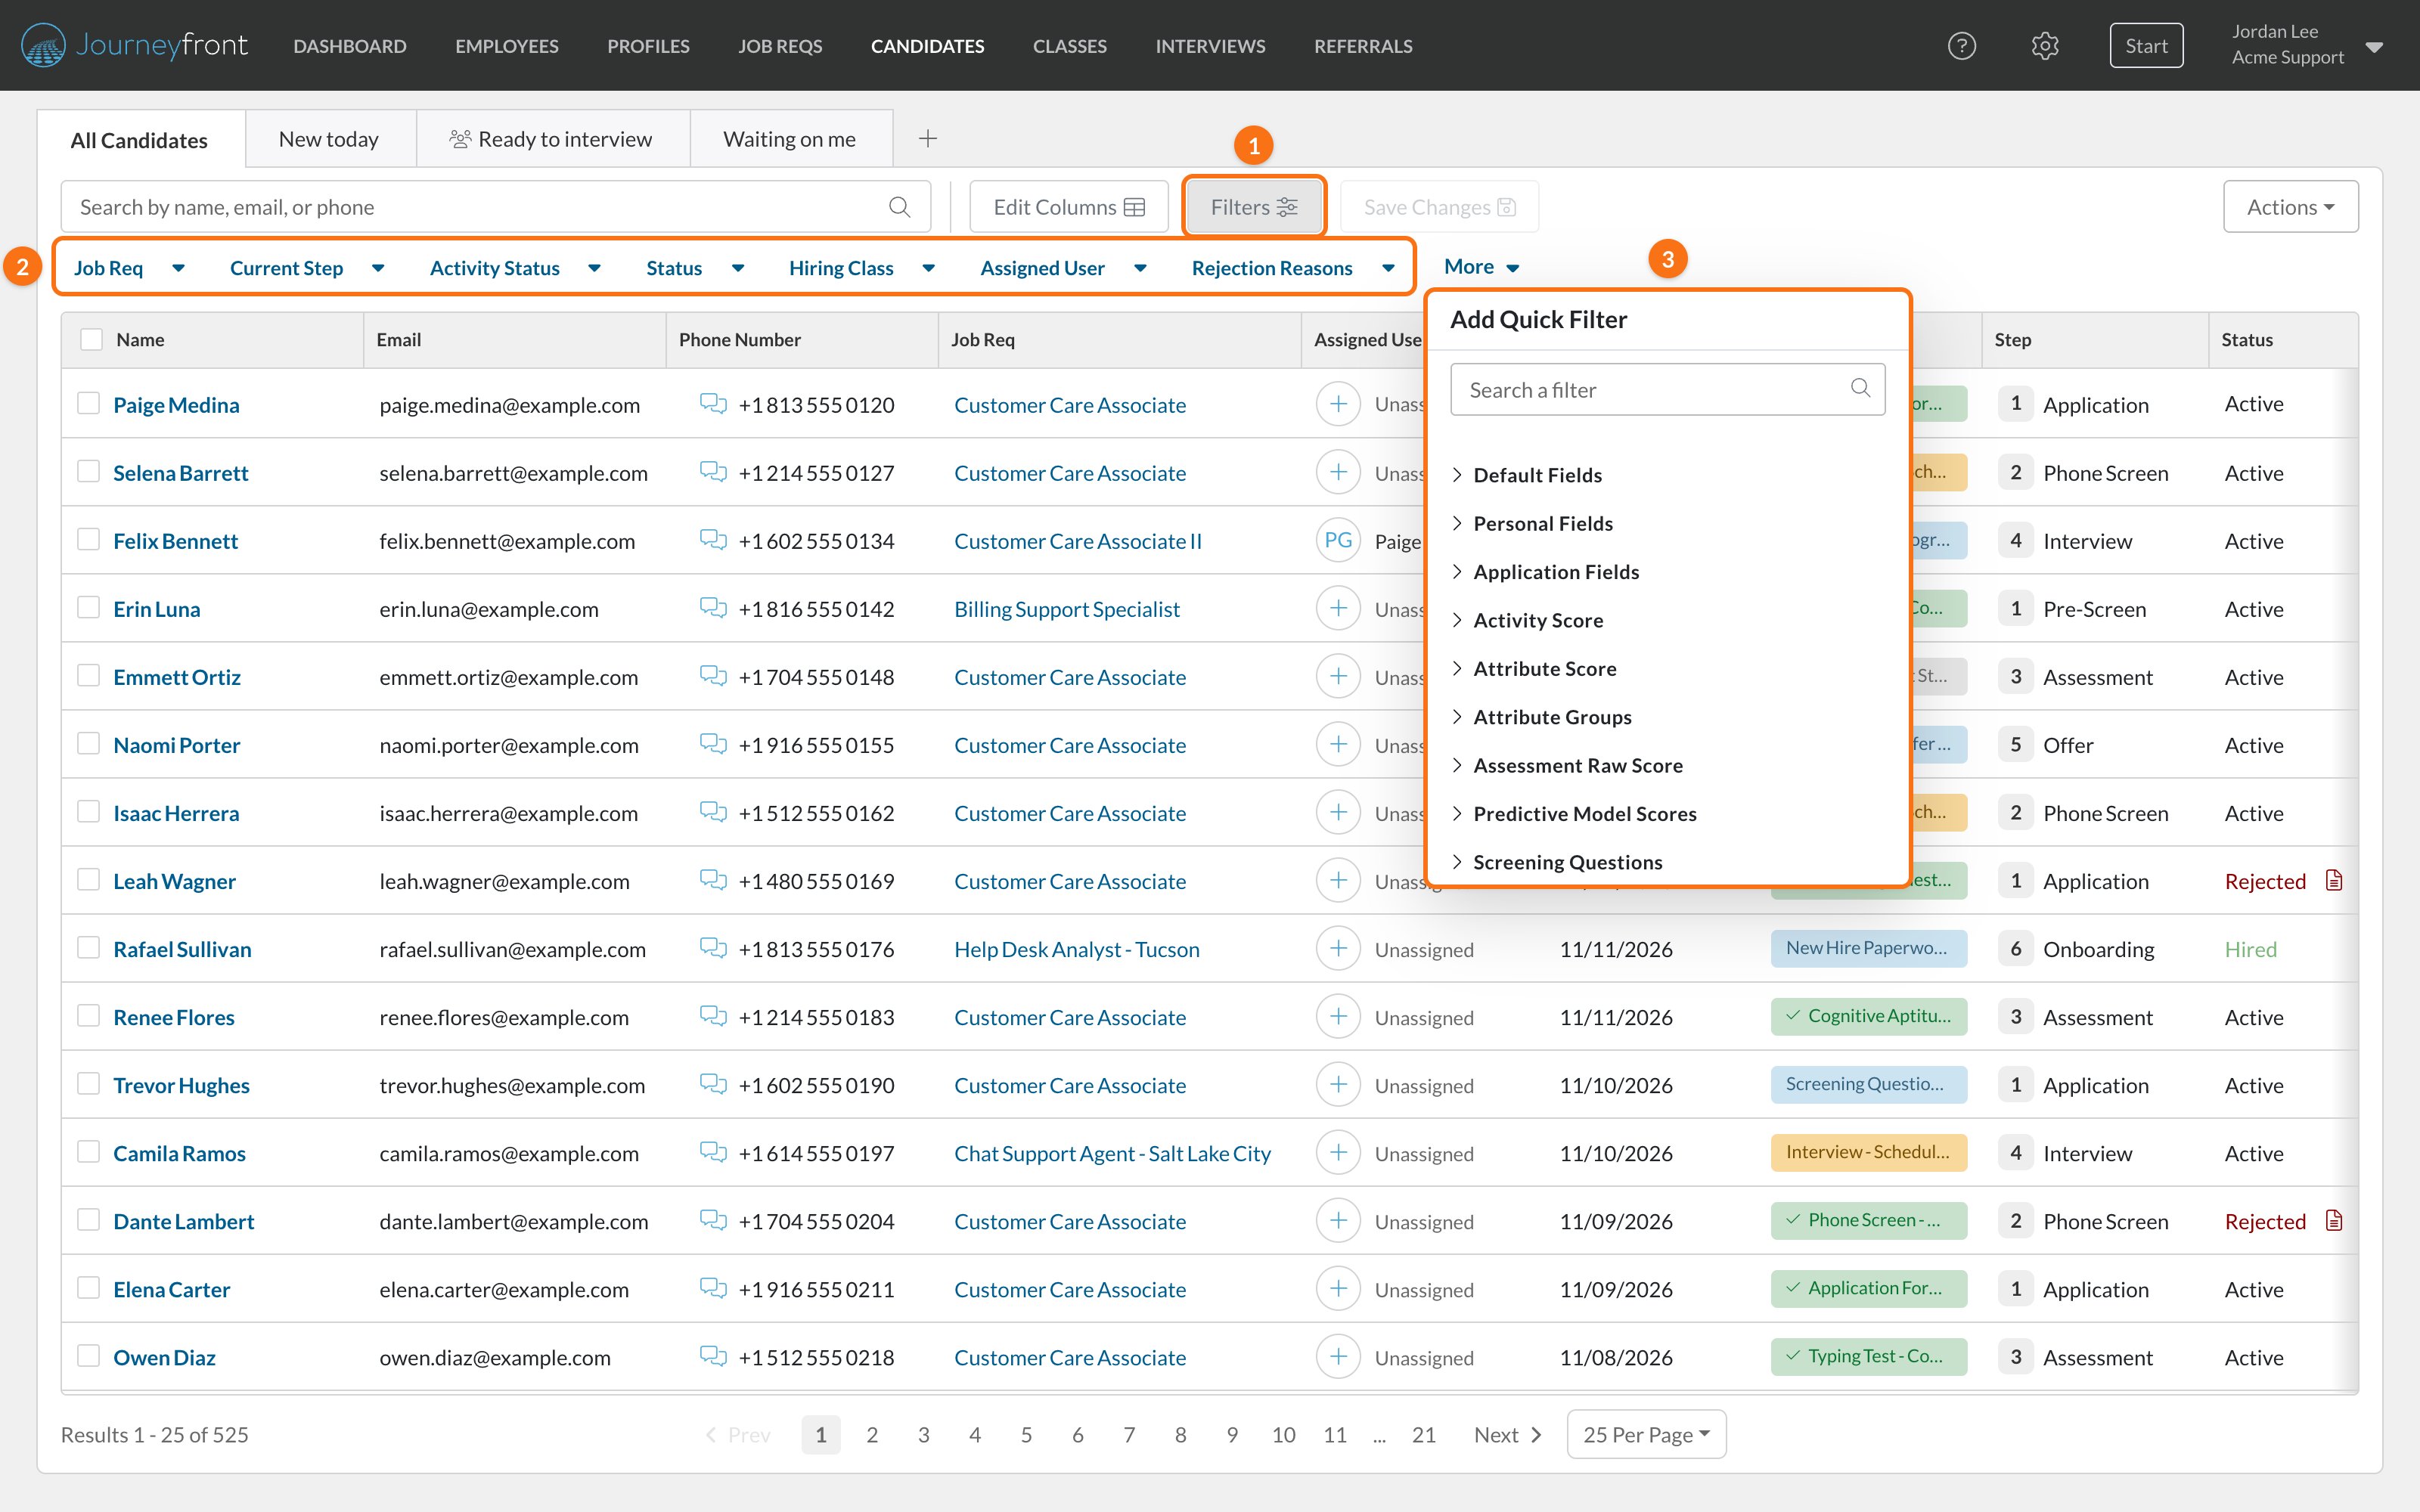
- Default Fields: Sources, Source Types, Fraud Risk Levels, Country, State/Region, City, Zip/Postal Code, Date Applied, Overall score, Time in Current Step, Unread Messages, Do Not Hire, Hired Date, Start Date, Date of Birth, and AI Resume Score when AI resume scoring is on for your account.
- Personal Fields and Application Fields: your account’s custom fields.
- Scores: Activity Score, Attribute Score, Attribute Groups, Assessment Raw Score and Predictive Model Scores.
- Screening Questions: filter by how candidates answered a specific question.
Custom fields
Set up the personal and application fields you filter and sort by.
Choose your columns
Click Edit Columns to choose what the list shows.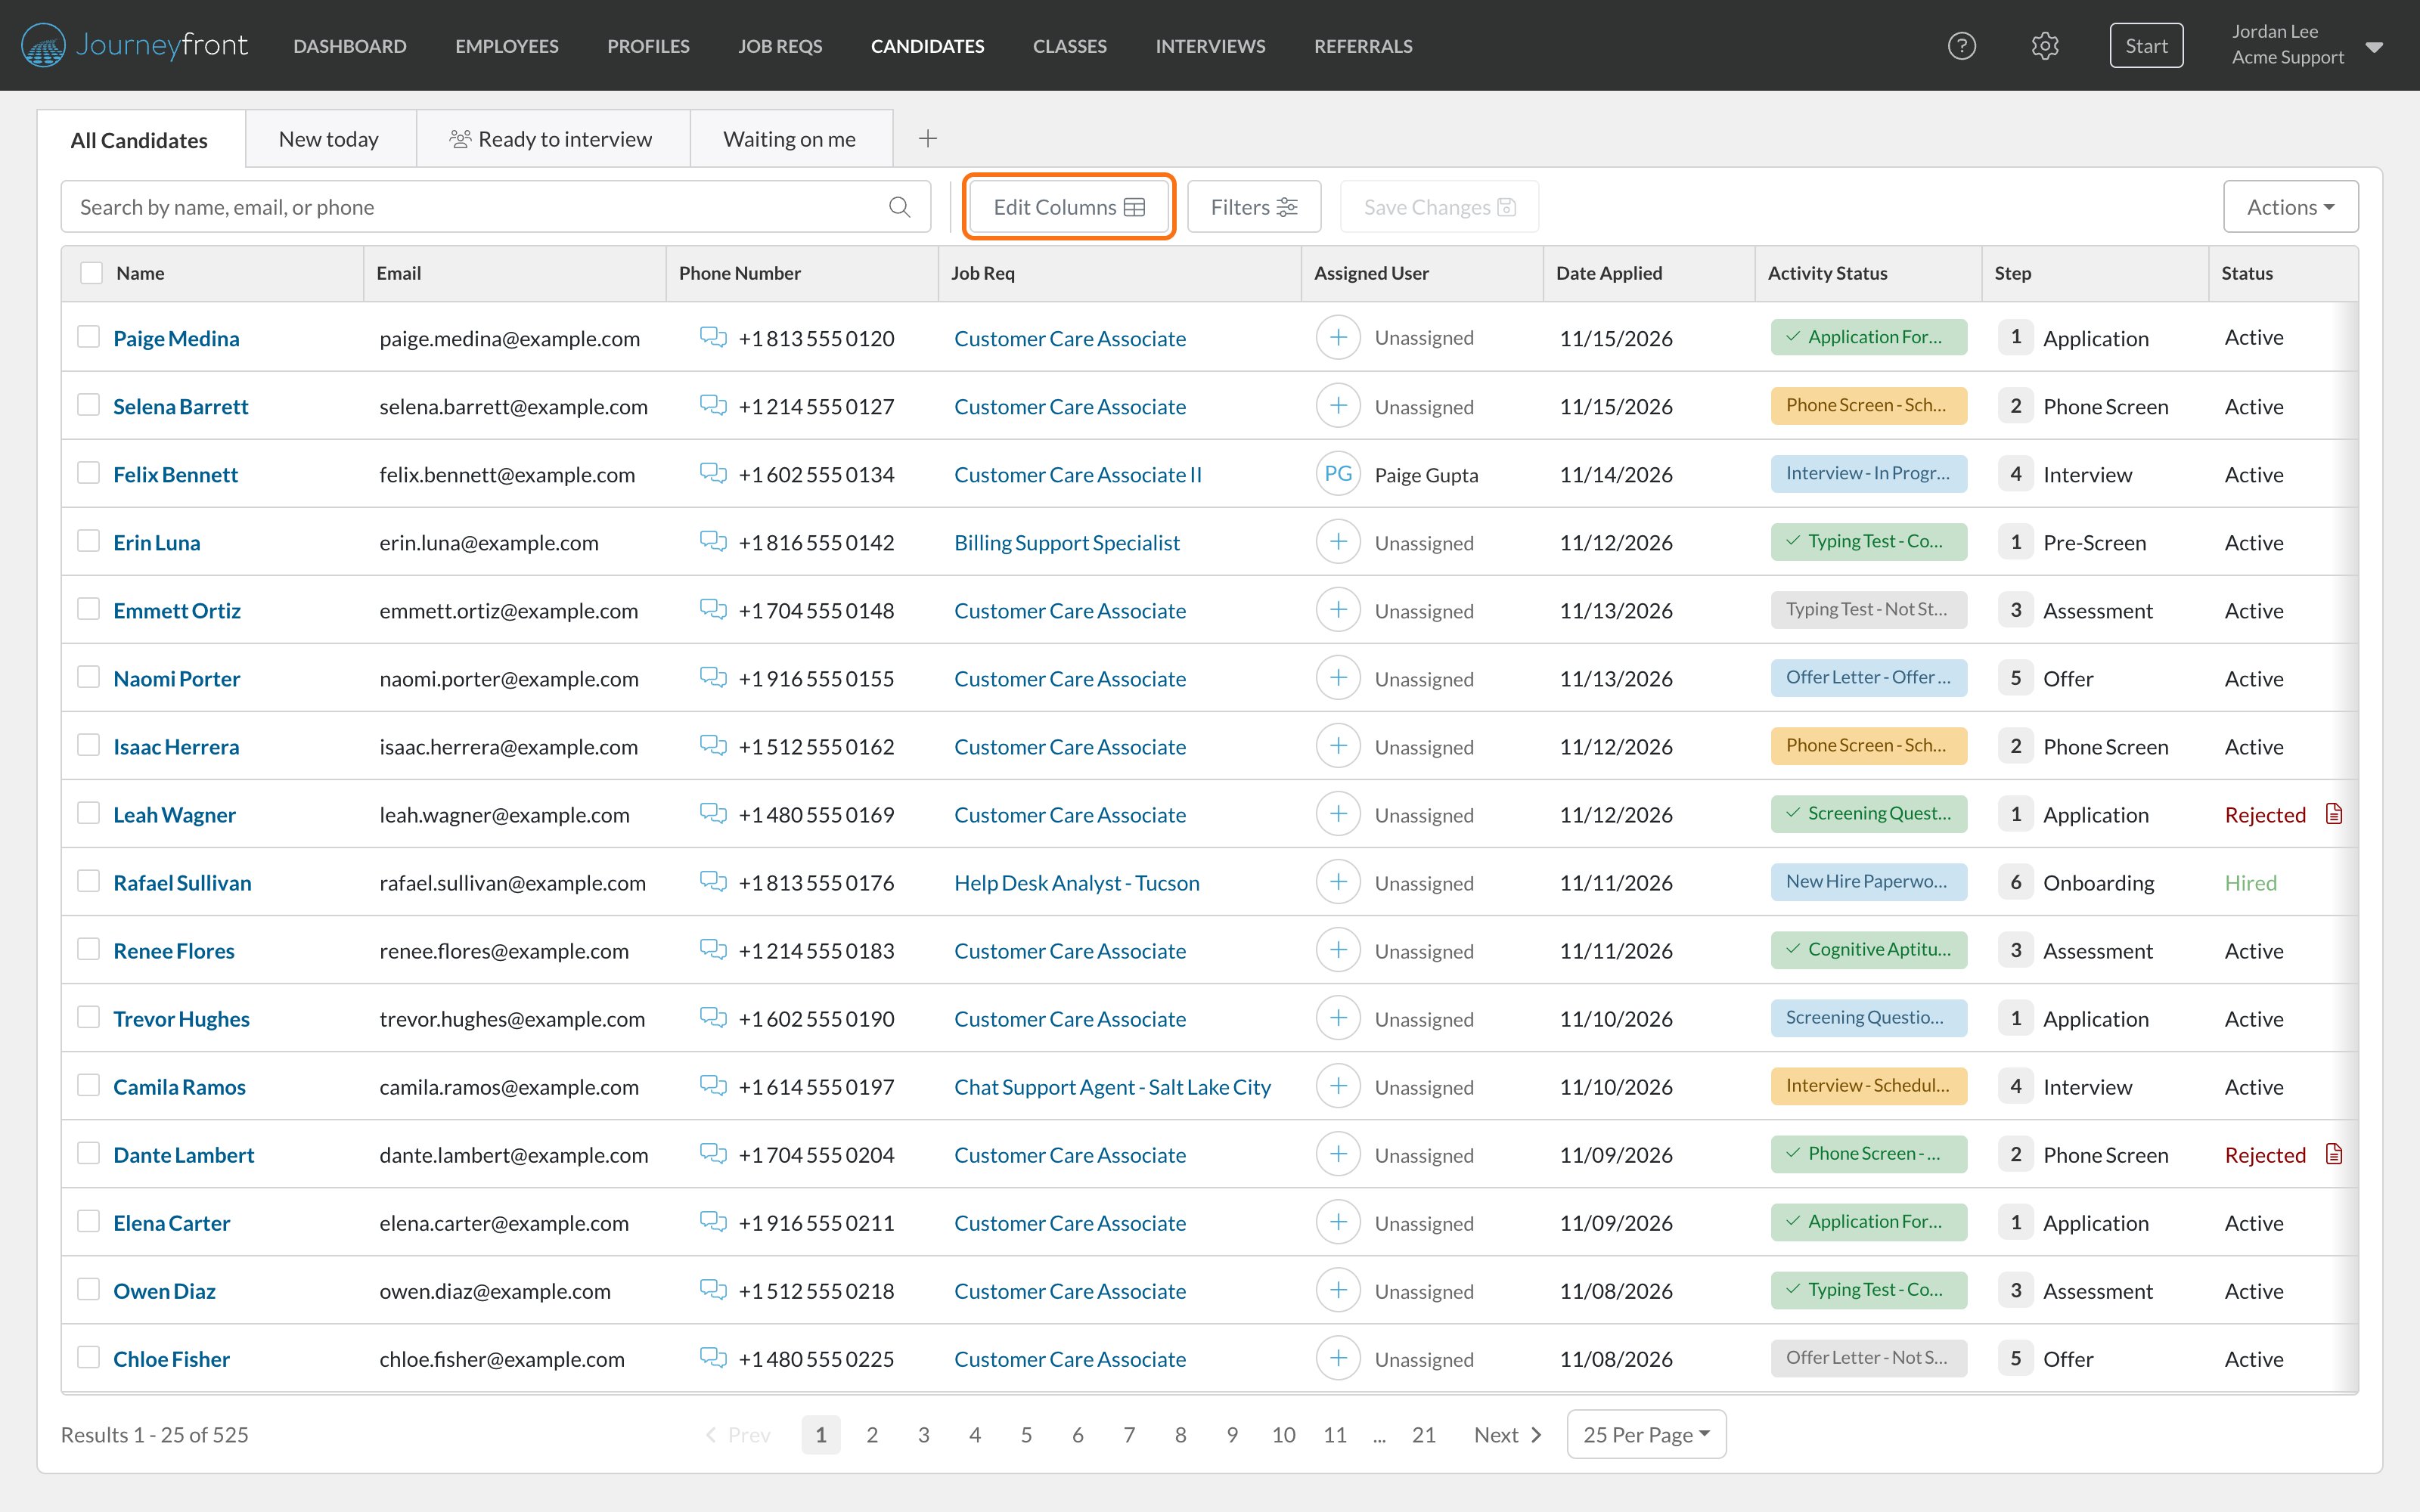
1
Open Edit Columns
The left side lists every column you can add, grouped into sections you can expand. The right side, Selected Columns, shows what’s in the list now.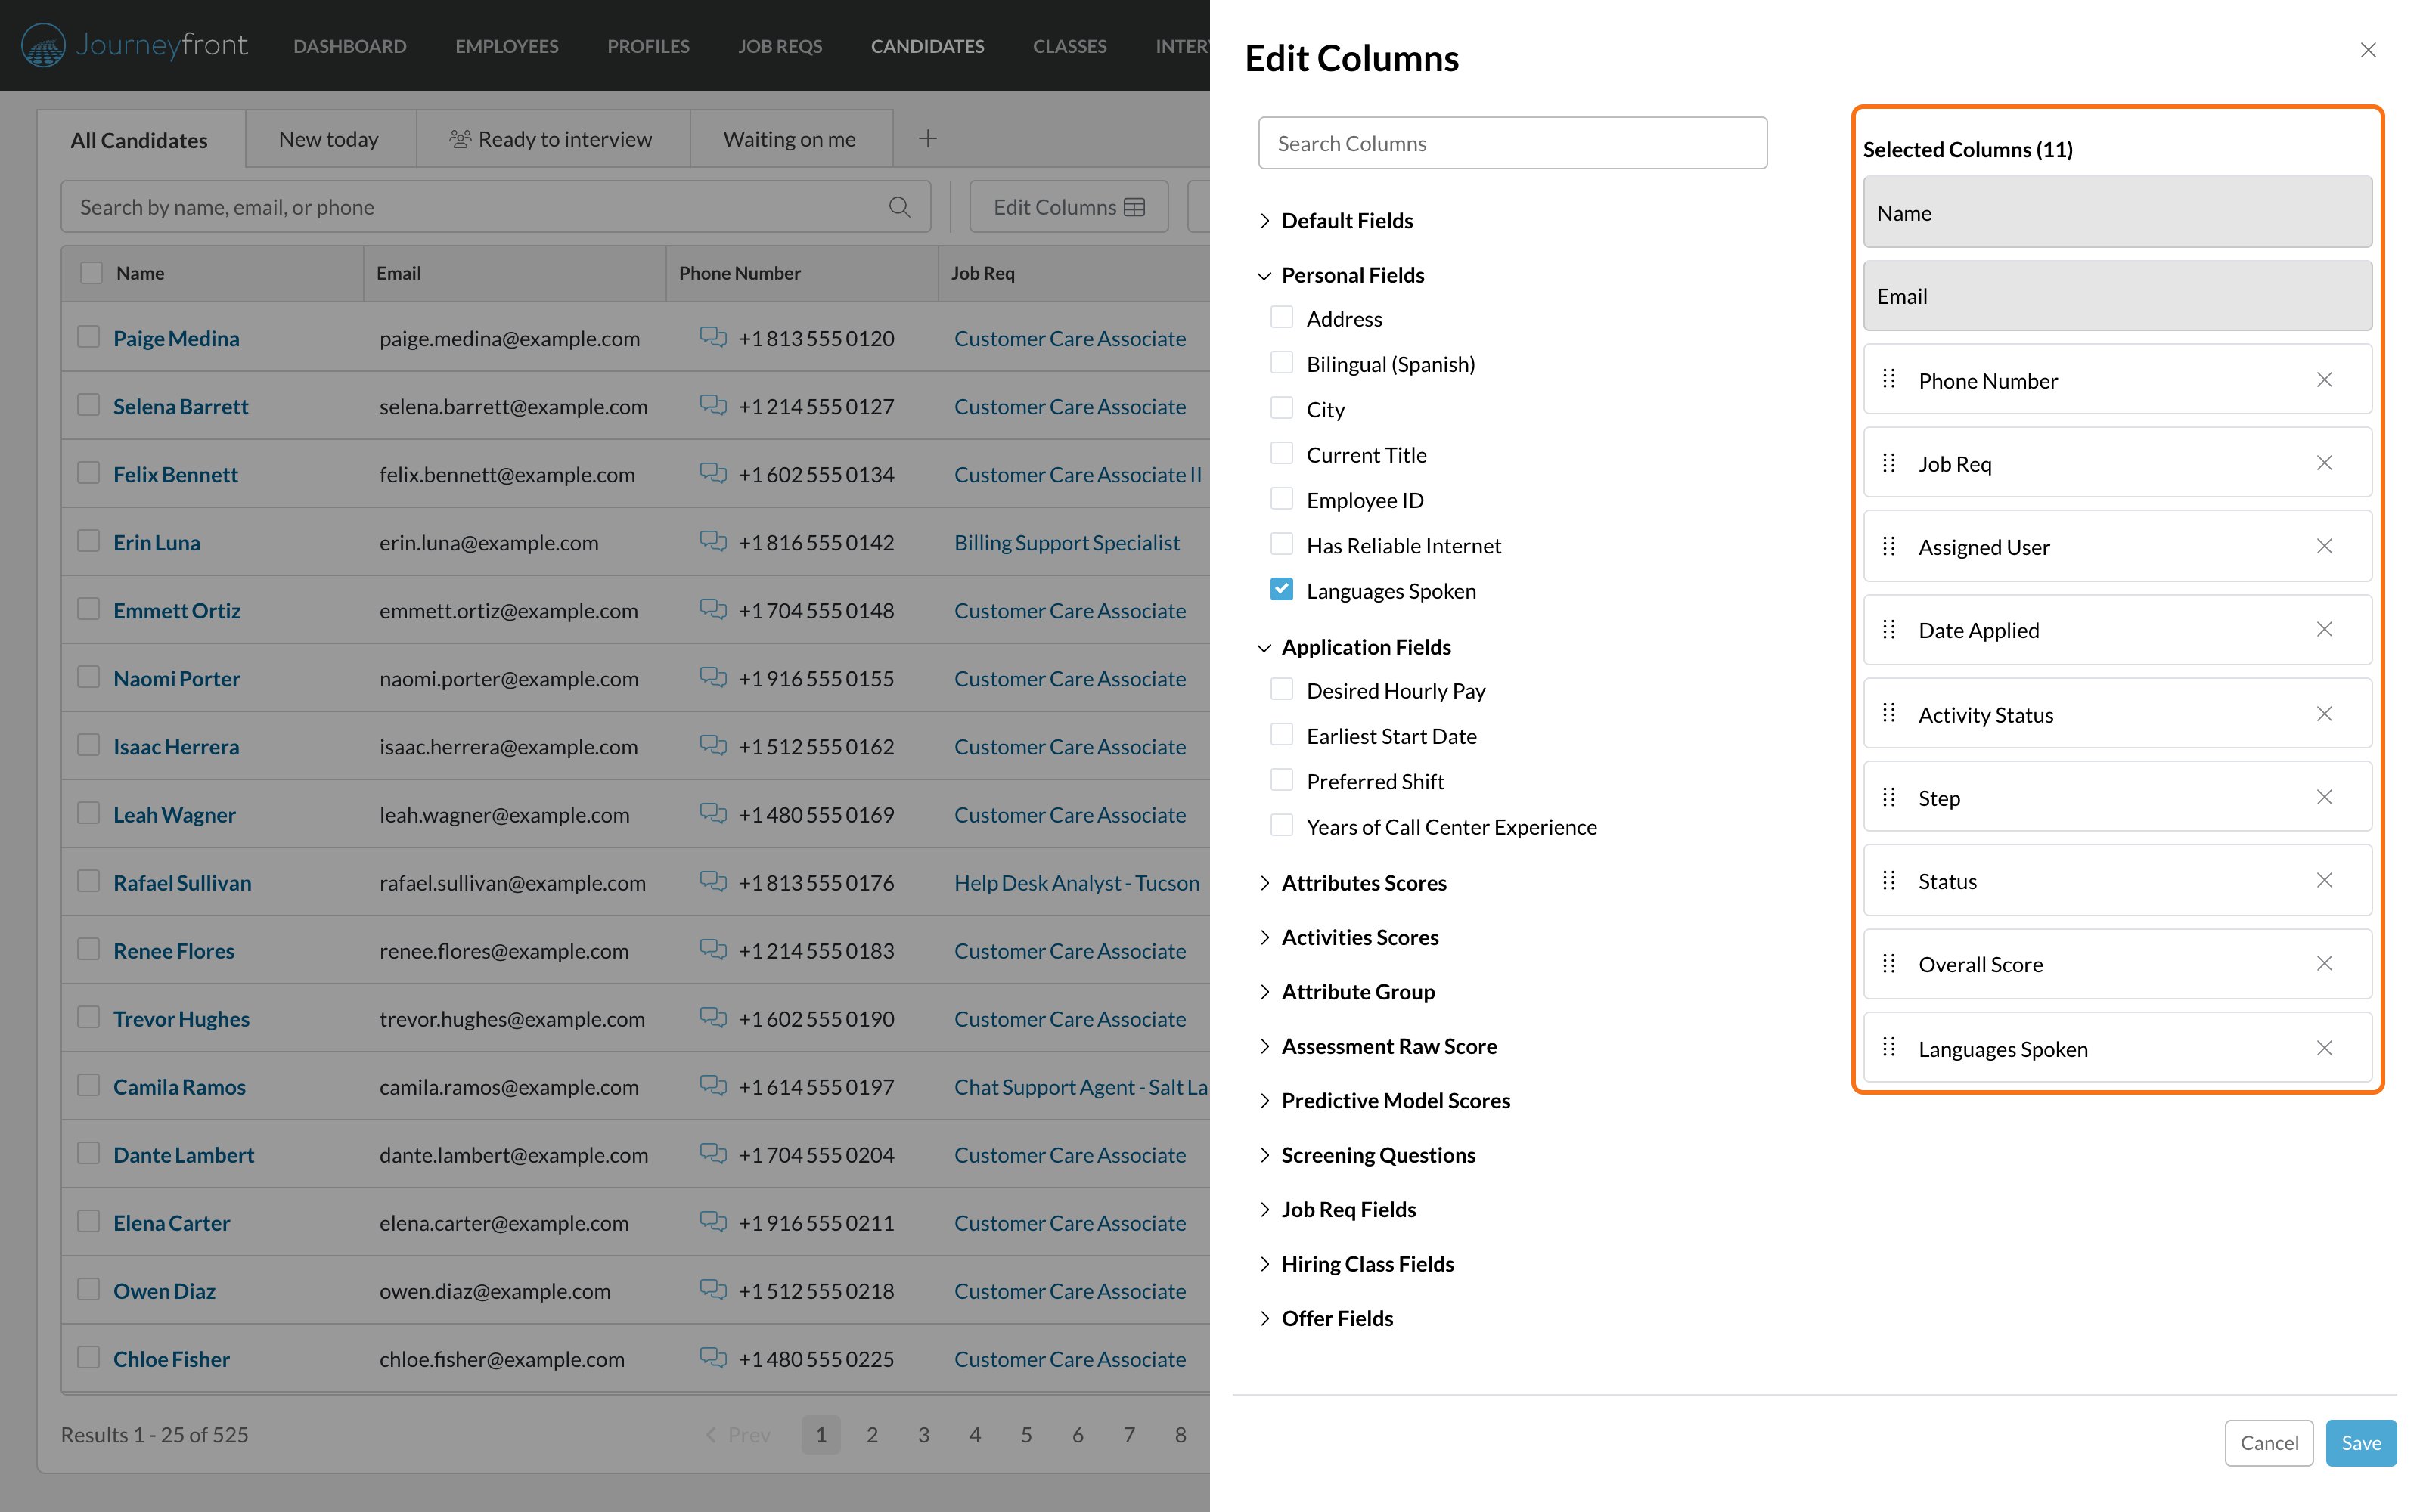
2
Add or remove columns
Tick a column on the left to add it, or click the x next to a column on the right to remove it. Use Search Columns to find one quickly.
3
Reorder
Drag columns up or down in Selected Columns. Name and Email always come first and can’t be moved or removed.
4
Save
Click Save. The list updates right away.
- Default Fields such as Source, Source Type, Time in Step, Other Applications, Hiring Class, Job Version, Interview, Date Completed, Rejection Reason, Fraud Risk Level, address and location fields, Hired Date, Start Date, Date of Birth, Do Not Hire and Do Not Hire Reason.
- Personal Fields and Application Fields from your account’s custom fields.
- Scores: Attributes Scores, Activities Scores, Attribute Group, Assessment Raw Score (such as typing speed) and Predictive Model Scores when your job reqs use them.
- Screening Questions: one column per question, showing each candidate’s answer.
- Job Req Fields and Hiring Class Fields: values from the candidate’s job req or hiring class.
- Offer Fields: values from the candidate’s offer details.
Saved views
A saved view remembers your filters, columns and sort order as a tab across the top of the list. Set up the list, click Save as New View, name it and click Save. You can share a view with your whole organization or with specific people, and add views your teammates shared from the + at the end of the tabs. See Saved views for everything you can do with them. Changed the columns or filters on All Candidates itself? Click Save Changes and that tab keeps your layout. Click Reset to Default to go back to the standard one.Saved views
Create, share and organize views, including views on a job req.
Open a candidate
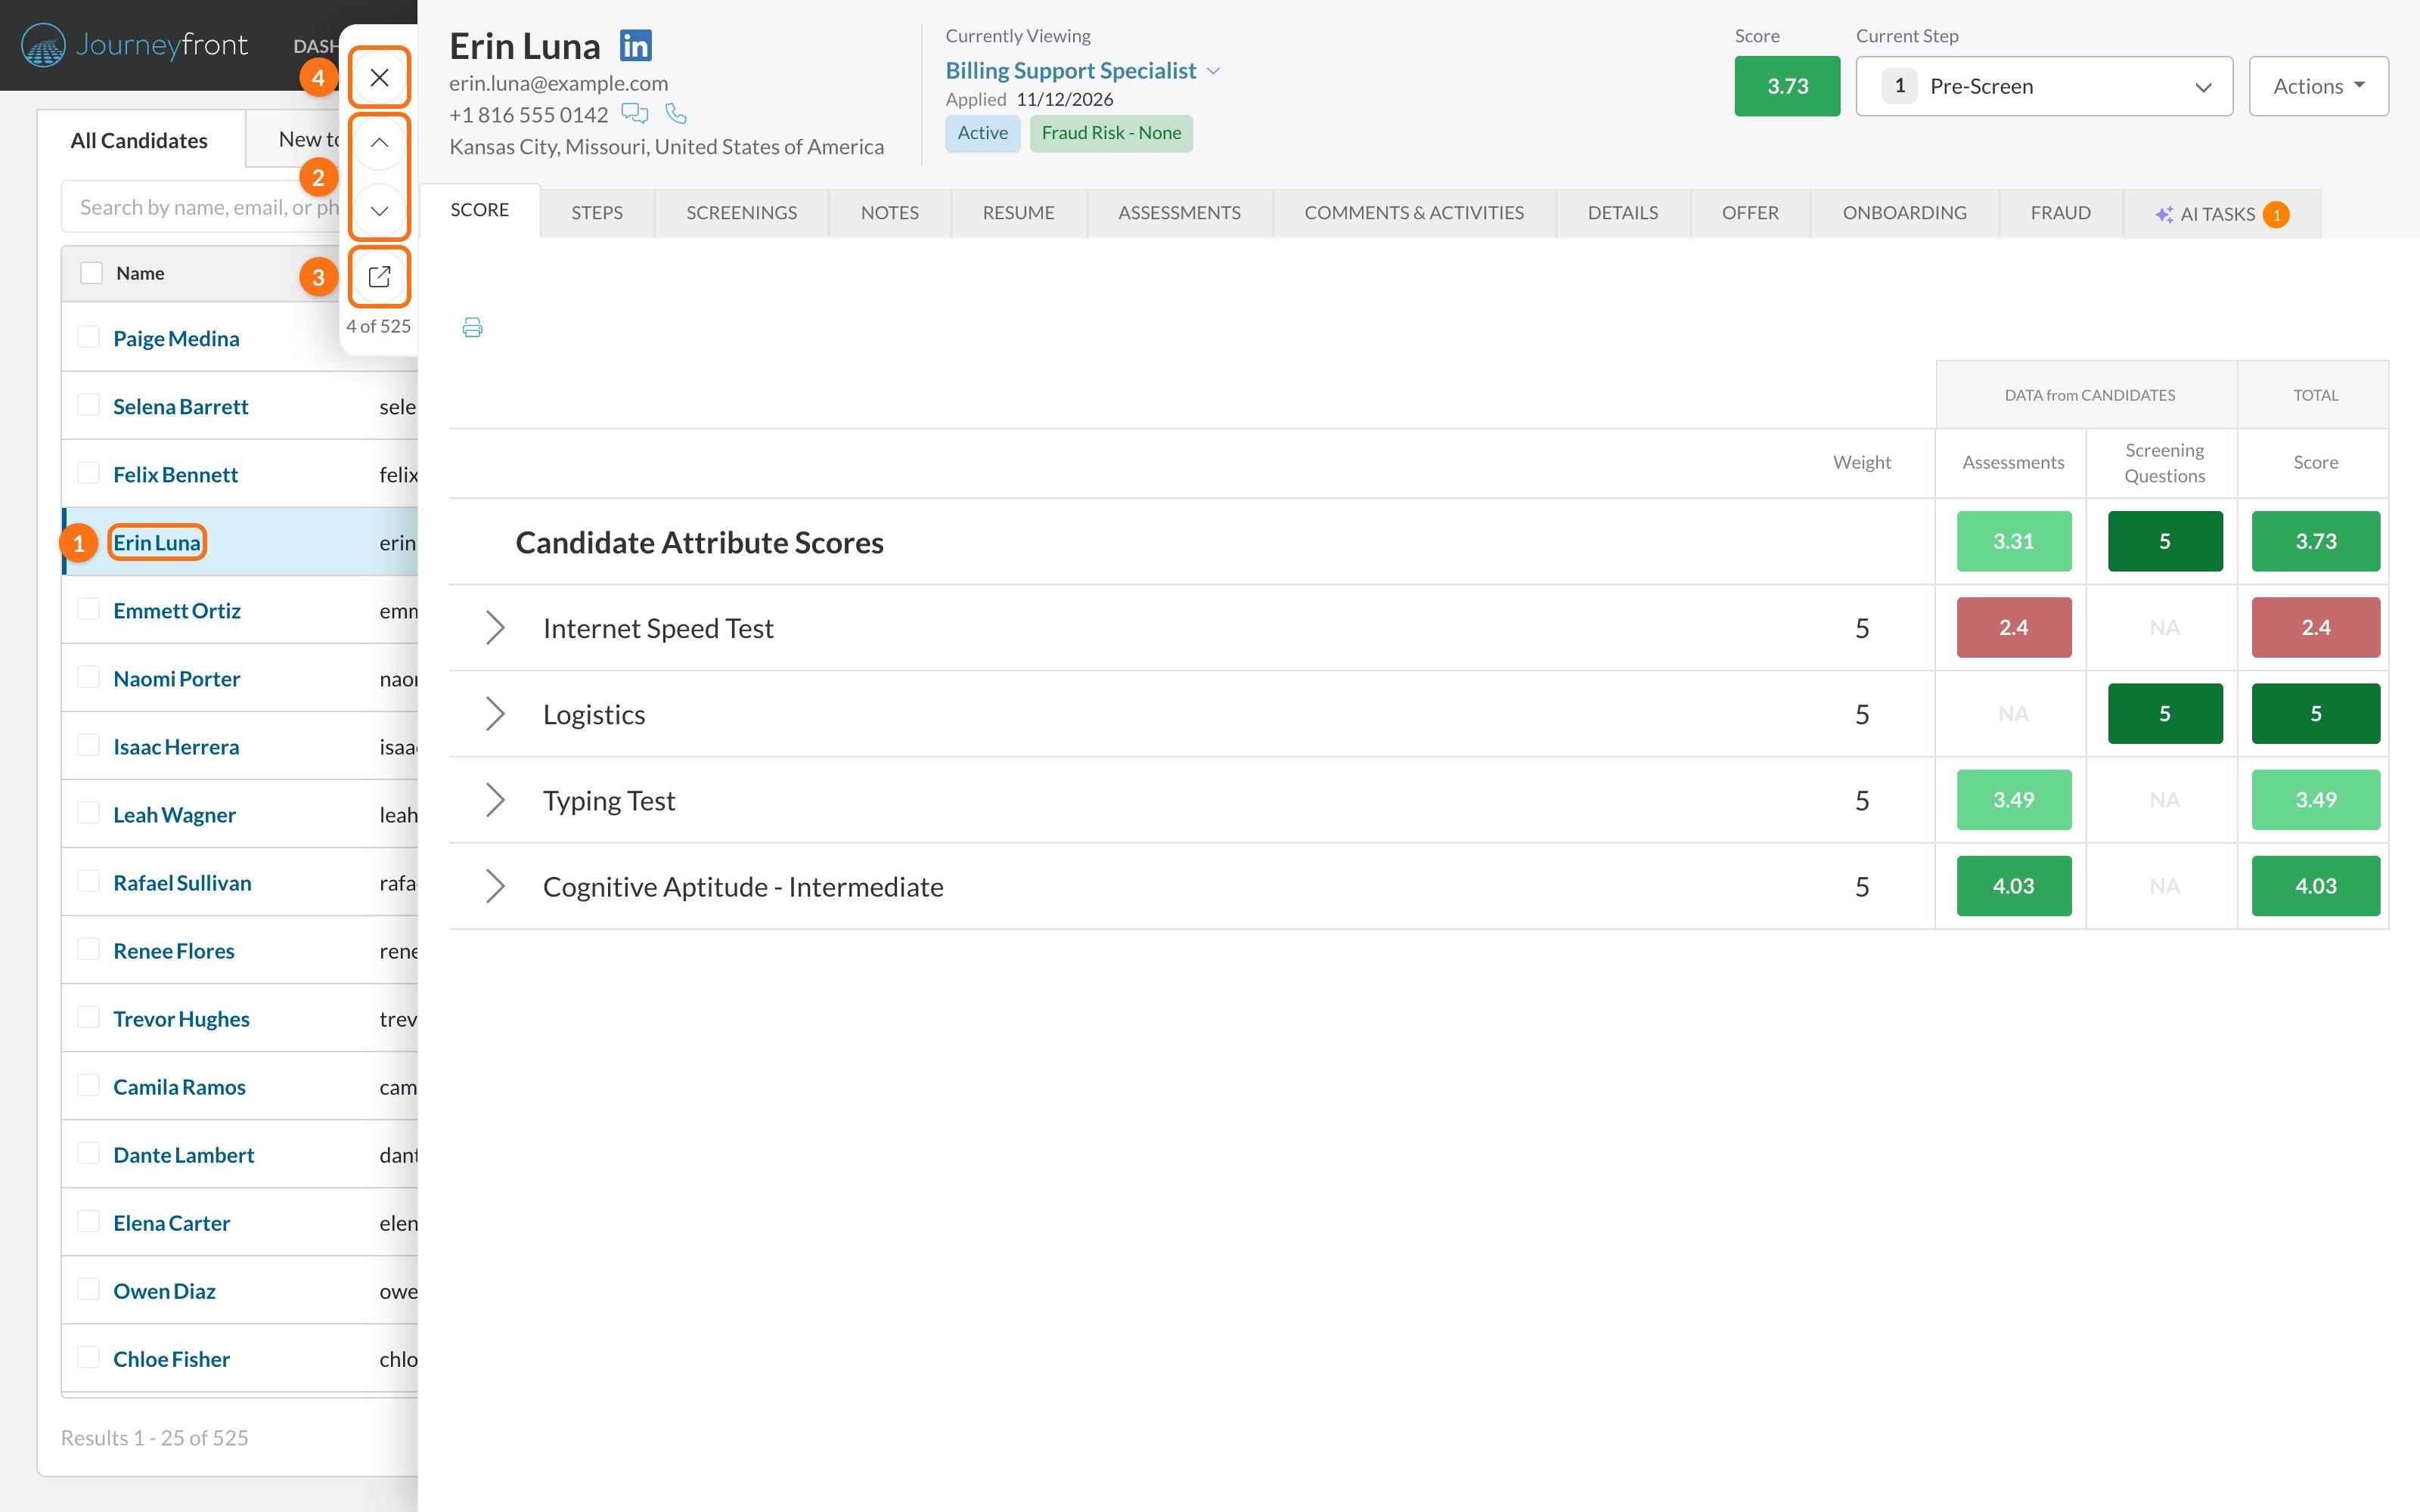
Click a candidate’s name (1) to open their Candidate Application in a side panel without leaving the list.- Use the up and down arrows (2) on the side of the panel to move to the previous or next candidate in your list. With the keyboard, hold Alt (Option on a Mac) and press the up or down arrow. The number below the buttons shows where you are in the list.
- Click the Open in a new tab icon (3) to open the full page.
- Press Esc or click the x (4) to close the panel. The list refreshes with any changes you made.
Edit right in the list
You can change some values without opening the candidate. Hover over a cell and click the pencil to edit it, for example Phone Number, Source, Hiring Class, Step, the location columns and most custom field columns. Make the change and click Save.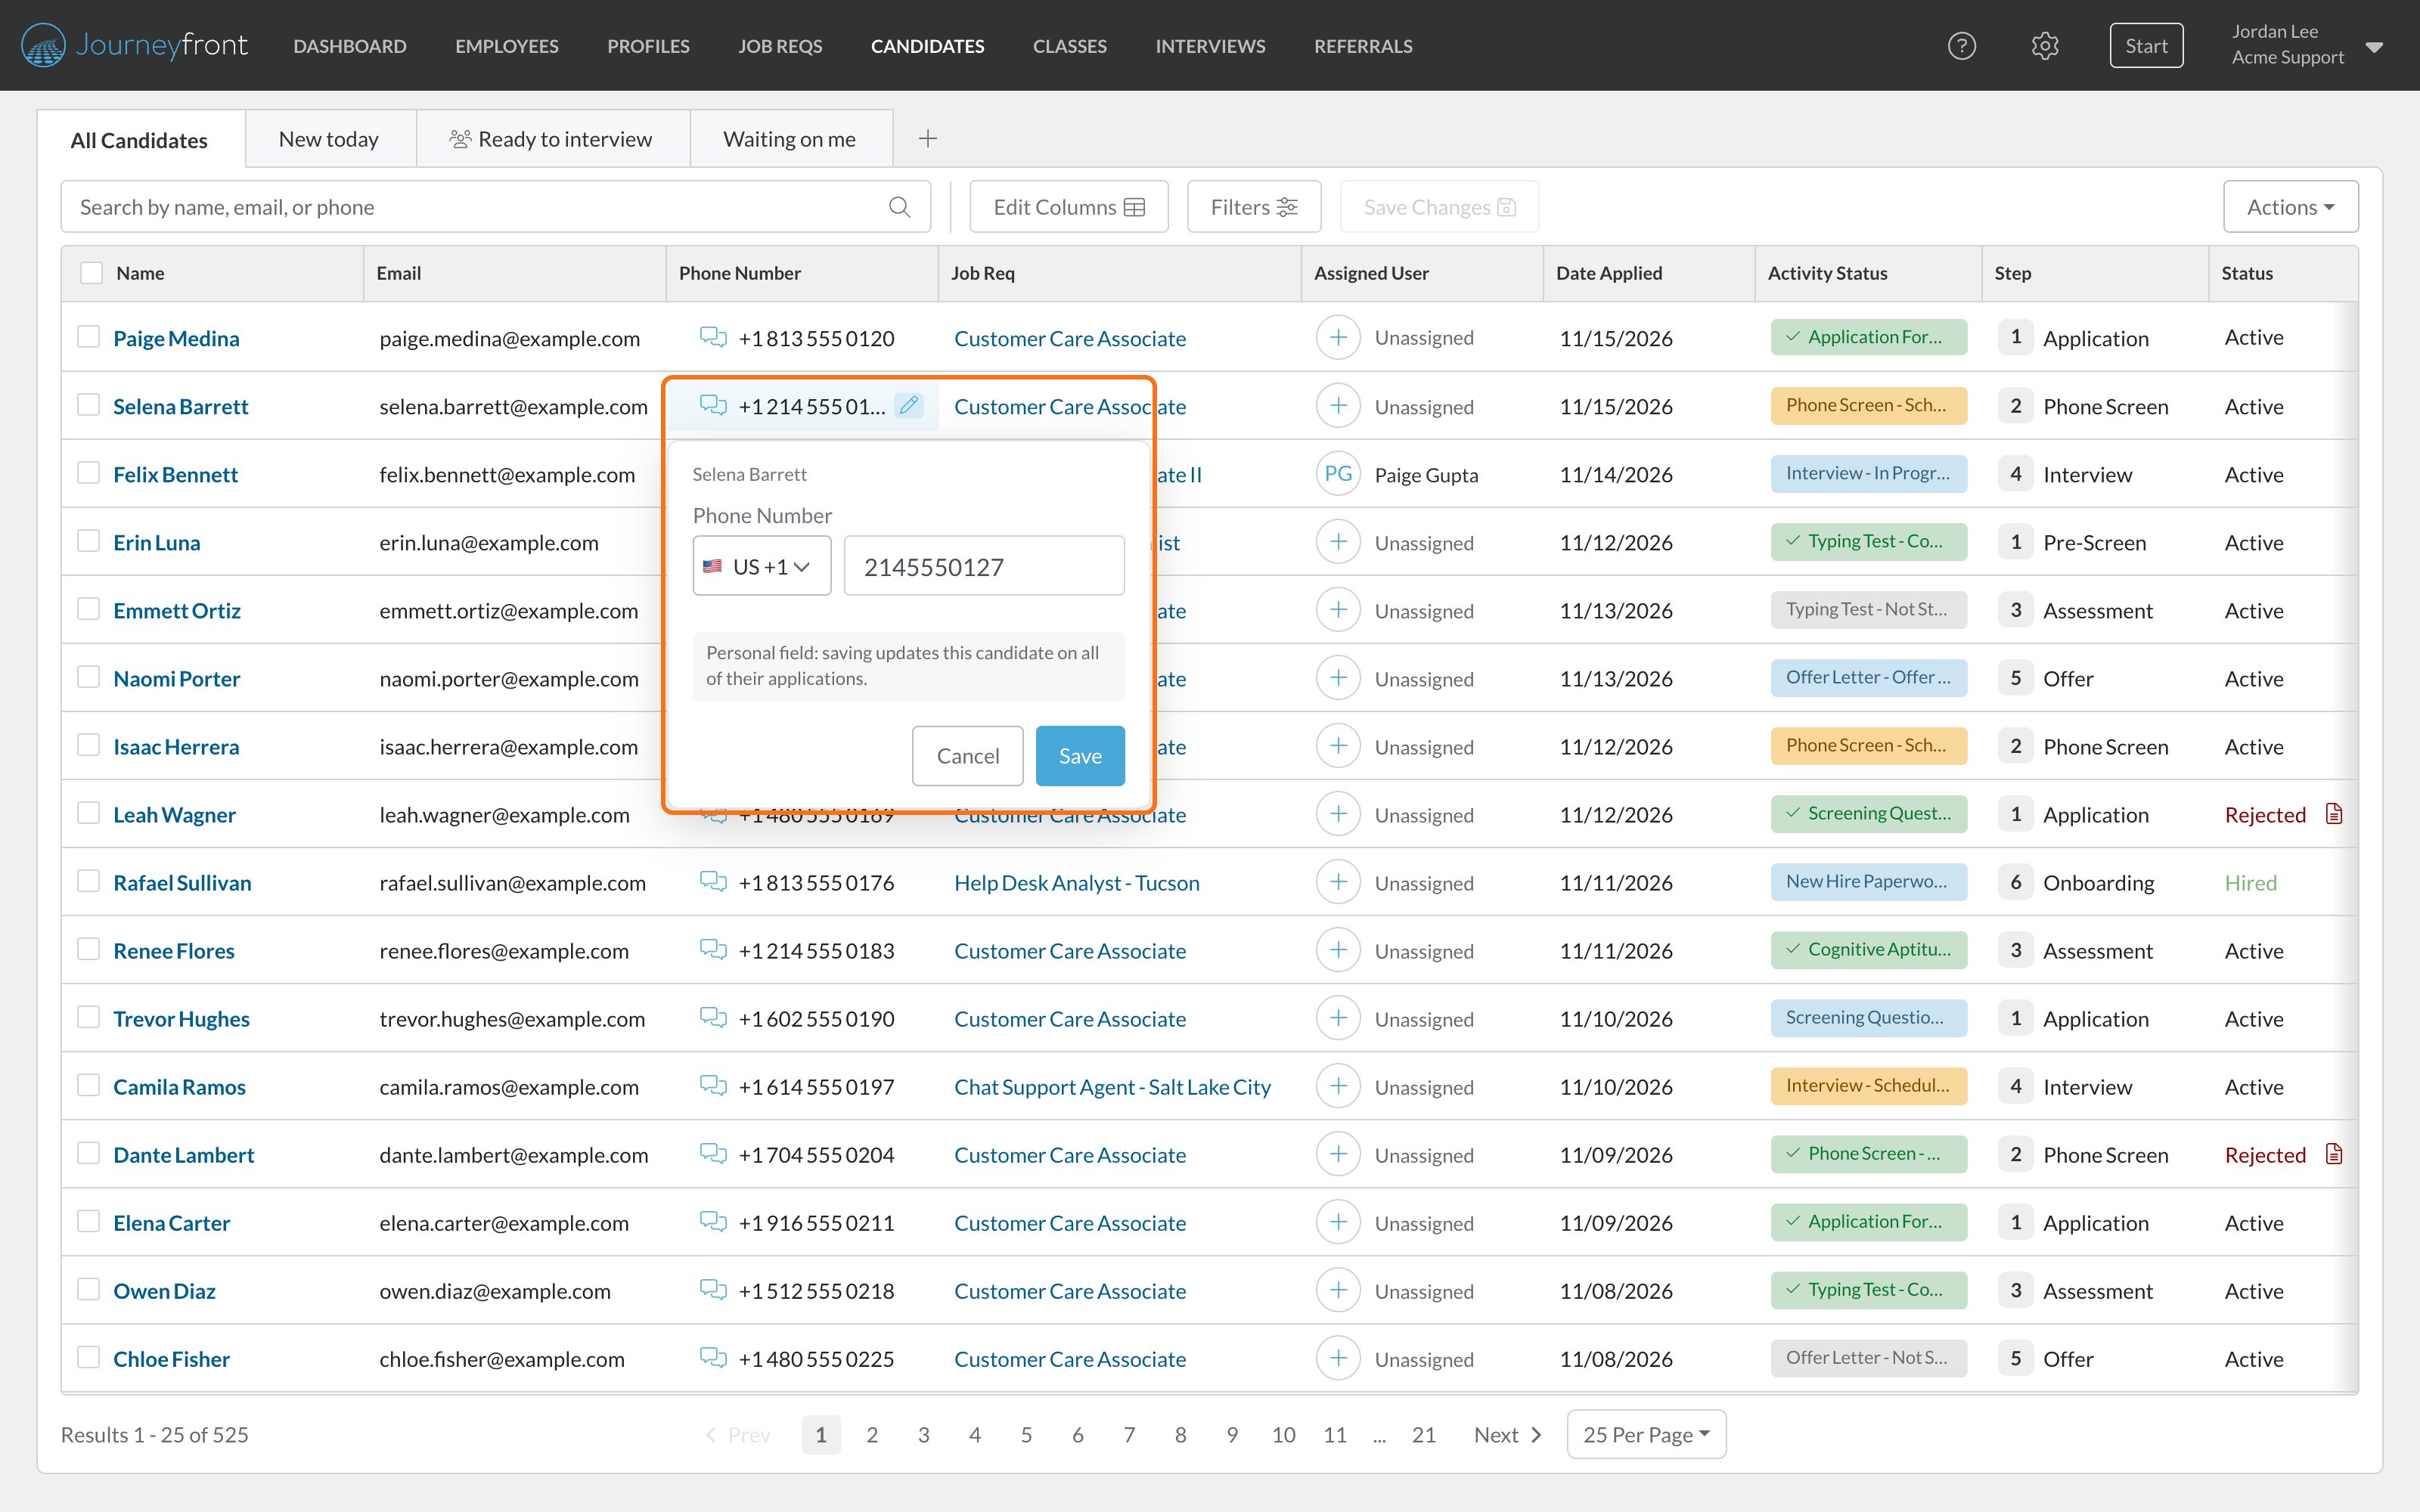
- Changing Step or Hiring Class opens the same window you’d use for a group of candidates.
- Personal values like phone number and location update the person on all of their Candidate Applications.
- Name and Email can’t be edited in the list. Change them on the Candidate Application’s Details tab. See Edit candidate details.
Act on a group of candidates
Tick the boxes next to candidates to show the actions bar: Compare, Merge, E-mail, Reject, Change Step, Send Offers, Hire, Assign User, Message and more. Some actions need a permission or only work when everyone you selected is on the same job req.Bulk actions
Every action in the bar, and when it appears.
Export
Click Actions, then Export Data, to download the list exactly as you see it: your current tab, search, filters and columns.1
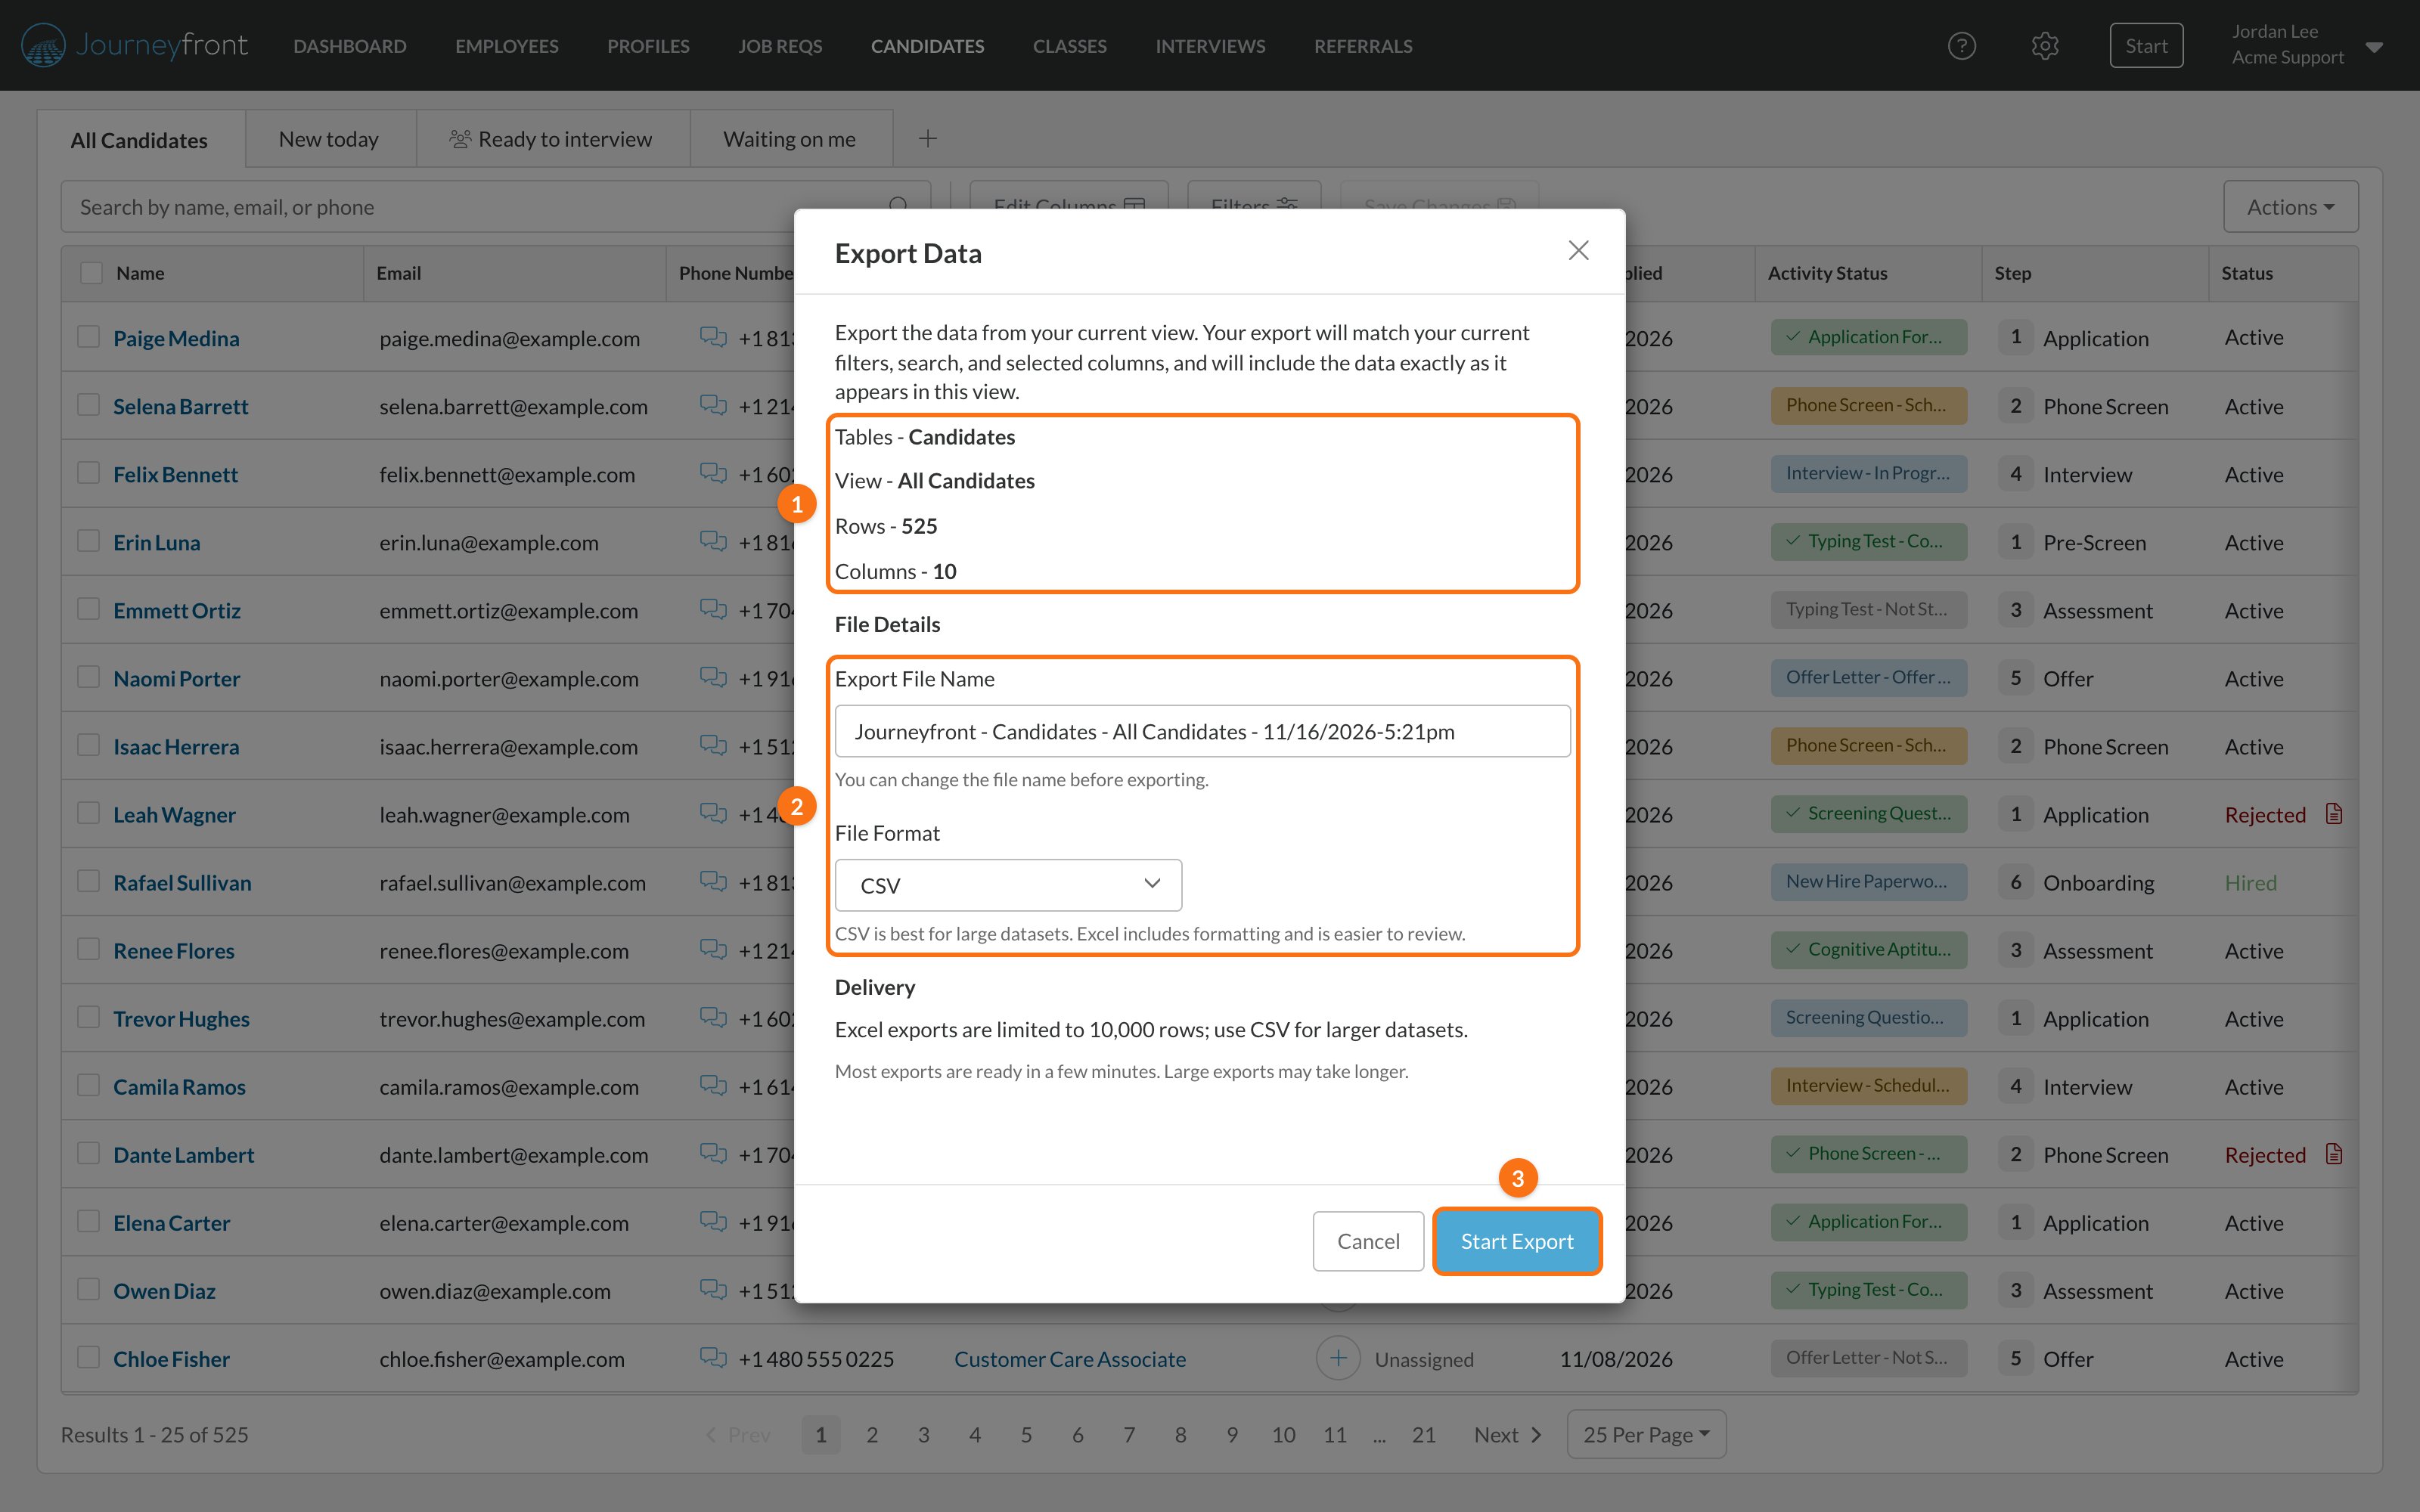
Click Actions, then Export Data
The Export Data window shows the view, and how many rows and columns the file will have (1).
2
Name the file and choose a format
Change the Export File Name if you like, then choose CSV or Excel under File Format (2).
3
Click Start Export
Click Start Export (3). Most files download right away.
FAQ
Why does the same person appear more than once?
Why does the same person appear more than once?
Each row is a Candidate Application, so someone who applied to two job reqs has two rows on the Candidates page. Add the Other Applications column to see who has applied elsewhere. See Candidate Profiles and Candidate Applications.
Why can't I find a candidate?
Why can't I find a candidate?
Check the tab you’re on and your filters first; All Candidates with no filters shows everything you can access. You only see candidates on job reqs you’re on, unless your security role has All Job Req Access.
Can my teammates see my saved views?
Can my teammates see my saved views?
Only if you share them. Views start as Only me. To share one, open it and click Actions, then Edit View, and change Who can see this. See Share a view.
How do I change which view opens first?
How do I change which view opens first?
Open the view, click Actions, then Edit View, turn on Make Default and click Save.
How do I find candidates flagged Do Not Hire?
How do I find candidates flagged Do Not Hire?
Add the Do Not Hire filter from More, or add the Do Not Hire and Do Not Hire Reason columns with Edit Columns. See Do Not Hire.
Why did my export arrive by email?
Why did my export arrive by email?
Exports over 10,000 rows are prepared in the background, and Journeyfront emails you when the file is ready. Exports this large are CSV only.
Can I filter by how candidates answered a screening question?
Can I filter by how candidates answered a screening question?
Yes. Click Filters, then More, and choose the question under Screening Questions. You can also add the question as a column with Edit Columns.
Related
The Candidate Application
Everything about one candidate in one job req.
Bulk actions
Act on many candidates at once.
Compare and merge candidates
Side-by-side scores, and cleaning up duplicates.
Export data
Get your hiring data out of Journeyfront.