

Who can do this: Admins with Company Settings Access create and manage custom fields. Anyone who can edit a record can fill in its fields. Fields marked private are only visible to users with Private Data Access.
The five kinds of custom field
Each kind of field belongs to a different record:Value types
Every field has a type, which decides what people can enter:
Not every type is available on every kind of field:
Personal, application and employee job fields
Add a field
1
Open the page
Go to Settings, then Custom Fields, then Personal Fields, Application Fields or Employee Job Fields.
2
Add the field
Click + Field and fill in the details:
- Label: the name people see on forms and records.
- Internal Name: a unique name for the field within your account.
- Merge Key: optional. Lets you place the field in offer letters and documents. See Use fields in offer letters.
- Field Type: what kind of value it holds.
- Placeholder Text: optional hint text shown in the empty field.
- Options: the choices, for Multiple Choice fields.
3
Choose who fills it in
Set Required, Admin Only or Private (see below), then click Save.
A field is either filled in by candidates (and can be Required) or kept for your team (Admin Only or Private), so turning one of these on can turn the others off. Application fields only have the Private setting: you decide whether they’re required on each job req’s application form.
To change a field, click its edit icon. To remove one, click its delete icon. Journeyfront’s built-in fields can be edited but not deleted.
Ask candidates on the application form
Personal and application fields can be added to any job req’s application form:- Open the job req and go to Setup, then Application Form.
- Click Add, then Add Field, and pick the fields you want. Each field is labeled Personal or Application.
- Set each one to Optional or Required, and drag the rows into the order you want.
- Save the application form.
Where the values show
- Personal fields show on the Candidate Profile and on each of the person’s Candidate Applications. On the Candidates page, add them as columns or filters under Personal Fields.
- Application fields show on the Candidate Application they belong to. On the Candidates page, they’re under Application Fields.
- Employee job fields show on the employee’s job record, and you can fill them in when you hire someone.
Job req fields
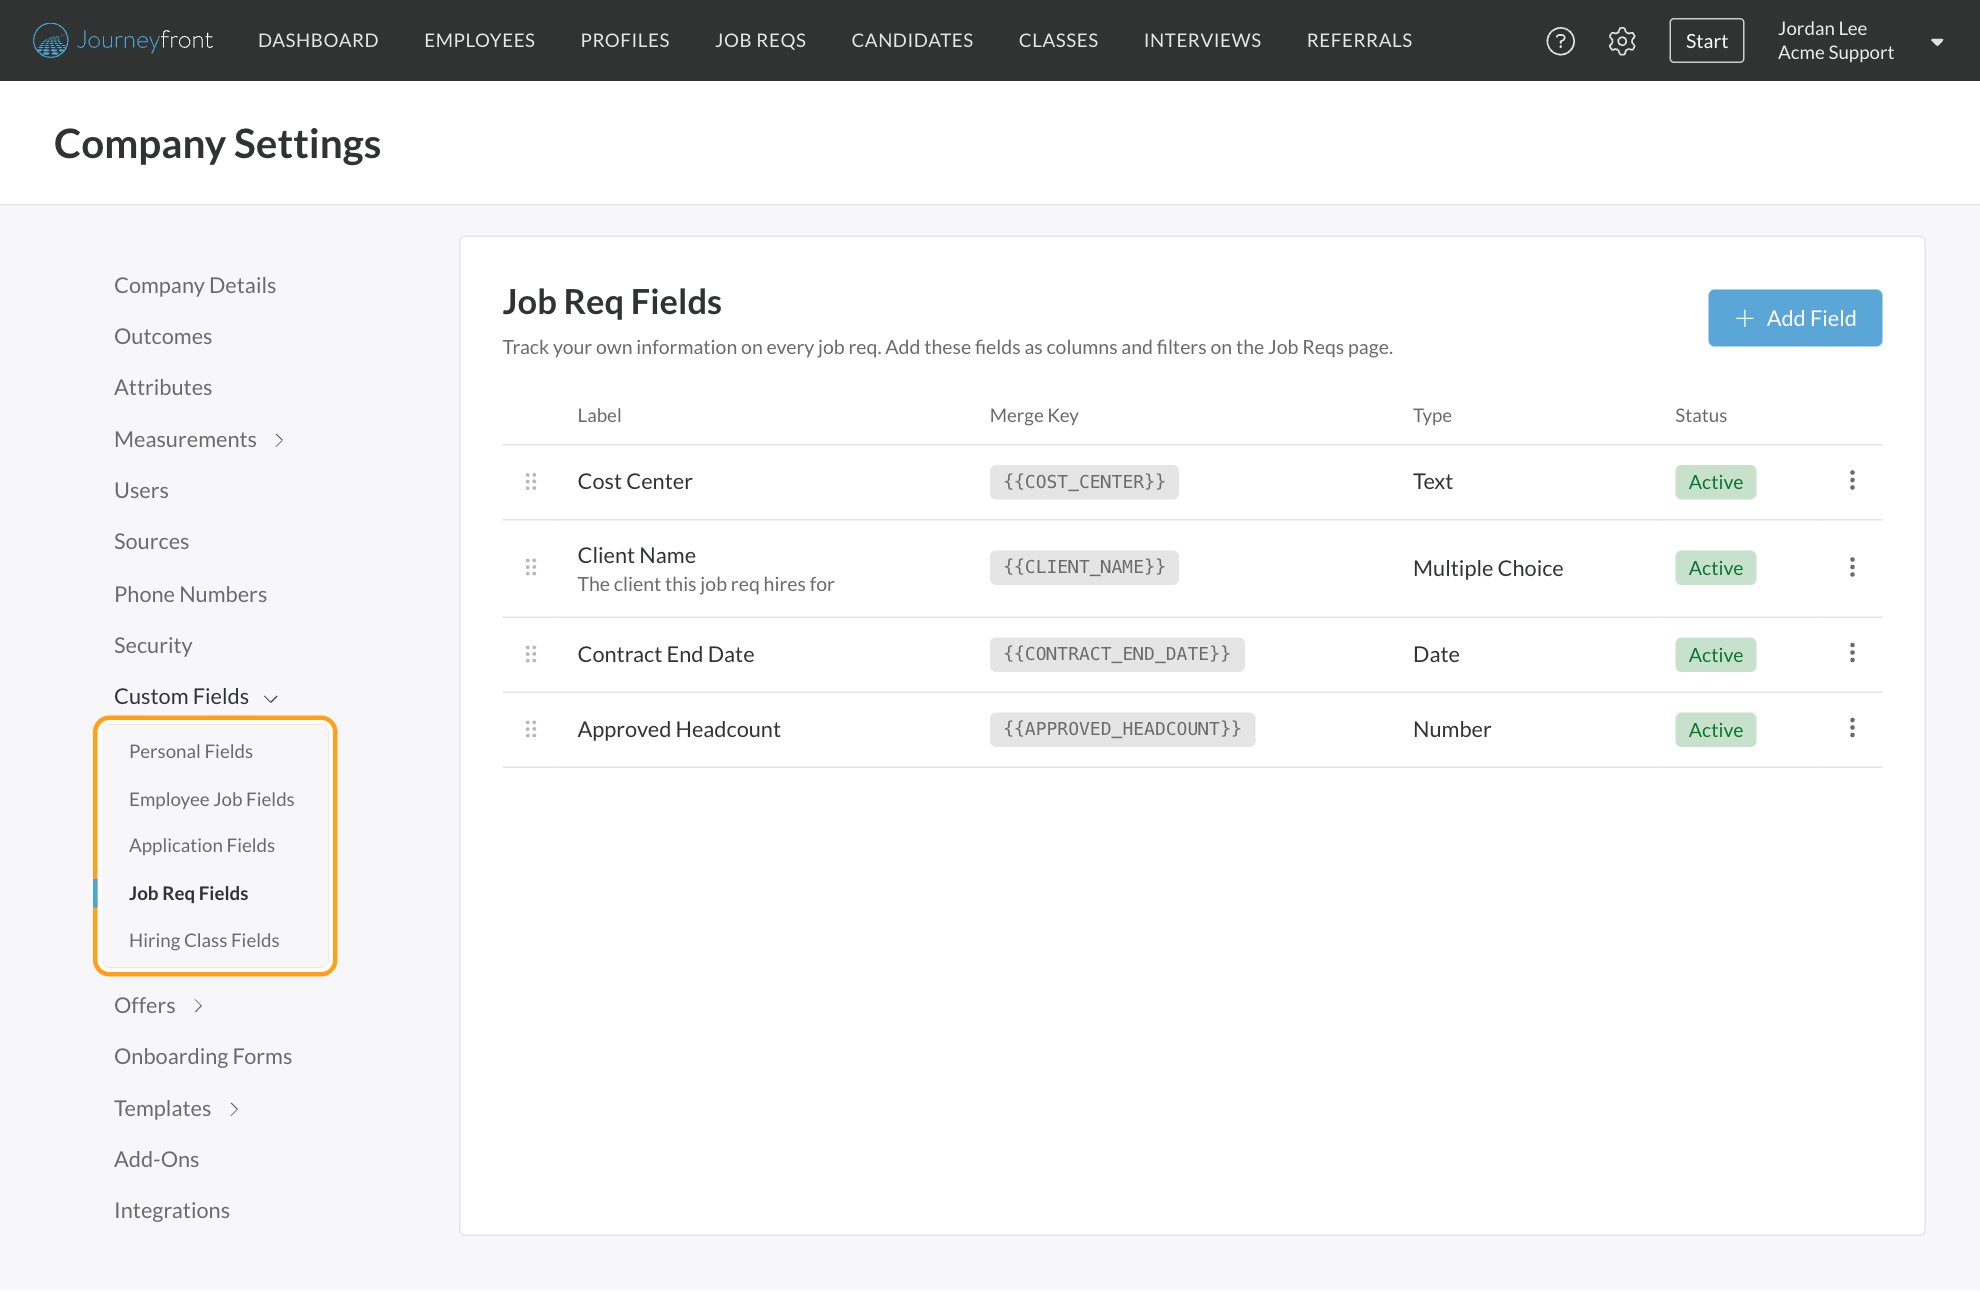
Job req fields hold the details you organize your job reqs by, such as client, cost center, headcount or contract end date. You can fill them in on any job req, show them as columns on the Job Reqs page, filter by them and include them in exports.Add a job req field
1
Open the page
Go to Settings, then Custom Fields, then Job Req Fields, and click Add Field.
2
Name it
Enter a Label, such as “Cost Center”. Journeyfront suggests a Merge Key from the label (for example 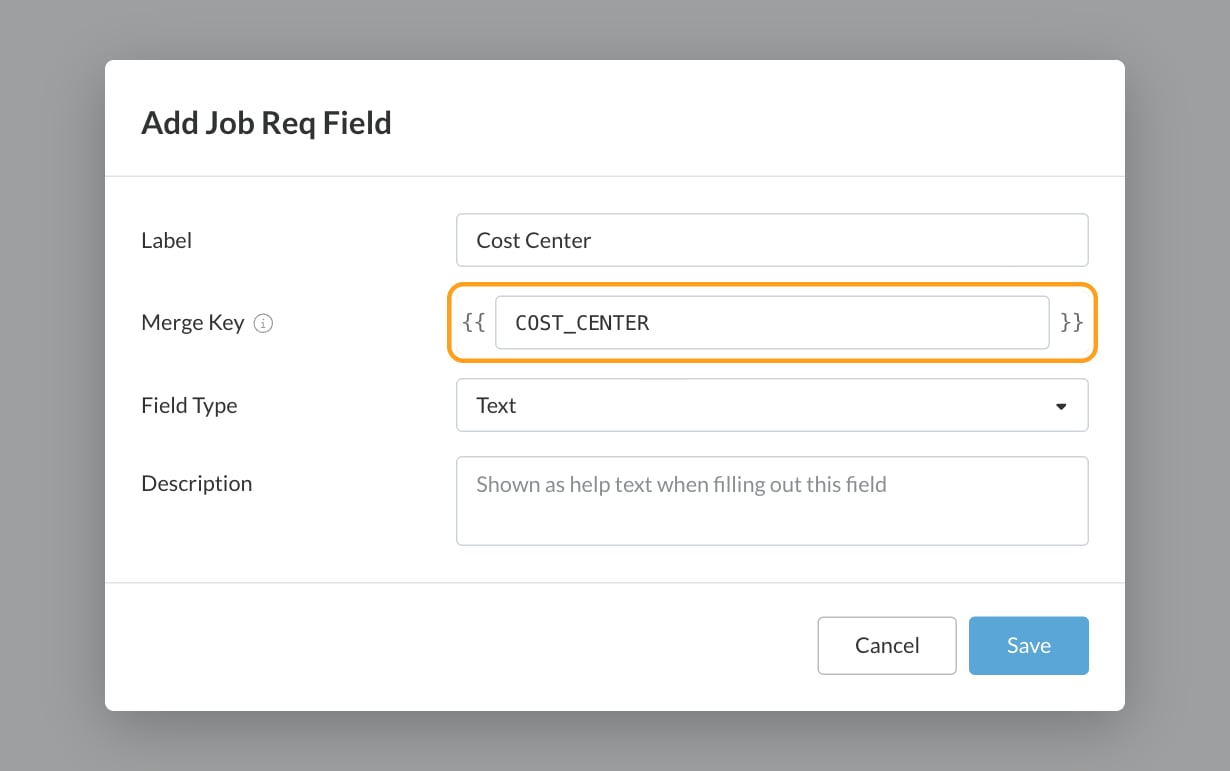
COST_CENTER). You can change the key before you save, but not after.3
Choose a type
Pick a Field Type. Add a Description if you’d like help text under the field, and Options for a Multiple Choice field.
4
Save
Click Save. The field now appears on every job req in your account.
Fill in values on a job req
Open the job req and go to Setup, then Details. Under Custom Fields, the Custom Job Req Fields section lists your account’s fields. The heading shows how many there are, and you can collapse the section when you don’t need it. Fill in whatever applies and click Save at the top of the page. No job req field is ever required, so you can always save a job req before you have every detail. Fields appear in the order you set in Settings.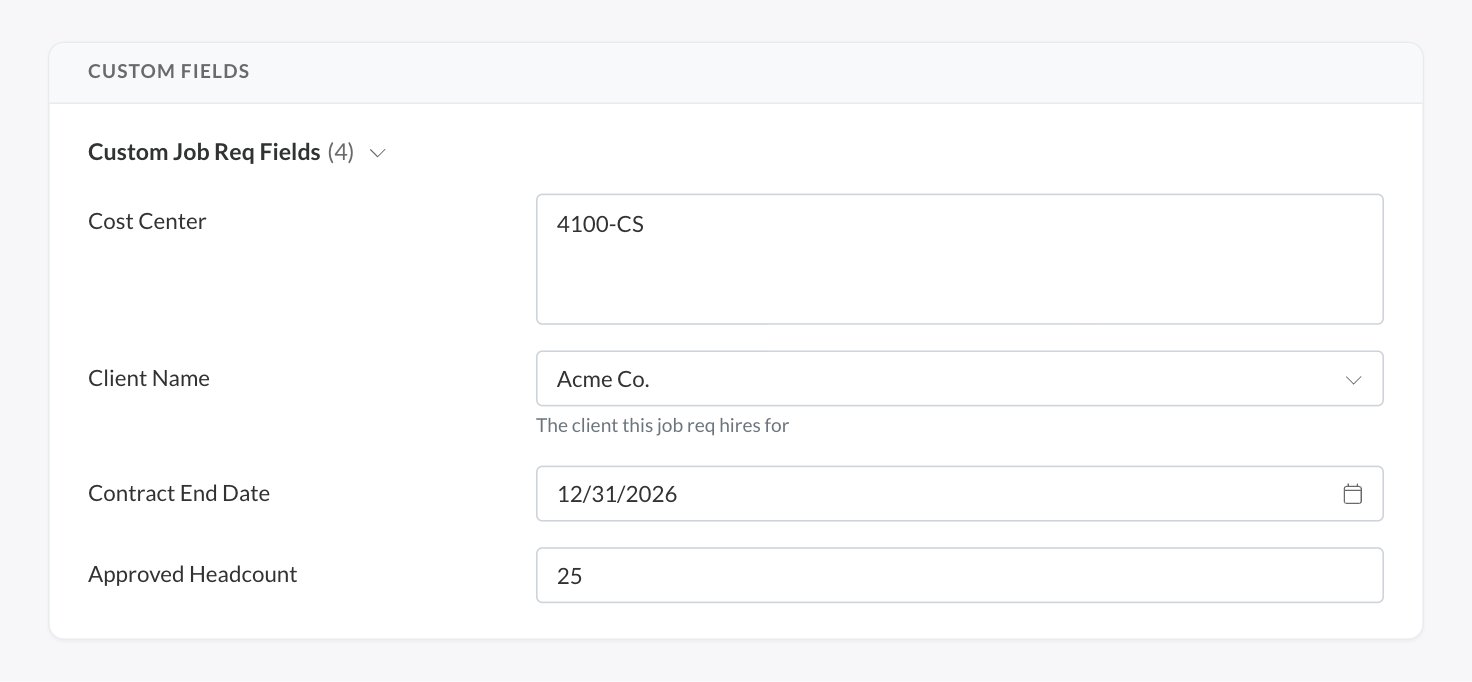
Work with job req fields on the Job Reqs page
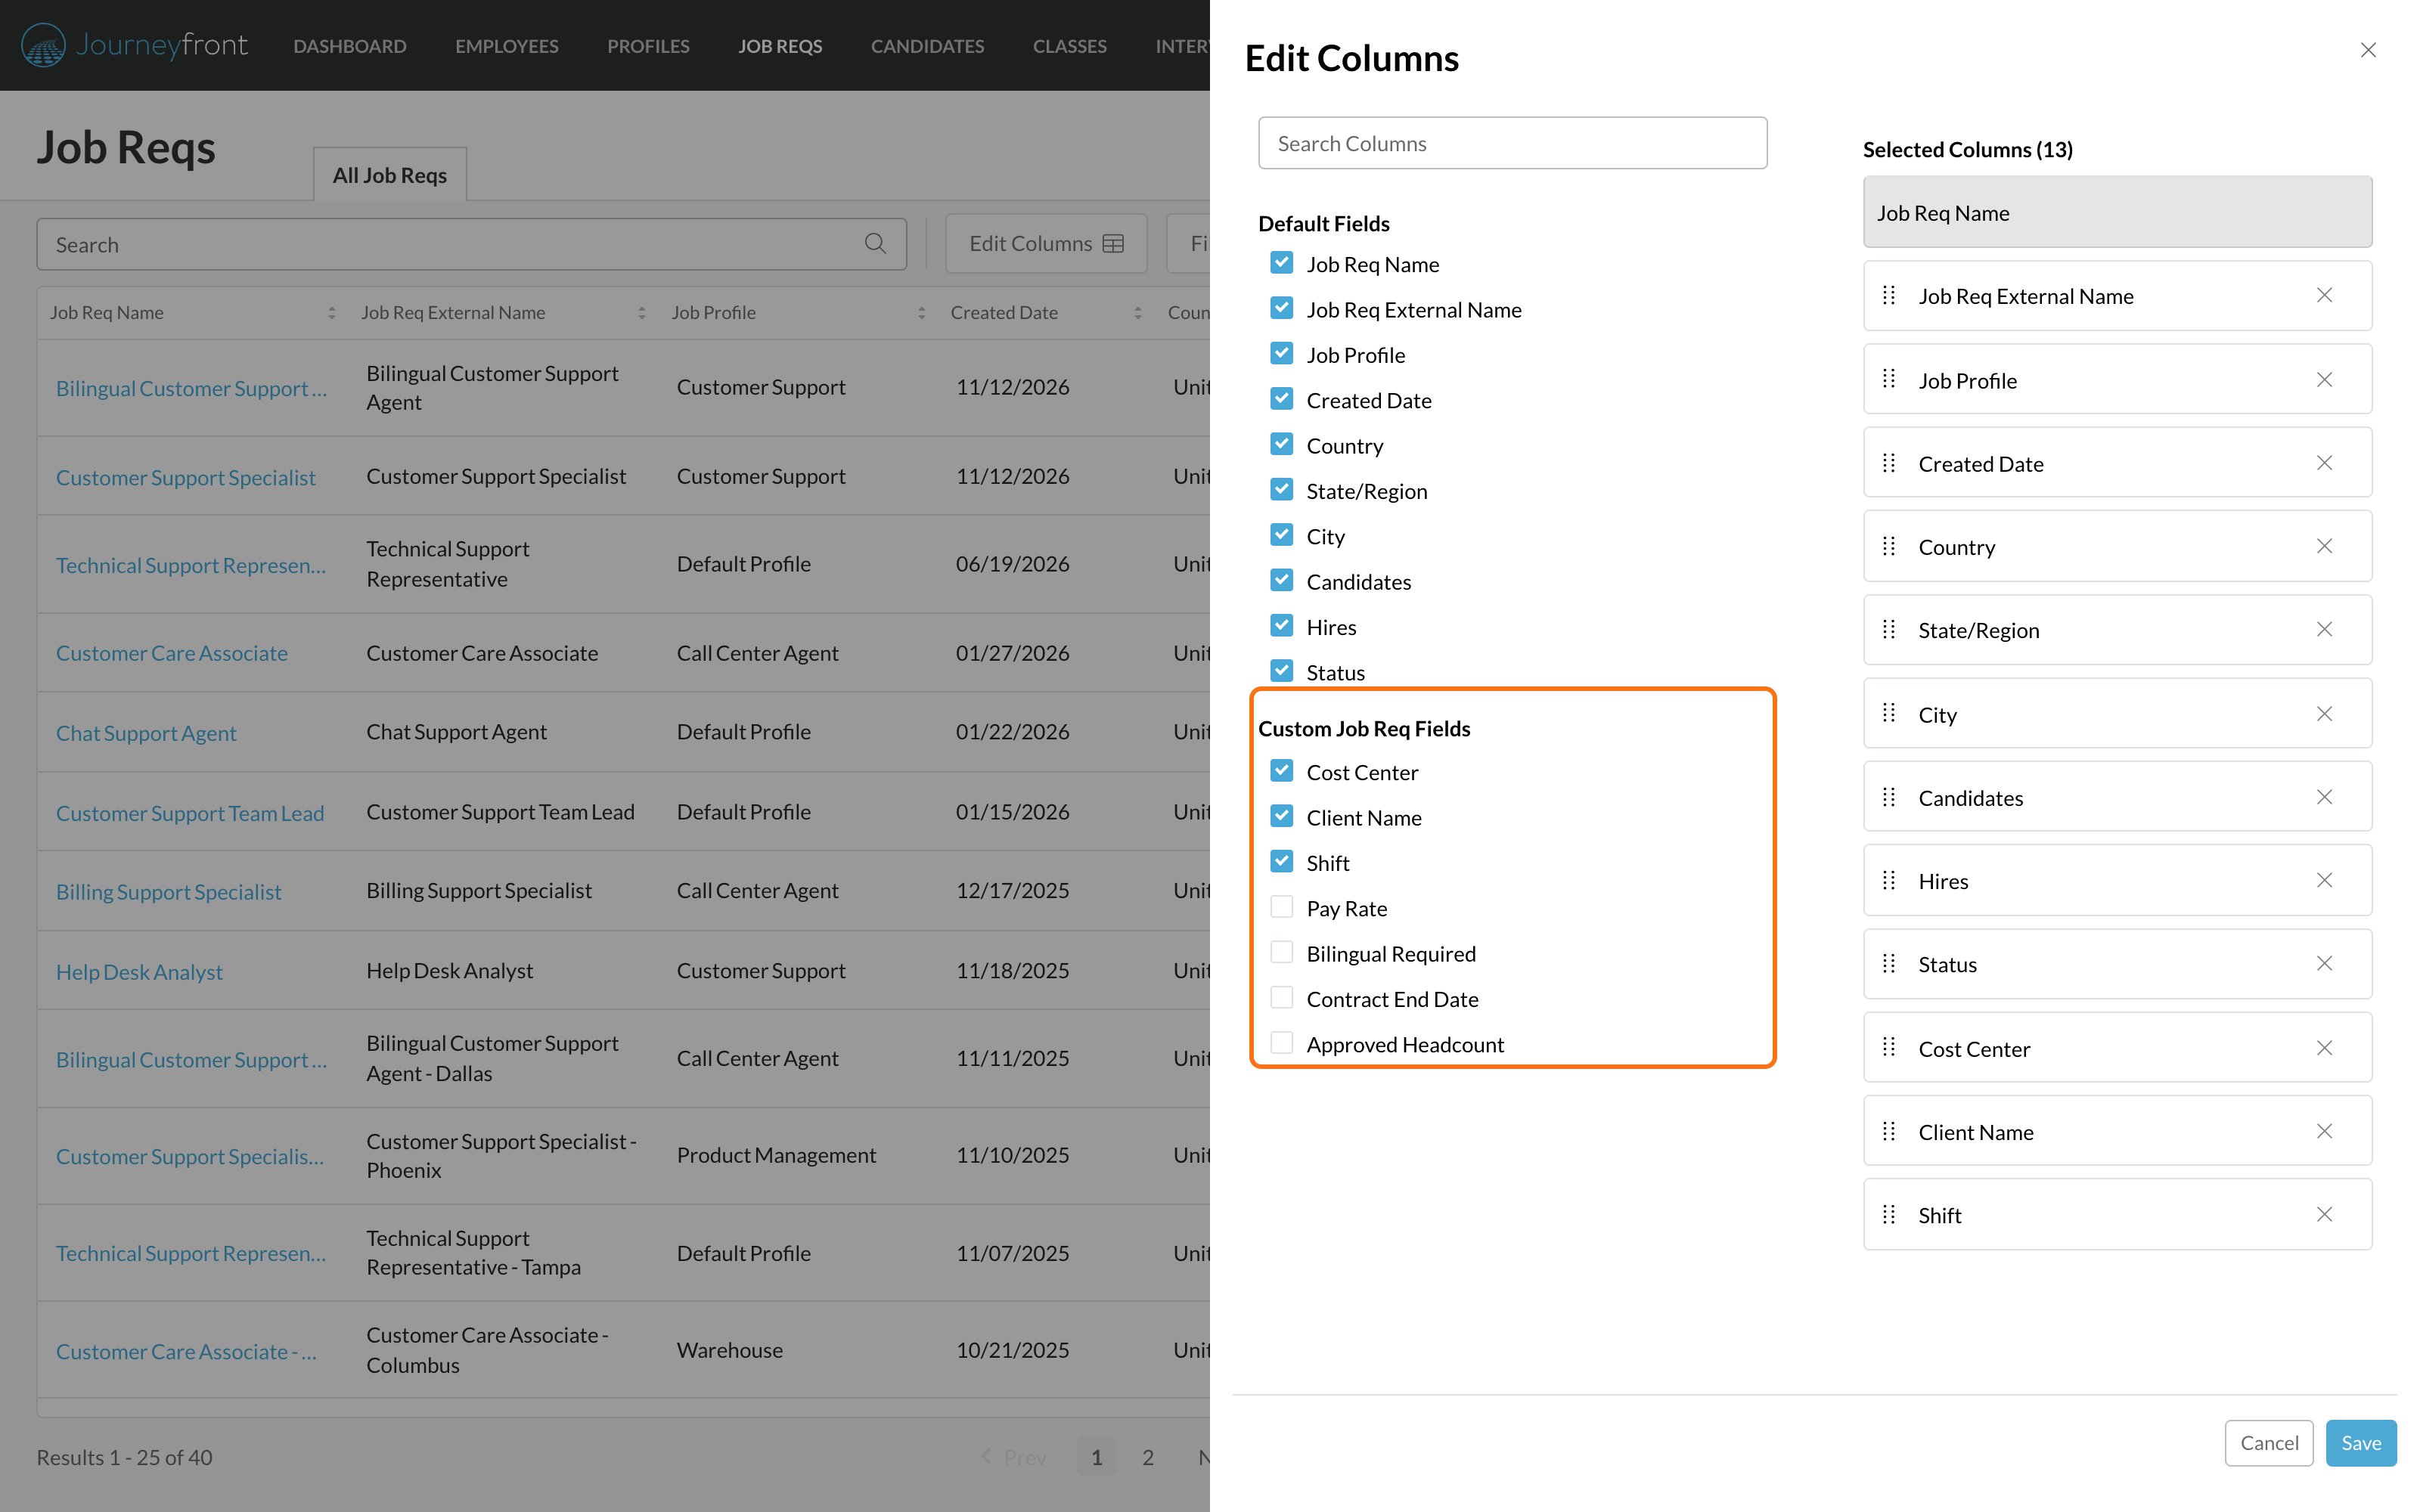
- Add columns: click Edit Columns. Your fields are under Custom Job Req Fields. Tick each one you want. Your columns are listed under Selected Columns on the right, where you can drag them to reorder. Click Save. Currency values show their currency code, links and files are clickable, and user fields show the person’s name.
- Edit in place: hover over a cell and click the pencil icon. Change the value and click Save (or press Enter). Click Cancel (or press Esc) to close without saving. You’ll only see the pencil on job reqs you can edit.
- Filter: click Filters, then More, and tick fields under Custom Job Req Fields. Then click a filter to set its value.
- Export: click Export, select the columns you want (including custom fields), and choose CSV or Excel. Each field becomes a column named after its label.
Hiring class fields
Hiring class fields work the same way as job req fields, for your hiring classes. Use them for details like a program code, trainer or training room.- Go to Settings, then Custom Fields, then Hiring Class Fields, and click Add Field.
- Enter a Label, check the suggested Merge Key, pick a Field Type, and click Save.
Manage job req and hiring class fields
On the Job Req Fields and Hiring Class Fields pages:- Reorder: drag a field by the grip handle on the left. The order you set is the order fields appear on forms, in Edit Columns and in filters.
- Edit: open the field’s menu and choose Edit. You can change the label, description and options at any time. The merge key can’t change. The type can only change until a job req or hiring class has a value for the field; after that, a value entered as a date can’t be reread as a number. If you need a different key or type, create a new field.
- Archive: choose Archive to remove the field from forms while keeping every value already entered. The values stay visible as a read-only column. Choose Restore to use the field again.
- Delete: choose Delete to remove the field and all of its values permanently. Before you confirm, Journeyfront tells you how many records have a value for it.
HRIS Object fields
If your HR system (HRIS) is connected to Journeyfront, job req and hiring class fields can use the HRIS Object type. Instead of typing a value, people pick a real record from a list your HRIS keeps, such as a work location, department or job code. An HRIS Object field carries two values: the record’s name and the code your HRIS uses for it. Both appear as columns, in exports and as merge keys.Use fields in offer letters
Any field with a merge key can be placed in offer letters and documents as a token like{{COST_CENTER}}. When the document is created, the token is replaced with the value for that candidate, job req or hiring class.
- Job req and hiring class fields always have a merge key.
- Personal, application and employee job fields have one only if you add it. You can add a merge key from the field’s edit dialog.
FAQ
Should a candidate question be a personal field or an application field?
Should a candidate question be a personal field or an application field?
Use a personal field when the answer is about the person and stays the same across job reqs, like languages spoken. Use an application field when the answer can be different for each job req they apply to, like availability for that role.
Can I make a custom field required?
Can I make a custom field required?
Personal and employee job fields have a Required setting. Application fields are set to Optional or Required on each job req’s application form. Job req and hiring class fields are never required.
Can candidates see every custom field?
Can candidates see every custom field?
No. Candidates only see fields you ask them to fill in, such as fields on an application or onboarding form. Fields marked Admin Only or Private are for your team only.
Can I change a job req field's merge key or type later?
Can I change a job req field's merge key or type later?
The merge key is permanent. The type can change until any job req has a value for the field. If you need either to be different, create a new field.
What happens to custom fields when I duplicate a job req?
What happens to custom fields when I duplicate a job req?
The copy keeps every job req field value from the original. If a field holds an uploaded file, the copy gets its own copy of the file, so removing it from one job req never affects the other.
Can I sort the Job Reqs page by a custom field?
Can I sort the Job Reqs page by a custom field?
Not yet. You can filter by any custom field and save the result as a view, which covers most of the same need.
Is there a limit to how many fields I can create?
Is there a limit to how many fields I can create?
No. Keep in mind that every job req field appears on each job req’s Details page, so a long list takes longer to fill in. The section can be collapsed when your team doesn’t need it.
Why can't I edit a value in a column?
Why can't I edit a value in a column?
Either the field has been archived, which makes its column read-only, or you don’t have permission to edit that job req.
Related
Offer letter templates
Place custom fields in offer letters with merge keys.
Hiring classes
Group hires who start and train together.
HRIS integrations
Connect your HR system.
Lead ads
Map lead form answers to personal fields.