

Who can do this: Anyone on the job req’s hiring team, or with the All Job Req Access permission, can add and remove candidates. Bulk actions like E-mail, Message and Hire need the same permissions as anywhere else.Availability: Each class’s own page (opened by clicking the class name) needs to be turned on for your account. Ask your Customer Success Manager. Everything else on this page works on every account.
Add candidates to a class
Candidates can only be added to Active classes, and only to classes on their own job req. A candidate is in one class at a time on each Candidate Application.Several candidates at once
1
Select the candidates
On the job req’s Candidates tab, tick the candidates. On the Candidates page, select candidates from a single job req.
2
Click Assign Class
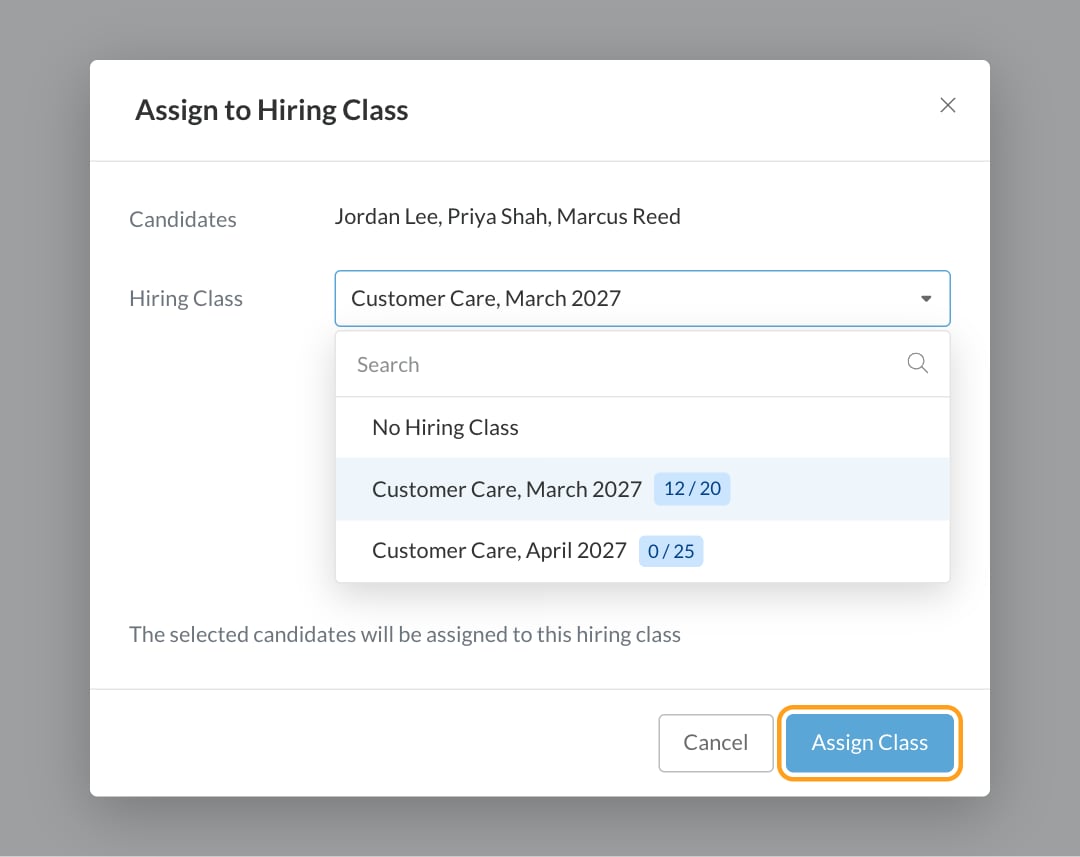
Click Assign Class in the actions bar. The Assign to Hiring Class window lists the job req’s active classes, with how many have been hired out of the openings.
3
Pick the class
Choose the Hiring Class and click Assign Class.
One candidate
Open the Candidate Application, click the Details tab, and choose a class in the Hiring Class field of the Application Details card.Automatically
Add the Set Hiring Class action to an automation rule, for example to put every candidate who reaches the Offer step into the current class. See Automation rules.From the class’s page
On the class’s page, click Add Candidate, search by name or email, and click Add next to each candidate. Only candidates on the class’s job req who aren’t already in the class are listed. Click Close when you’re done.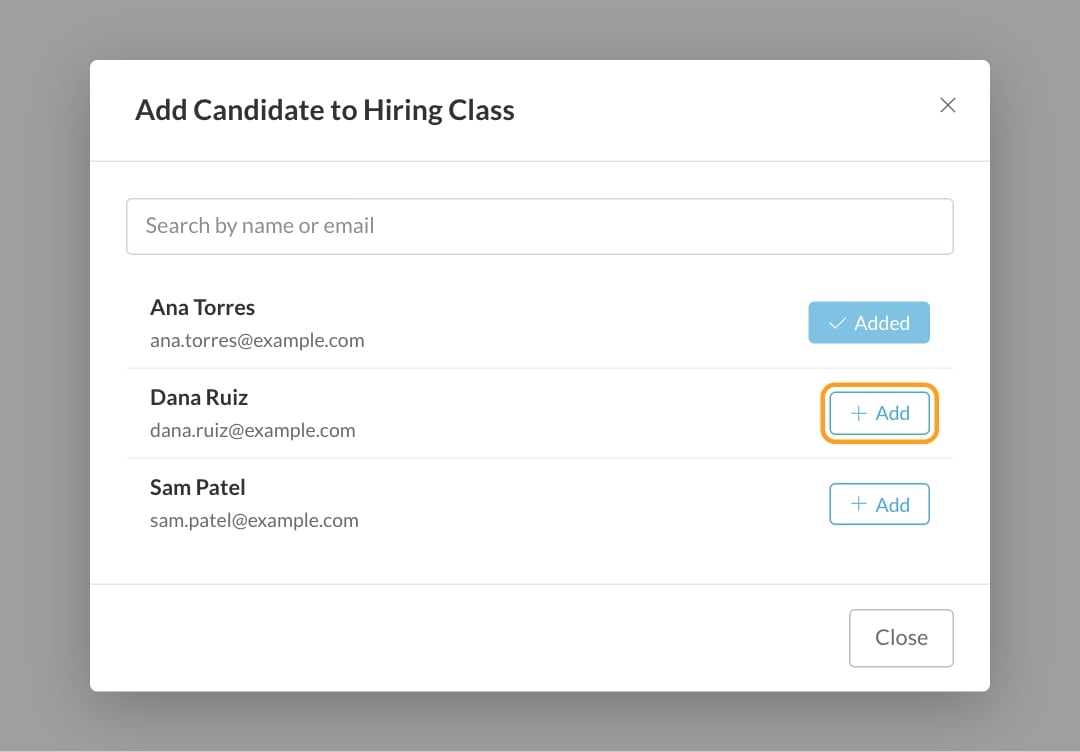
Move or remove a candidate
- Move to another class: assign them to the new class in any of the ways above. They leave their old class, and both classes’ counts update.
- Remove from a class: choose No Hiring Class in the Assign to Hiring Class window or the Hiring Class field. On the class’s page, click the trash icon on the candidate’s row, then Remove.
The class’s page
Click a class’s name on the Hiring Classes tab, or on Classes in the top navigation, to open it. The top of the page shows the class’s name and status, its job title, and Hiring Start Date, Created, Due Date, Offer Package, Candidates, Rejected, Hired, Openings and Filled %, with a progress bar. The menu at the top right has Edit, the Set To status options and Delete Class. Below, the Candidates list shows everyone in the class with their Email, Assigned User, Applied For, Date Applied, Step, Activity Status, Status and Overall Score. Use Search candidates to find someone. Hover over the icon next to a Rejected status to see when, by whom and why they were rejected.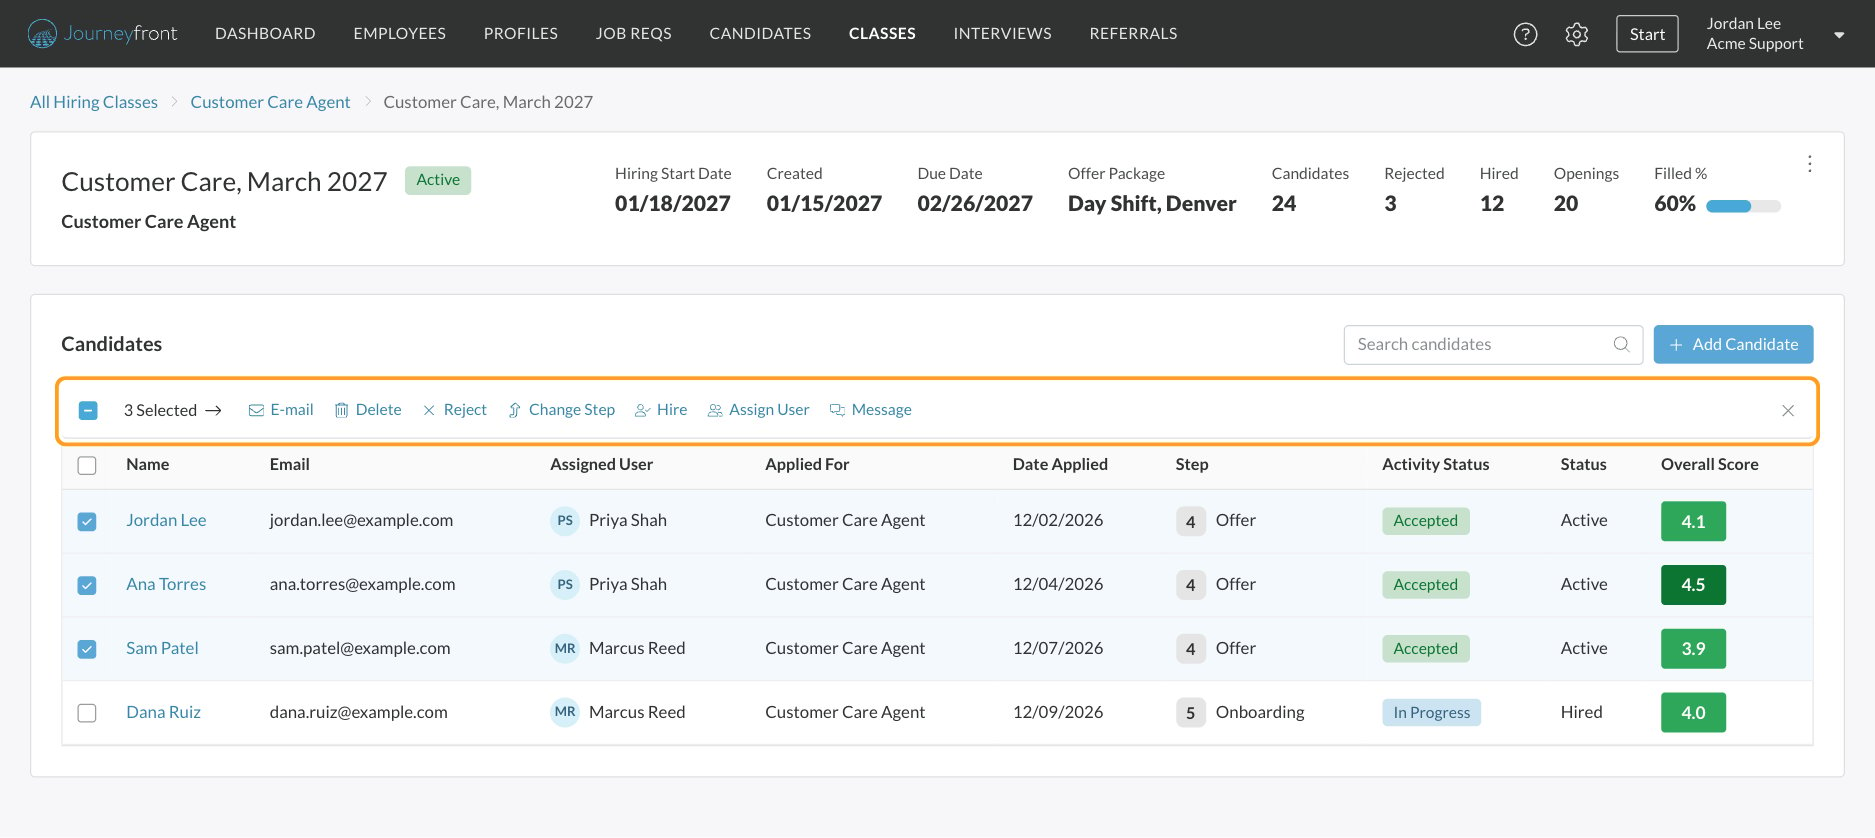
Act on the whole class
Tick candidates in the class’s Candidates list, or the header box to select them all, and the actions bar offers E-mail, Delete, Reject, Change Step, Hire, Assign User and Message. They work just like they do on the Candidates page. See Bulk actions.- Message the class: use E-mail or Message to send everyone the same start-date details, with each candidate’s own name filled in. See Email candidates and Text messages.
- Move the class forward: use Change Step to move everyone to the next step together. See Move candidates through steps.
Hire the class
When the class is ready to start, select the candidates and click Hire. You can hire up to 100 candidates in one run. Each hire’s start date is filled in from the class’s Candidate Start Date, so set it before you hire. See Bulk hire. As candidates are hired, the class’s Hired count and Filled % go up. When hires reach the number of openings, the class records its Date Filled. Set the class to Complete when you’re done with it.Offers for a class
If the class has an Offer Package, and the job req’s Offer activity allows it, offers for candidates in the class start from that package. That lets two classes on the same job req get different terms, like a different shift or pay rate. See Offer packages.Track your classes
- Fill progress: Candidates, Hired, Openings, Filled % and Days Left on the Hiring Classes tab and each class’s page.
- Candidates by class: on the Candidates page or a job req’s Candidates tab, add the Hiring Class column with Edit Columns, or filter by Hiring Class.
- In automation rules: use the Hiring Class condition to act only on candidates in a certain class.
FAQ
Why isn't my class in the list when I assign candidates?
Why isn't my class in the list when I assign candidates?
Only Active classes on the candidates’ own job req are listed. Set a Draft class to Active first, or check that you selected candidates from the right job req.
Why don't I see Assign Class?
Why don't I see Assign Class?
On the Candidates page, your selection includes candidates from more than one job req. Select candidates from one job req only, or work from that job req’s Candidates tab.
Can a candidate be in two classes?
Can a candidate be in two classes?
Not on the same Candidate Application. Assigning them to a new class takes them out of the old one.
Why can't I click the class name?
Why can't I click the class name?
The class’s own page isn’t turned on for your account. You can still assign candidates, change statuses and edit classes from the Hiring Classes tab. Ask your Customer Success Manager about the class page.
Does removing a candidate from a class change their application?
Does removing a candidate from a class change their application?
No. They stay on the job req in the same step and status; they just aren’t counted in the class any more.
Related
Create and manage classes
Set up a class’s openings, dates and status.
Bulk hire
Hire a whole class at once.
Bulk actions
Act on many candidates at once.
Offer packages
Give a class its own offer terms.