

Who can do this: Everyone sees the job profiles they have access to under Profiles: all of them with the All Job Profile Access permission, otherwise the ones ticked for them in Settings, then Users. Creating a job profile needs All Job Profile Access. Company outcomes need Company Settings Access.
- Every job req is linked to a job profile. You choose it in Linked to Job Profile when you create the job req, and it’s where the job req’s hires go unless you pick another profile in the Hire window. See Create a job req.
- Predictive models are built on job profiles. Journeyfront learns from a profile’s employee outcomes which candidates are likely to perform and stay, and job reqs linked to the profile can use that model in their scores. See Predictive models.
The Profiles page
Click Profiles in the top navigation. Job Profiles shows a card for each profile you have access to, with its description, Created Date and Total Employees. Click a card to open the profile. Every account has a Default Profile. It can’t be renamed or deleted.Create a job profile
1
Click New Profile
On the Profiles page, click New Profile. The Job Profile window opens.
2
Fill in the details
Enter a Profile Name, a Profile Description and the Employment Type, all required. O*NET Code is optional: the standard occupation code for the role, which you can look up on O*NET OnLine from the info icon.
3
Click Create
The new profile opens. Profile names must be unique in your account.
Inside a job profile
A job profile’s tabs are Dashboard, Employees and Setup, and it opens on Employees. Click All Job Profiles at the top to go back. The Actions menu has Invite New Employees, Add New Employee, Export Data and Delete Profile.The Employees tab
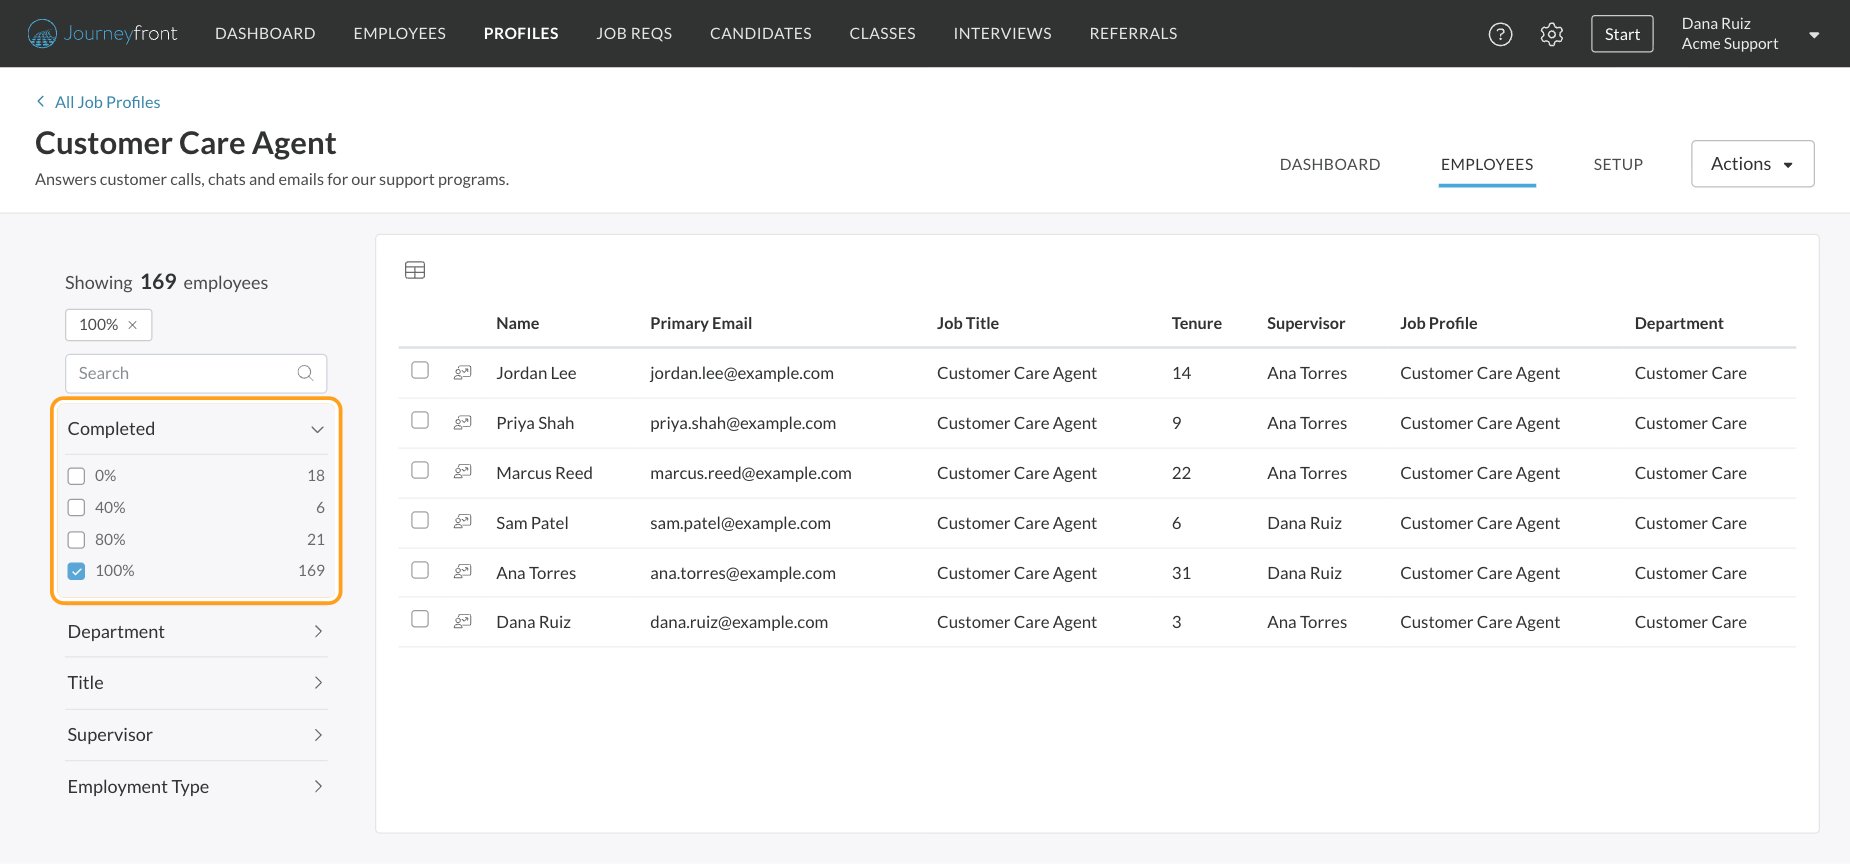
The Employees tab lists everyone in the profile. It works like the Employees page: search, filters on the left (including your multiple choice custom fields), and the table icon to choose your columns. Click a name to open the employee’s record. Tick one or more employees to act on them:- Move them to another job profile. See Move or remove employees.
- Merge, when you tick exactly two, to combine duplicate records of the same person. See Compare and merge candidates.
- Email them, with the envelope icon. Needs Send Emails.
- Delete them from the profile.
Add employees to a profile
Employees join a profile when you hire them into it, when your HR system syncs them, or when you import them. See Employee records. To add one person yourself:1
Open Add New Employee
Open the profile and click Actions, then Add New Employee.
2
Check the email
Enter their Email and click Check Email. For someone new to Journeyfront, enter their first and last name.
3
Click Add To Profile
They appear on the Employees tab. No email is sent.
Invite employees to take the assessments
To learn what success looks like in a role, invite the people already doing it well to take the same assessments you give candidates.1
Copy the invite link
Open the profile and click Actions, then Invite New Employees. In the Invite New Participants window, click Copy, then Done.
2
Send it yourself
Paste the link into your own email or chat message. Journeyfront doesn’t email it for you.
Track who has finished
On the Employees tab, open the Completed filter. Each value is a percentage of the profile’s assessments finished, with the number of employees at that point. For example, “40%” next to 6 means six people have finished 40% of the assessments. Tick a value to list those employees, or add the Percentage Complete column.See an employee’s assessment results
Click the chart icon at the start of an employee’s row. Assessment Values lists each assessment they took, with each attribute and their Value (1-5). Click the document icon next to an assessment’s name to open its full report. If the window is empty, the employee hasn’t taken the assessments yet.Move or remove employees
- Move to another profile: on the Employees tab, tick the employees and click Move. Choose the new profile under Select a Job Profile and click Move. If they answered questions that the new profile doesn’t ask, Delete Questions? lists them. Click Delete Questions to remove those answers and finish the move, or Cancel, add the questions to the new profile first, and move them again.
- Remove from the profile: tick the employees and click Delete, then confirm. The person’s record stays in Journeyfront; only their job in this profile is removed.
Export employee data
Open the profile and click Actions, then Export Data, then Export. Journeyfront downloads a CSV file of the profile’s employees with their details, job information, assessment completion, last performance and satisfaction dates, and your employee job fields. To export every employee in your account, use the Employees page.Profile dashboards
The Dashboard tab shows how the employees in this profile are doing, and which parts of your hiring go with success. Pick a view from the menu at the top:
On Attributes, Activities and Interview Questions, choose what to compare against, narrow it with the filters (for retention, by separation reason), and set From Date and To Date. Each row shows the Correlation, its Statistical Significance and how many Employees it’s based on. Click the chart icon at the end of a row to see the data points and the employees behind them.
These views fill up as you collect outcomes: performance reviews, separation reasons and satisfaction results. See Performance reviews and Employee records.
Set up a profile
The Setup tab has four pages:
Your Customer Success Manager can help you set up a profile’s outcomes and measurement plan, especially before your first performance reviews.
Company outcomes
Outcomes are the results you track for employees, such as quality, attendance or teamwork. Your company’s list lives in Settings, then Outcomes, and job profiles and performance questions pick from it.1
Open Outcomes
Go to Settings, then Outcomes. The list shows each outcome’s Name, Description and Type. Use the search box or Filter By to narrow it.
2
Click + Outcome
The Add New Outcome window opens.
3
Fill it in
Choose the Outcome Group (Performance or Culture Fit) and enter an Outcome Name. Add an Outcome Description; the more specific, the more consistently managers will score it.
4
Click Create
The outcome is added to the list.
Predictive models
Journeyfront builds predictive models on job profiles, from the outcomes of the profile’s employees. You don’t set them up in the profile. To get a model for a role, ask your Customer Success Manager. Then add it to the job reqs linked to the profile. See Predictive models. The behavioral assessment is made to go with predictive models. Giving it to candidates now builds the history a model can learn from later.FAQ
Why can't I see a job profile?
Why can't I see a job profile?
Without All Job Profile Access, you only see the profiles ticked for you on the Available Job Profile tab when an admin edits you in Settings, then Users. See Users.
Why don't I see New Profile?
Why don't I see New Profile?
Creating a job profile needs All Job Profile Access in your security role.
What's the difference between a job profile and a job req?
What's the difference between a job profile and a job req?
A job req is a job you’re hiring for. A job profile is a role your employees hold. Many job reqs can link to one job profile, for example one job req per site, all hiring Customer Care Agents.
Does inviting employees send them an email?
Does inviting employees send them an email?
No. Invite New Employees gives you a link to send yourself, in an email, a chat message or anywhere your employees will see it.
Can I delete a job profile?
Can I delete a job profile?
Yes, except the Default Profile. Open it and click Actions, then Delete Profile, then Confirm.
Can we build our own predictive model?
Can we build our own predictive model?
No. Journeyfront builds predictive models from your outcome data. Ask your Customer Success Manager about a model for a role.
Related
Predictive models
Use what a profile’s employees teach you in candidates’ scores.
Behavioral assessment
The assessment made to go with predictive models.
Employee records
Each employee’s details, job and history.
Performance reviews
Collect the outcomes that show what success looks like.