

Who can do this: Anyone who can manage both job reqs: job req managers and users whose security role includes job req access. Managing the list of move reasons needs Company Settings Access or full access.
When to move a candidate
Teams move candidates for two main reasons.From an evergreen job req to a job-specific one
For many high-volume teams, moving candidates is a planned part of the hiring process. You keep one evergreen job req always open, often one per role or location, so candidates can apply any time. Your team screens everyone there. When a specific opening is ready, like a new hiring class, site, shift or start date, you move the qualified candidates into that job req, where interviews, offers and hiring happen.- The evergreen job req stays a clean list of people still waiting, because moved candidates leave it.
- You can place candidates at a later step, like Interview or Offer, since they already passed screening.
- Transfer Data brings their screening answers and test results over, so they don’t repeat them.
- Keeping the Original Application Date means time-to-hire is counted from when they first applied.
When a candidate is a better fit for a different job
Sometimes a candidate doesn’t qualify for the job they applied to but would be a good match for another one. They might not meet one role’s language, schedule or skills requirements but suit a different role well. Instead of rejecting them and hoping they apply again, move them to the job req that fits.- Your rejection numbers stay accurate, because the candidate isn’t rejected.
- You pick the step that makes sense, so they don’t redo steps that still apply.
- A move reason and a note tell the team on the new job req why the candidate is there.
Move or add to another job req?
Journeyfront has two ways to get a candidate onto another job req: Move and Add to Job Req. Both create a new Candidate Application and can bring over results the candidate already has. The difference is what happens to the application they’re on now.- Move when the new job req is the next step in the candidate’s current hiring process. They’re partway through, and the right place to continue is a different job req. Their journey carries on there, and the first application closes as Moved.
- Add when you’re starting something new, outside their current process. For example, you’re reaching out to past candidates about a new opening, or you want someone considered for a second role while they stay in the first. Each application keeps its own status and runs through its own workflow.
Tips for choosing
- Keep a real rejection on record. If the candidate didn’t pass the first job req and you want that rejection and its reason to stay on their history, reject them there and then add them to the other job req. Moving would replace the rejection with Moved.
- Re-engage past candidates with Add. Move only works on open applications. To invite earlier applicants to a new opening, filter the Candidates page (for example by status or applied date), select them, and use Add to Other Req with the invitation email turned on.
- Don’t use Add as a stand-in for Move. If the candidate should only be in one place, adding leaves the first application open, so they show as an active candidate on both job reqs and each application keeps running through its workflow.
- Close the leftover application after an add. Once someone is hired or placed on one job req, nothing closes their other application automatically. Close it yourself so it doesn’t sit in that job req’s pipeline.
- Use Original Application Date for planned moves. When moving from an evergreen job req, keeping the original date means time-to-hire counts from when they first applied.
Move a candidate
1
Open Move
On the Candidate Application, click Actions, then Move. The Move Candidate to Another Job Req window opens.Move is only available on open applications. It doesn’t show for candidates who are hired, rejected, withdrawn or already moved.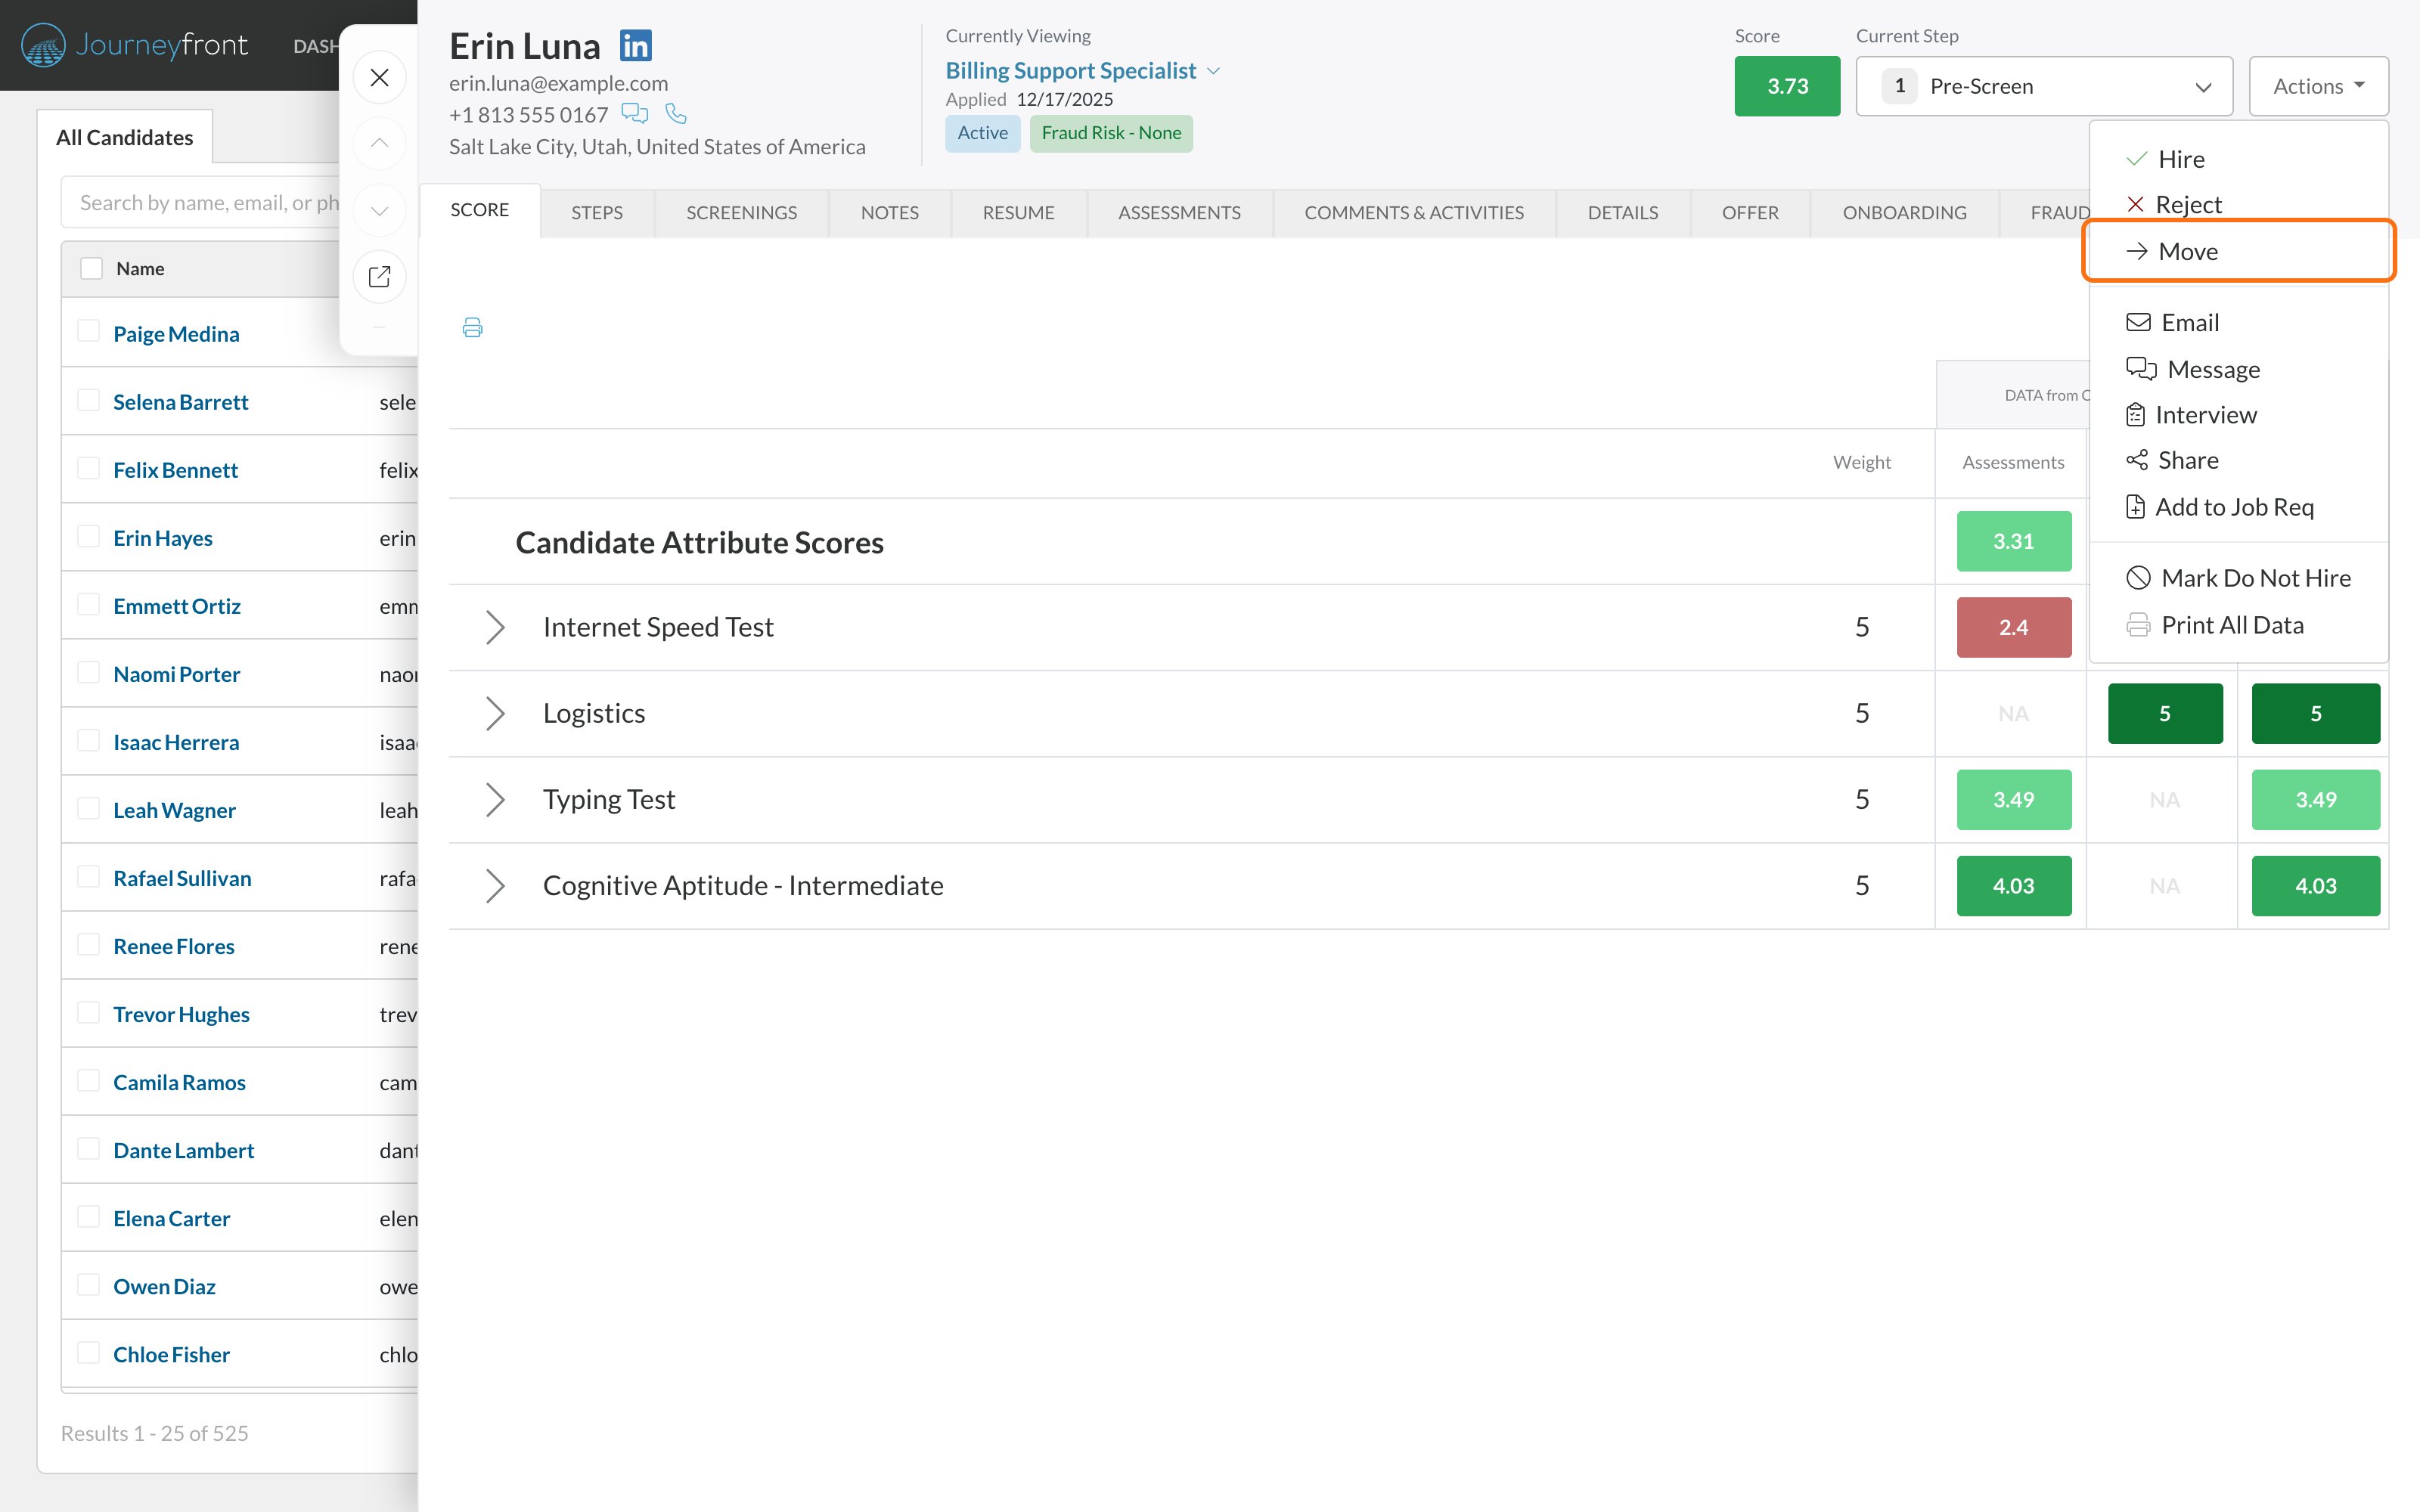
2
Check who you're moving
Who to move shows the candidate’s name, their current job req and their current step.
3
Choose where they go
Under Where to?:
- Job Req: pick the job req to move them to. The list shows the other open job reqs you have access to.
- Step: pick the step to place them at. Steps are listed in the order of that job req’s workflow.
- Application Date on New Job Req: choose Today’s Date, or Original Application Date to keep the date they first applied.
4
Say why
Under Why?, pick a move reason and add Notes if they help. If your account has move reasons set up, a reason is required. If you have access to manage move reasons, you can click Add Move Reason to add one without leaving the window.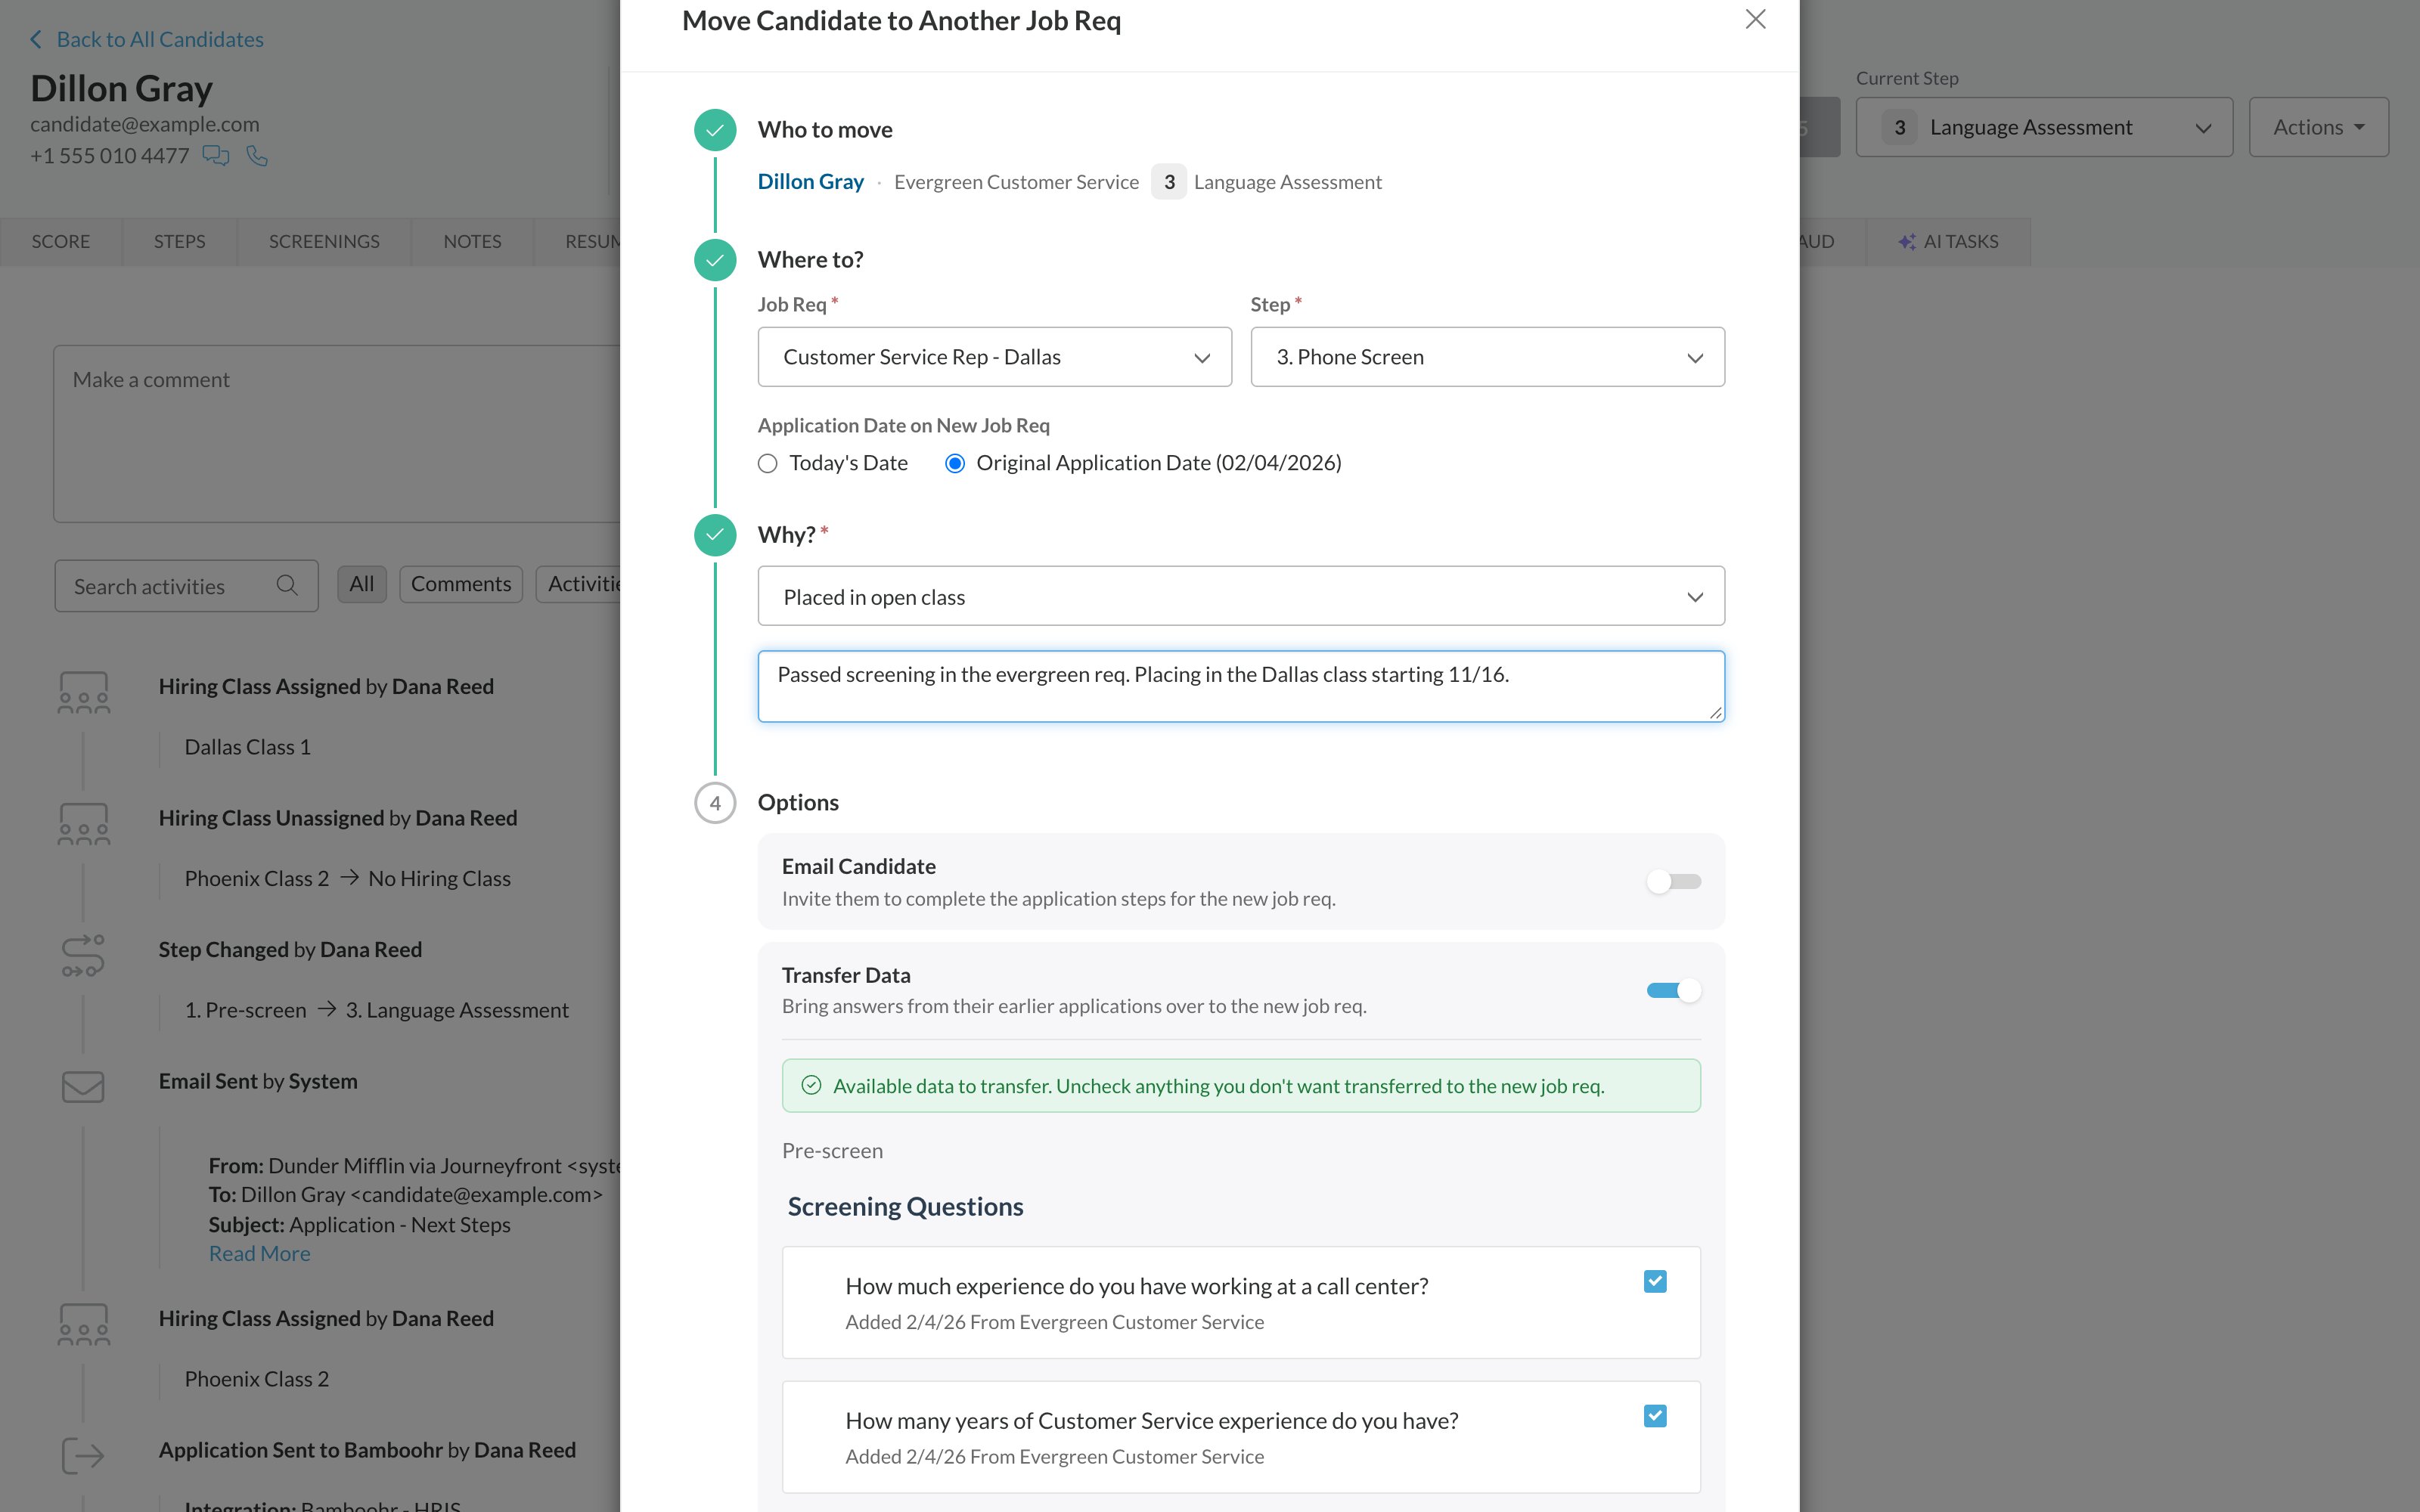
5
Choose the options
Under Options: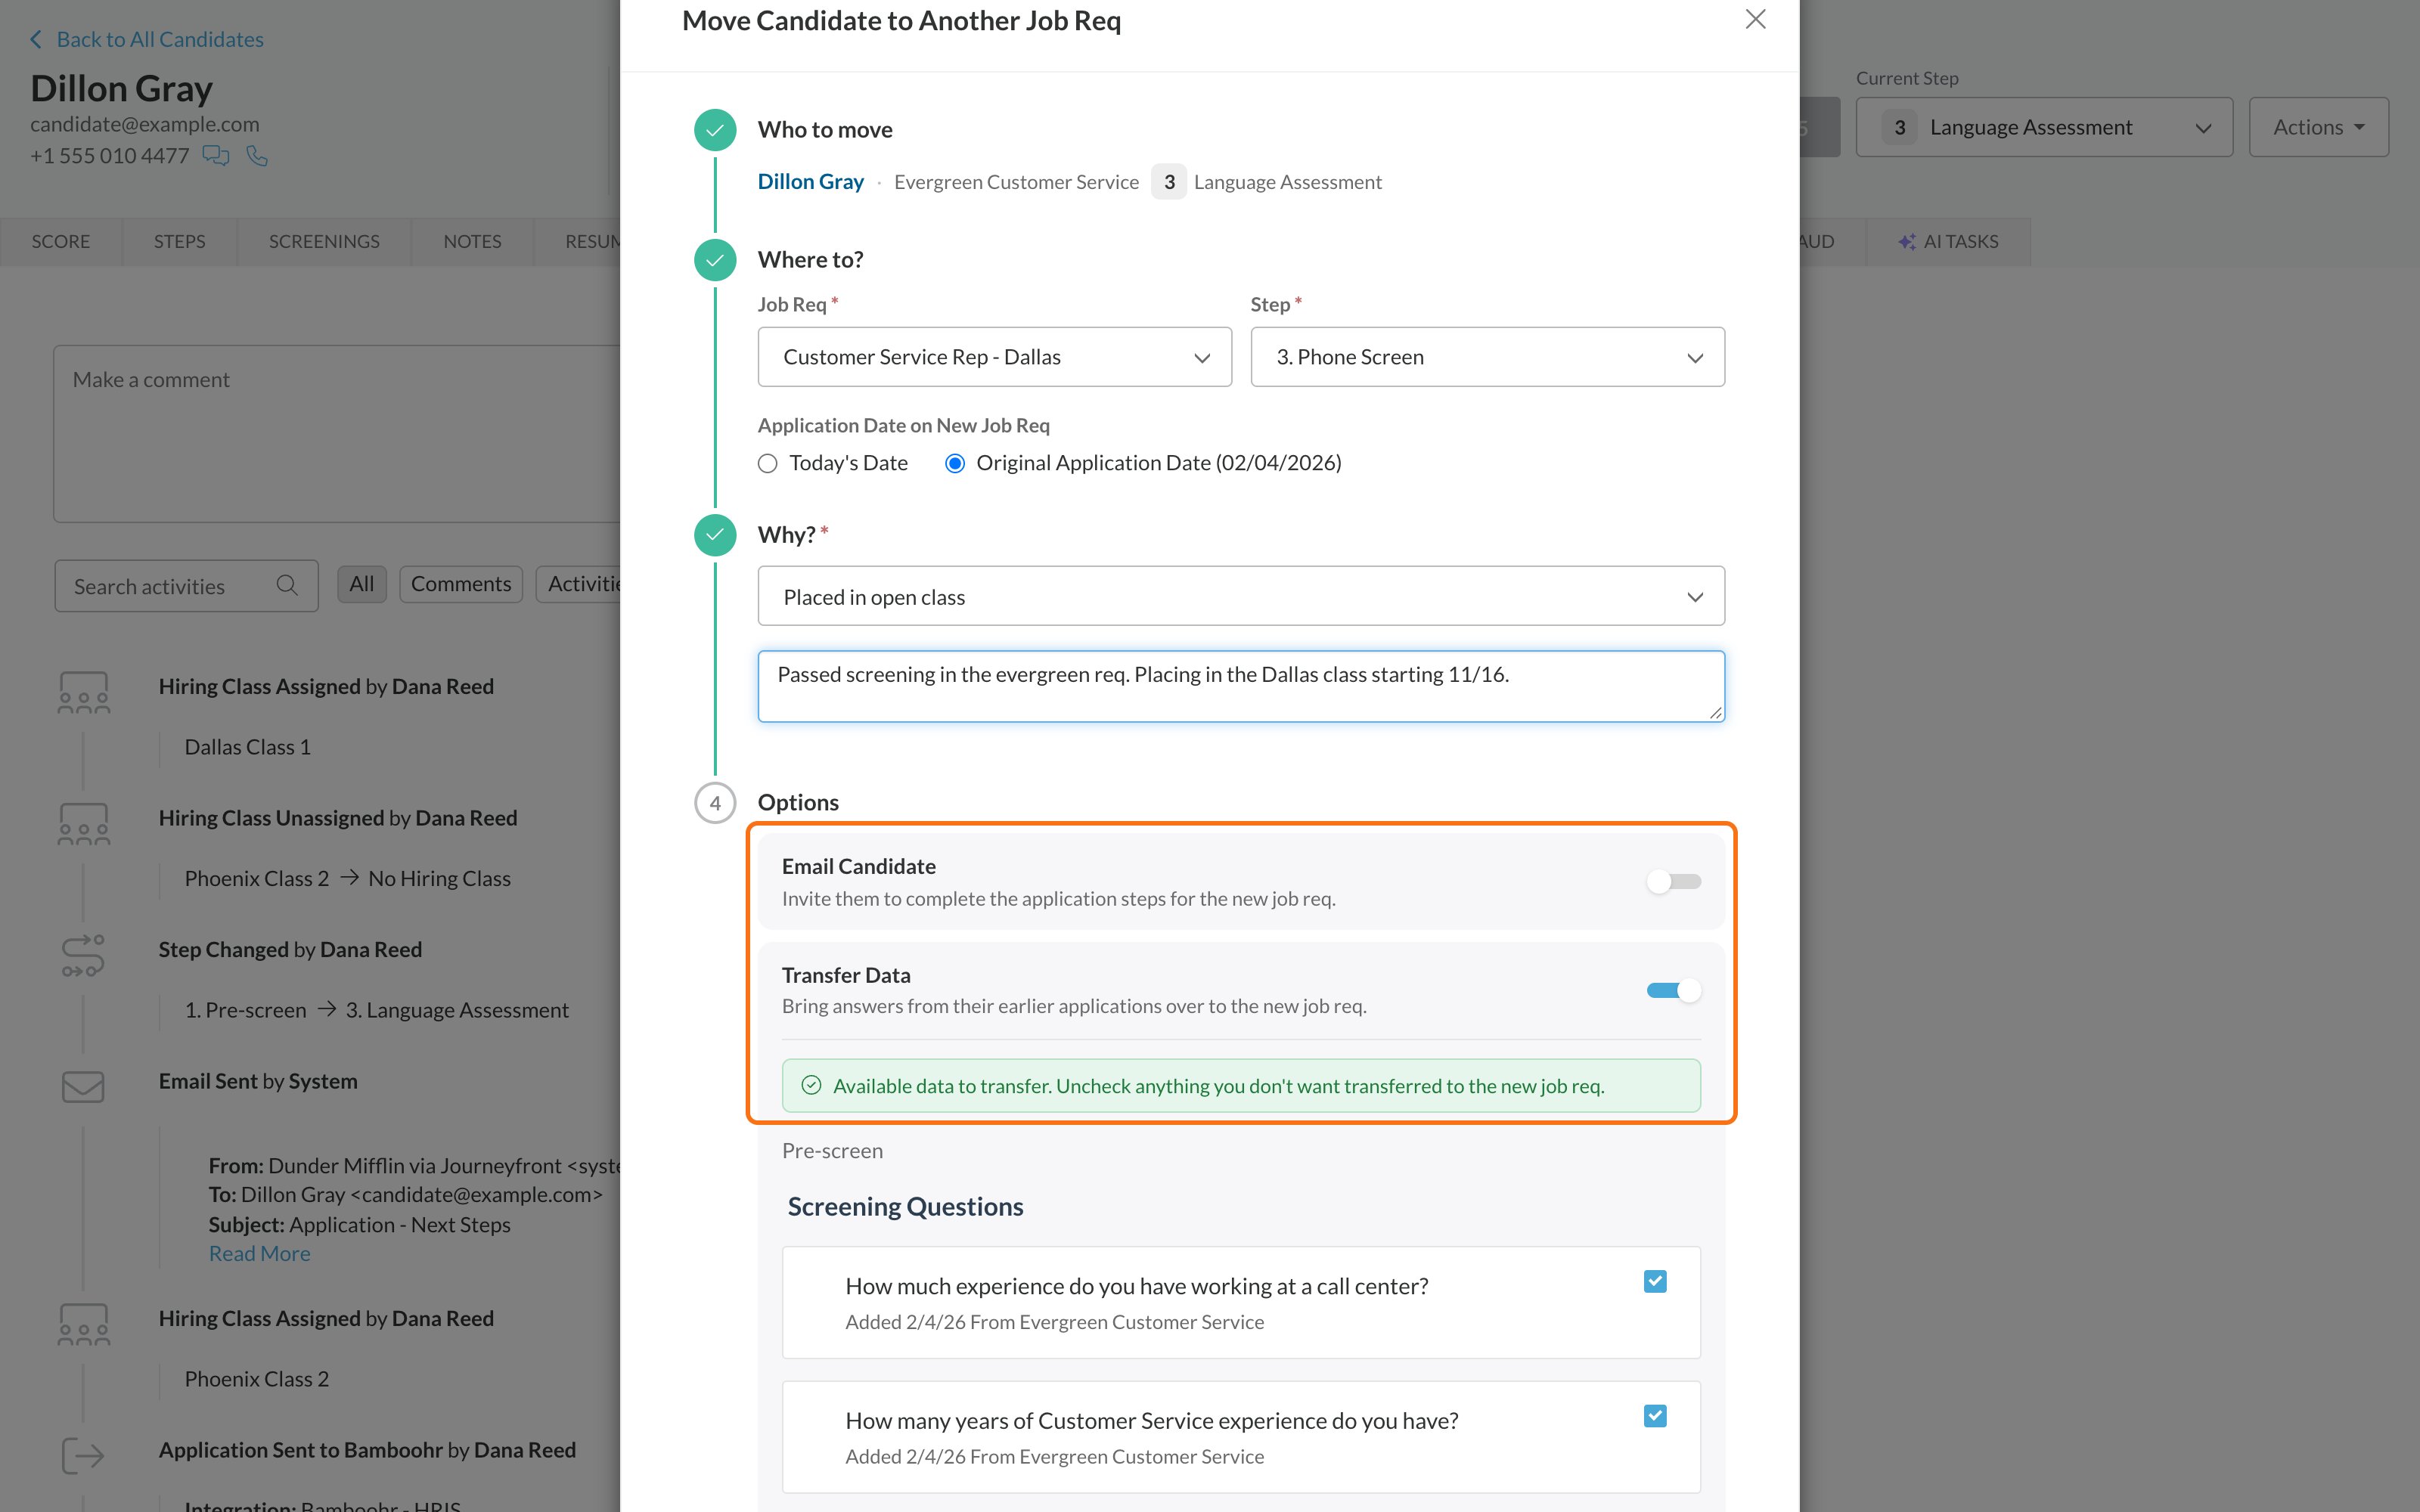
- Email Candidate: turn it on to email the candidate a link to complete the new job req’s application steps. It’s off by default.
- Transfer Data: on by default. Journeyfront checks what the candidate has already completed that matches the new job req, and ticks it for you. Untick anything you want them to do again, or turn the switch off to start fresh. If the check doesn’t finish, click Try again.
6
Click Move to Job Req
The button turns on once you’ve picked a job req, a step and (if required) a reason. When the move is done, click View in Job Req to open the new Candidate Application, or Close.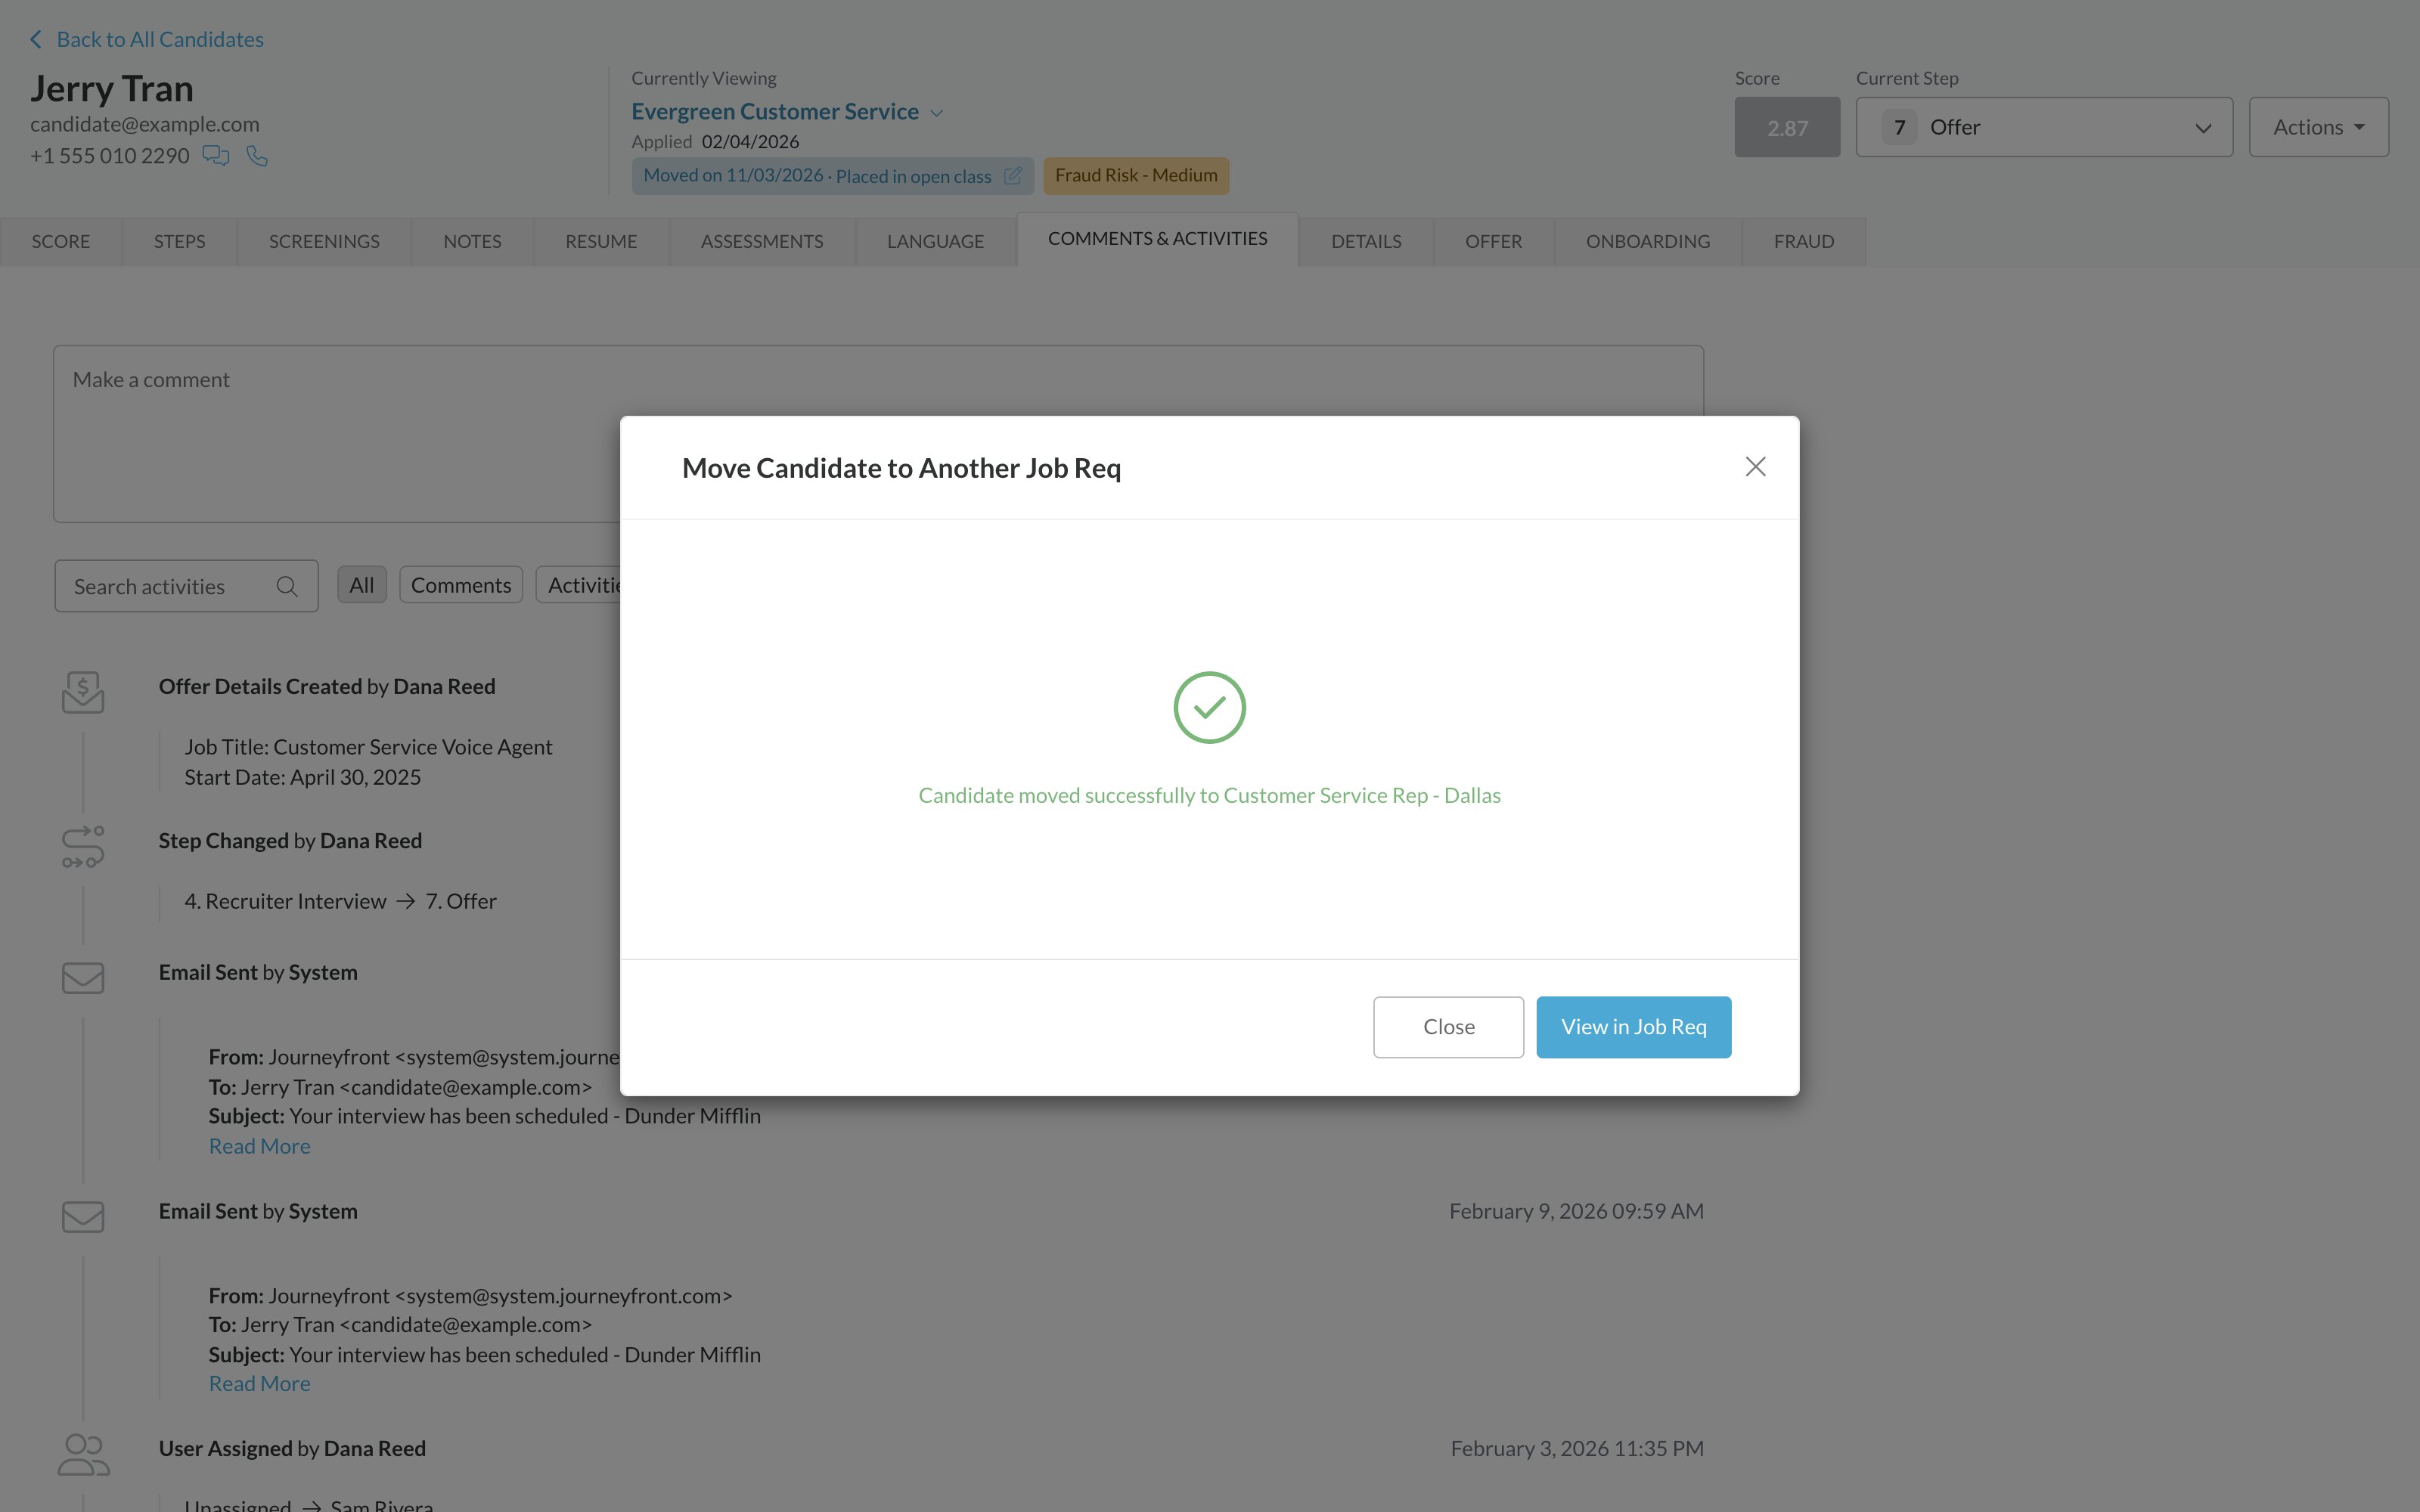
After the move
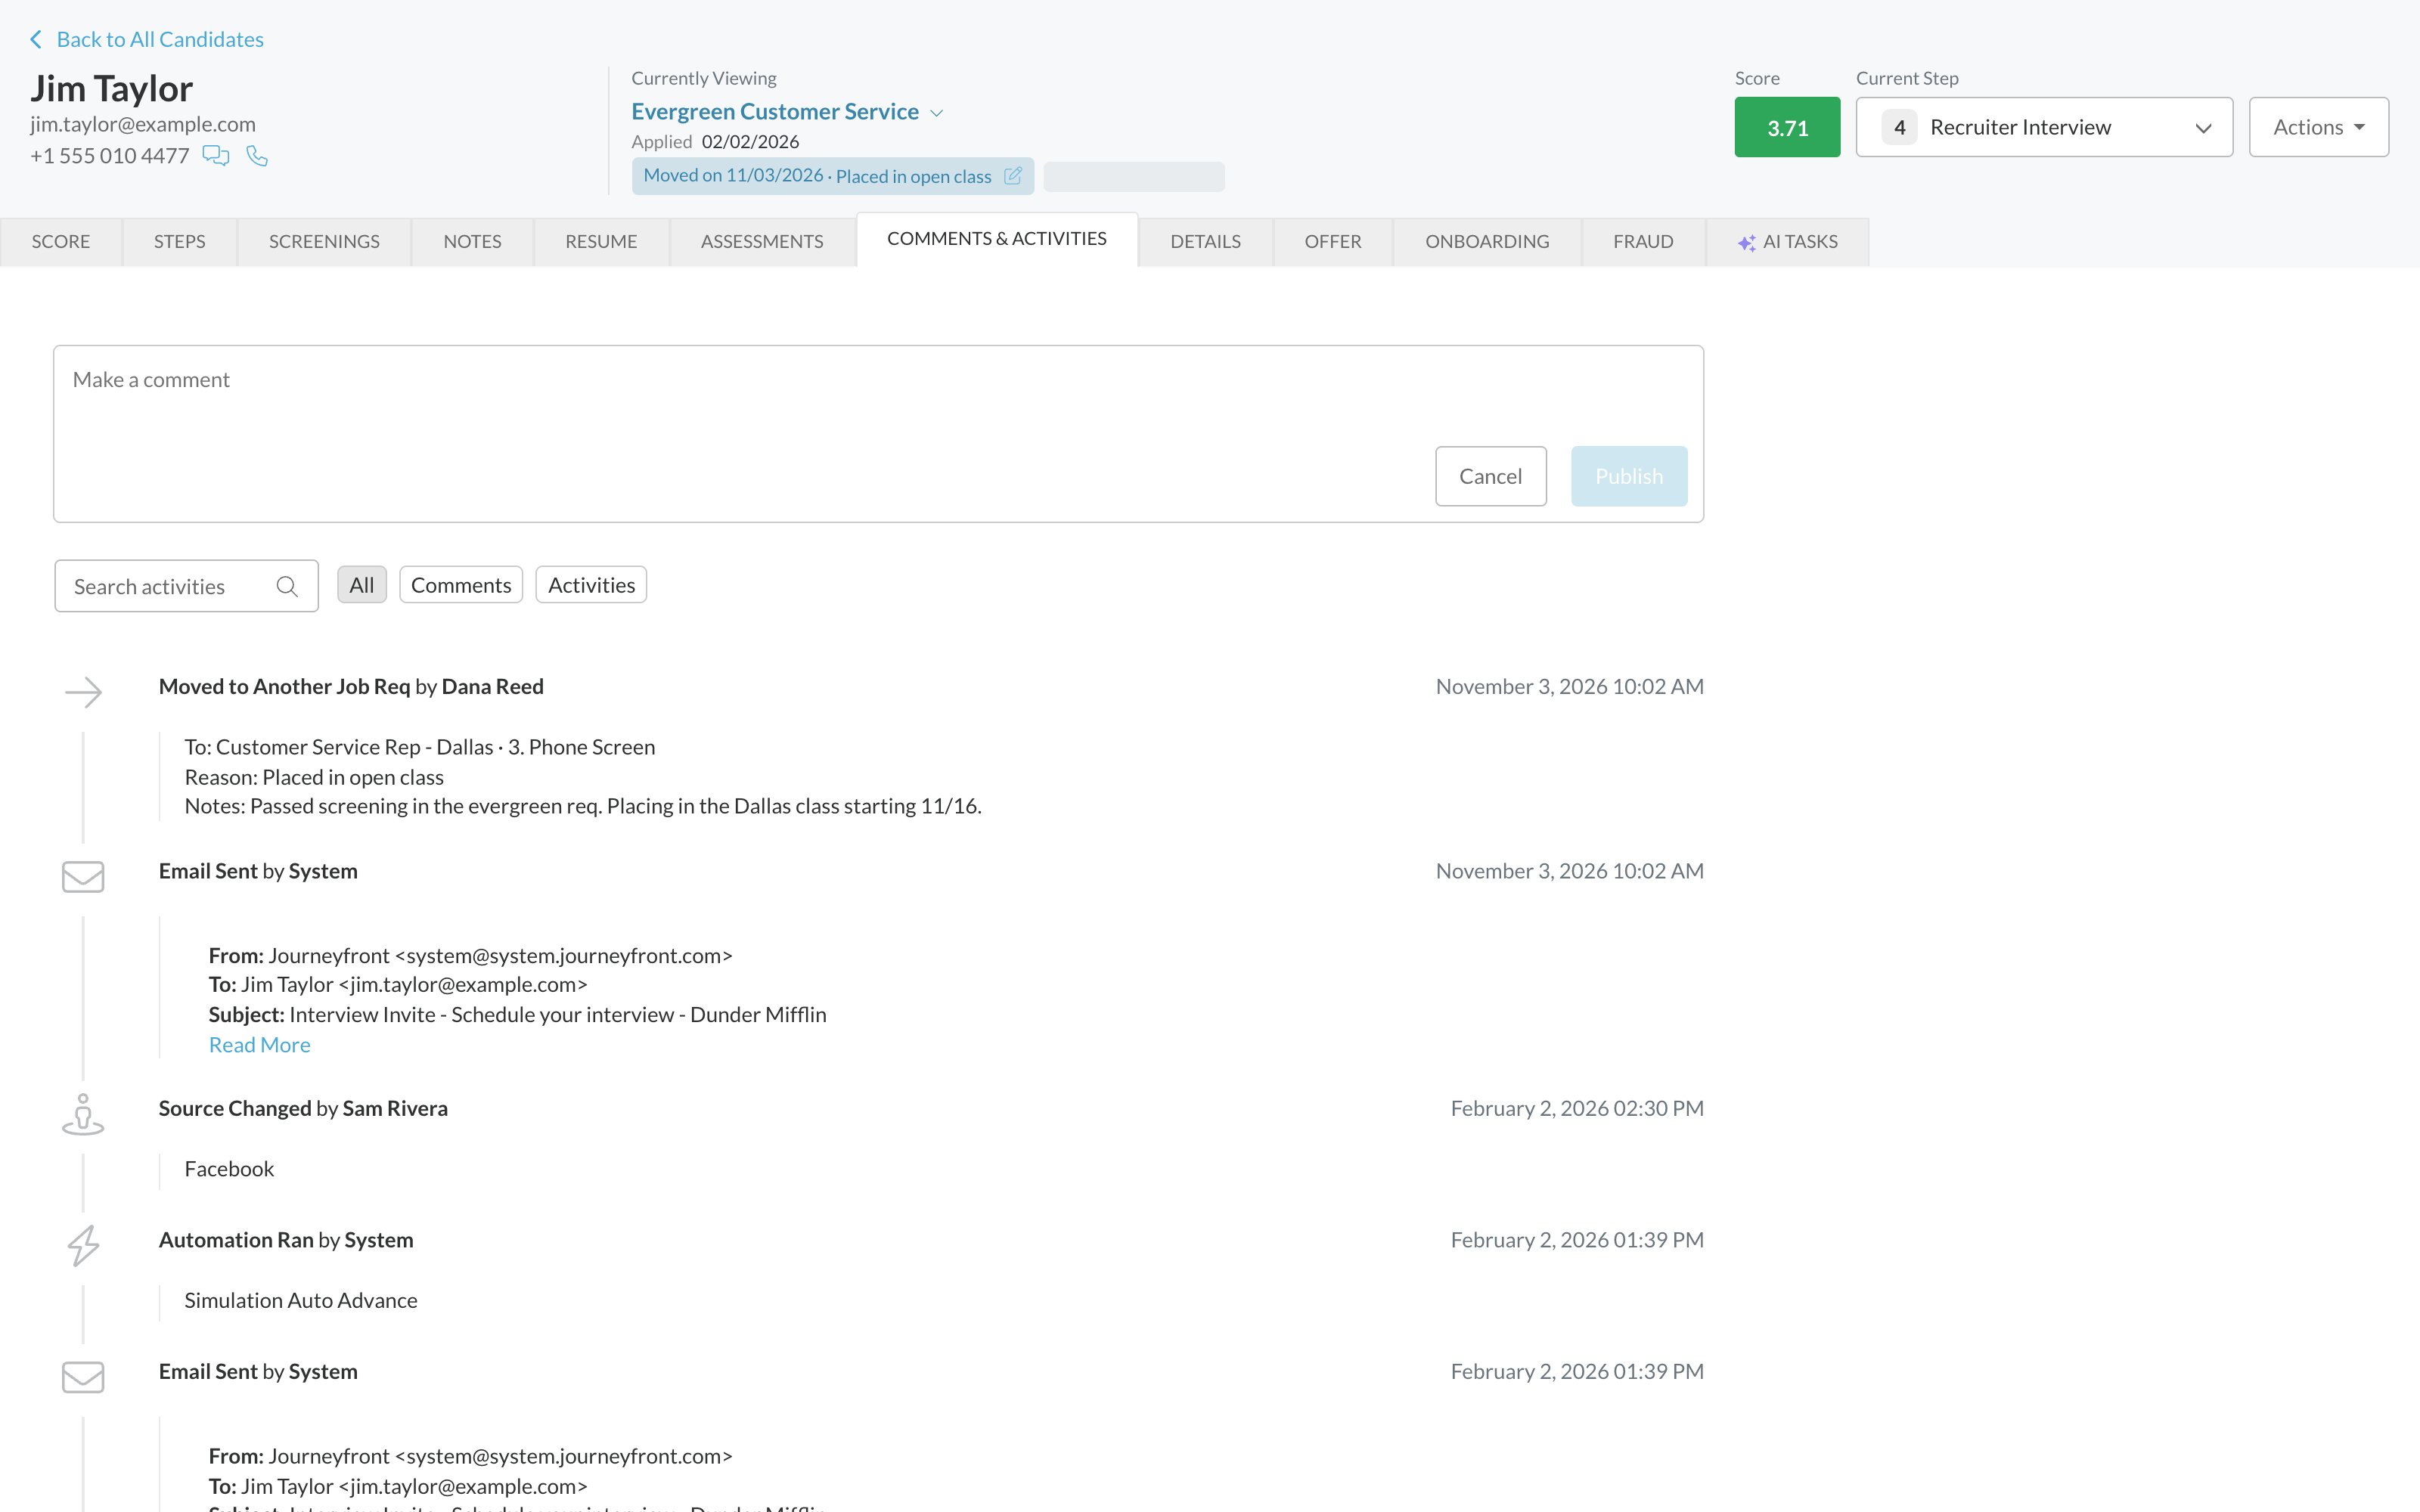
On the original application:- The status shows Moved on the move date, followed by the move reason.
- The application is closed. Its status can’t be changed, and bulk reject, Mark as New, reminder emails and automatic rejections all skip it.
- Comments & Activities shows Moved to Another Job Req, with the new job req, the step, the reason and the notes.
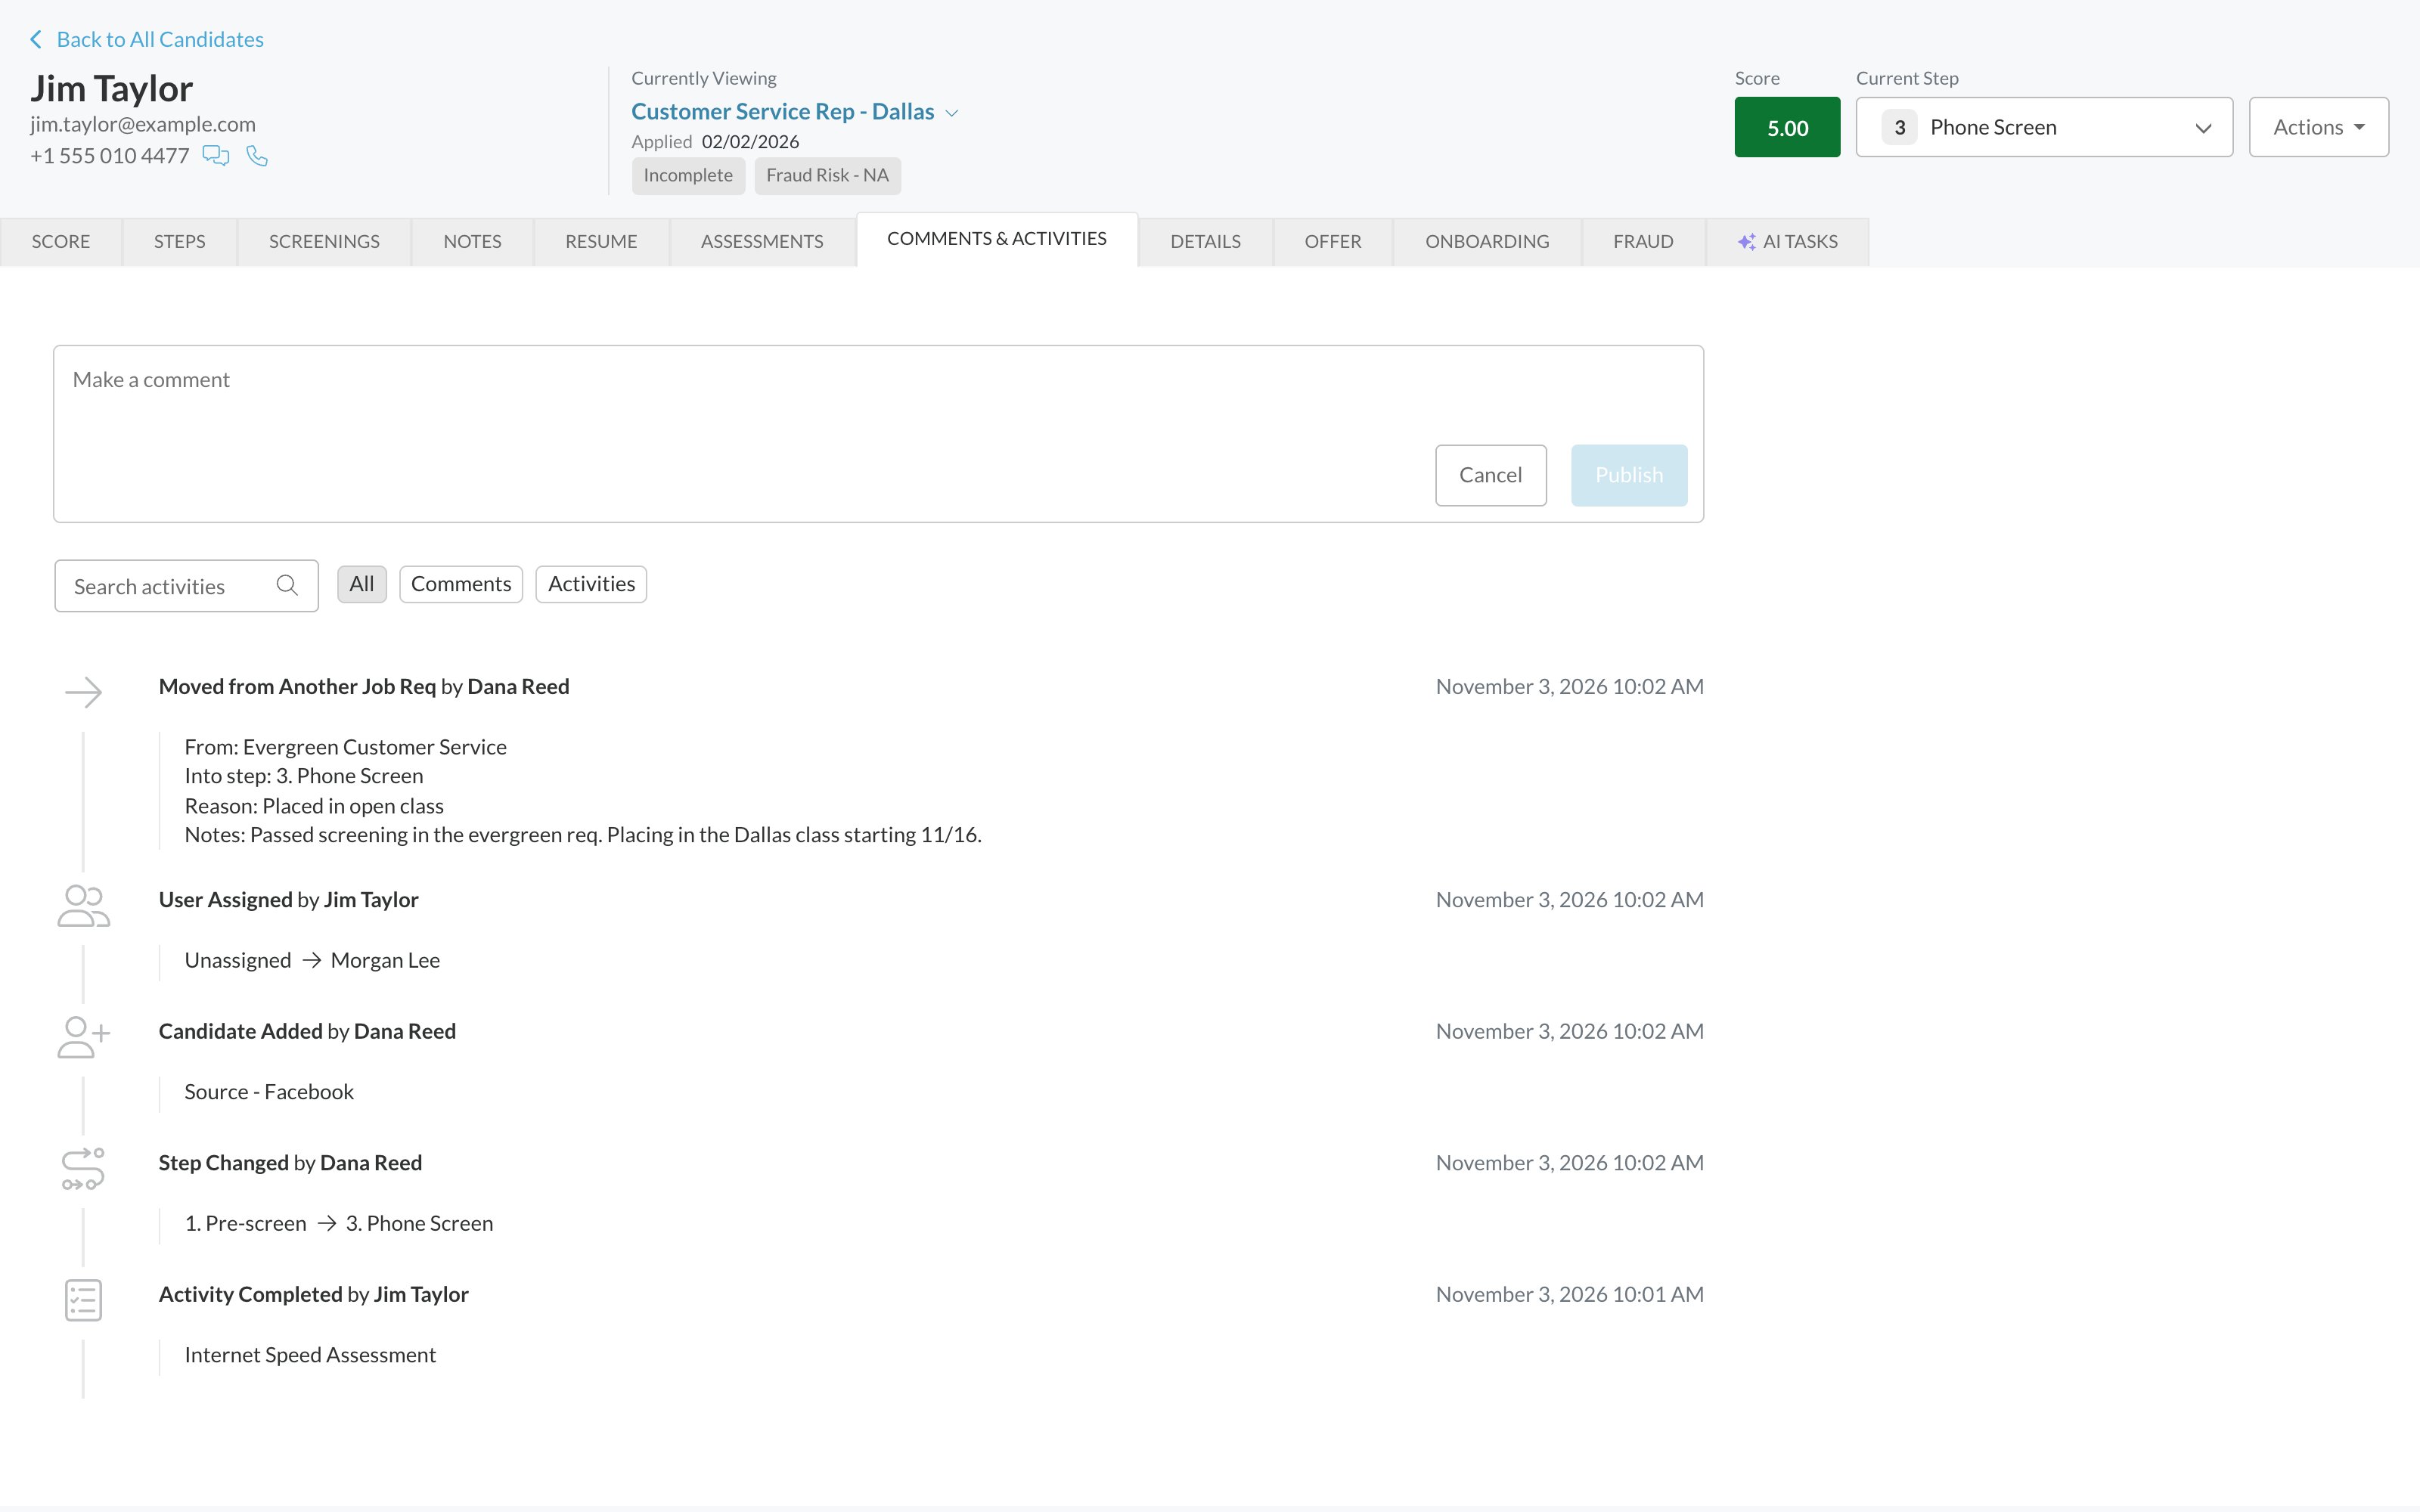
- The candidate is at the step you chose, with any transferred results already complete.
- Comments & Activities shows Moved from Another Job Req, with the same details.
- It’s a normal open application, so it moves through the new workflow like any other, and can be moved again later if needed.
Edit a move’s reason or notes
1
Open the original application
Open the Candidate Application the candidate was moved out of.
2
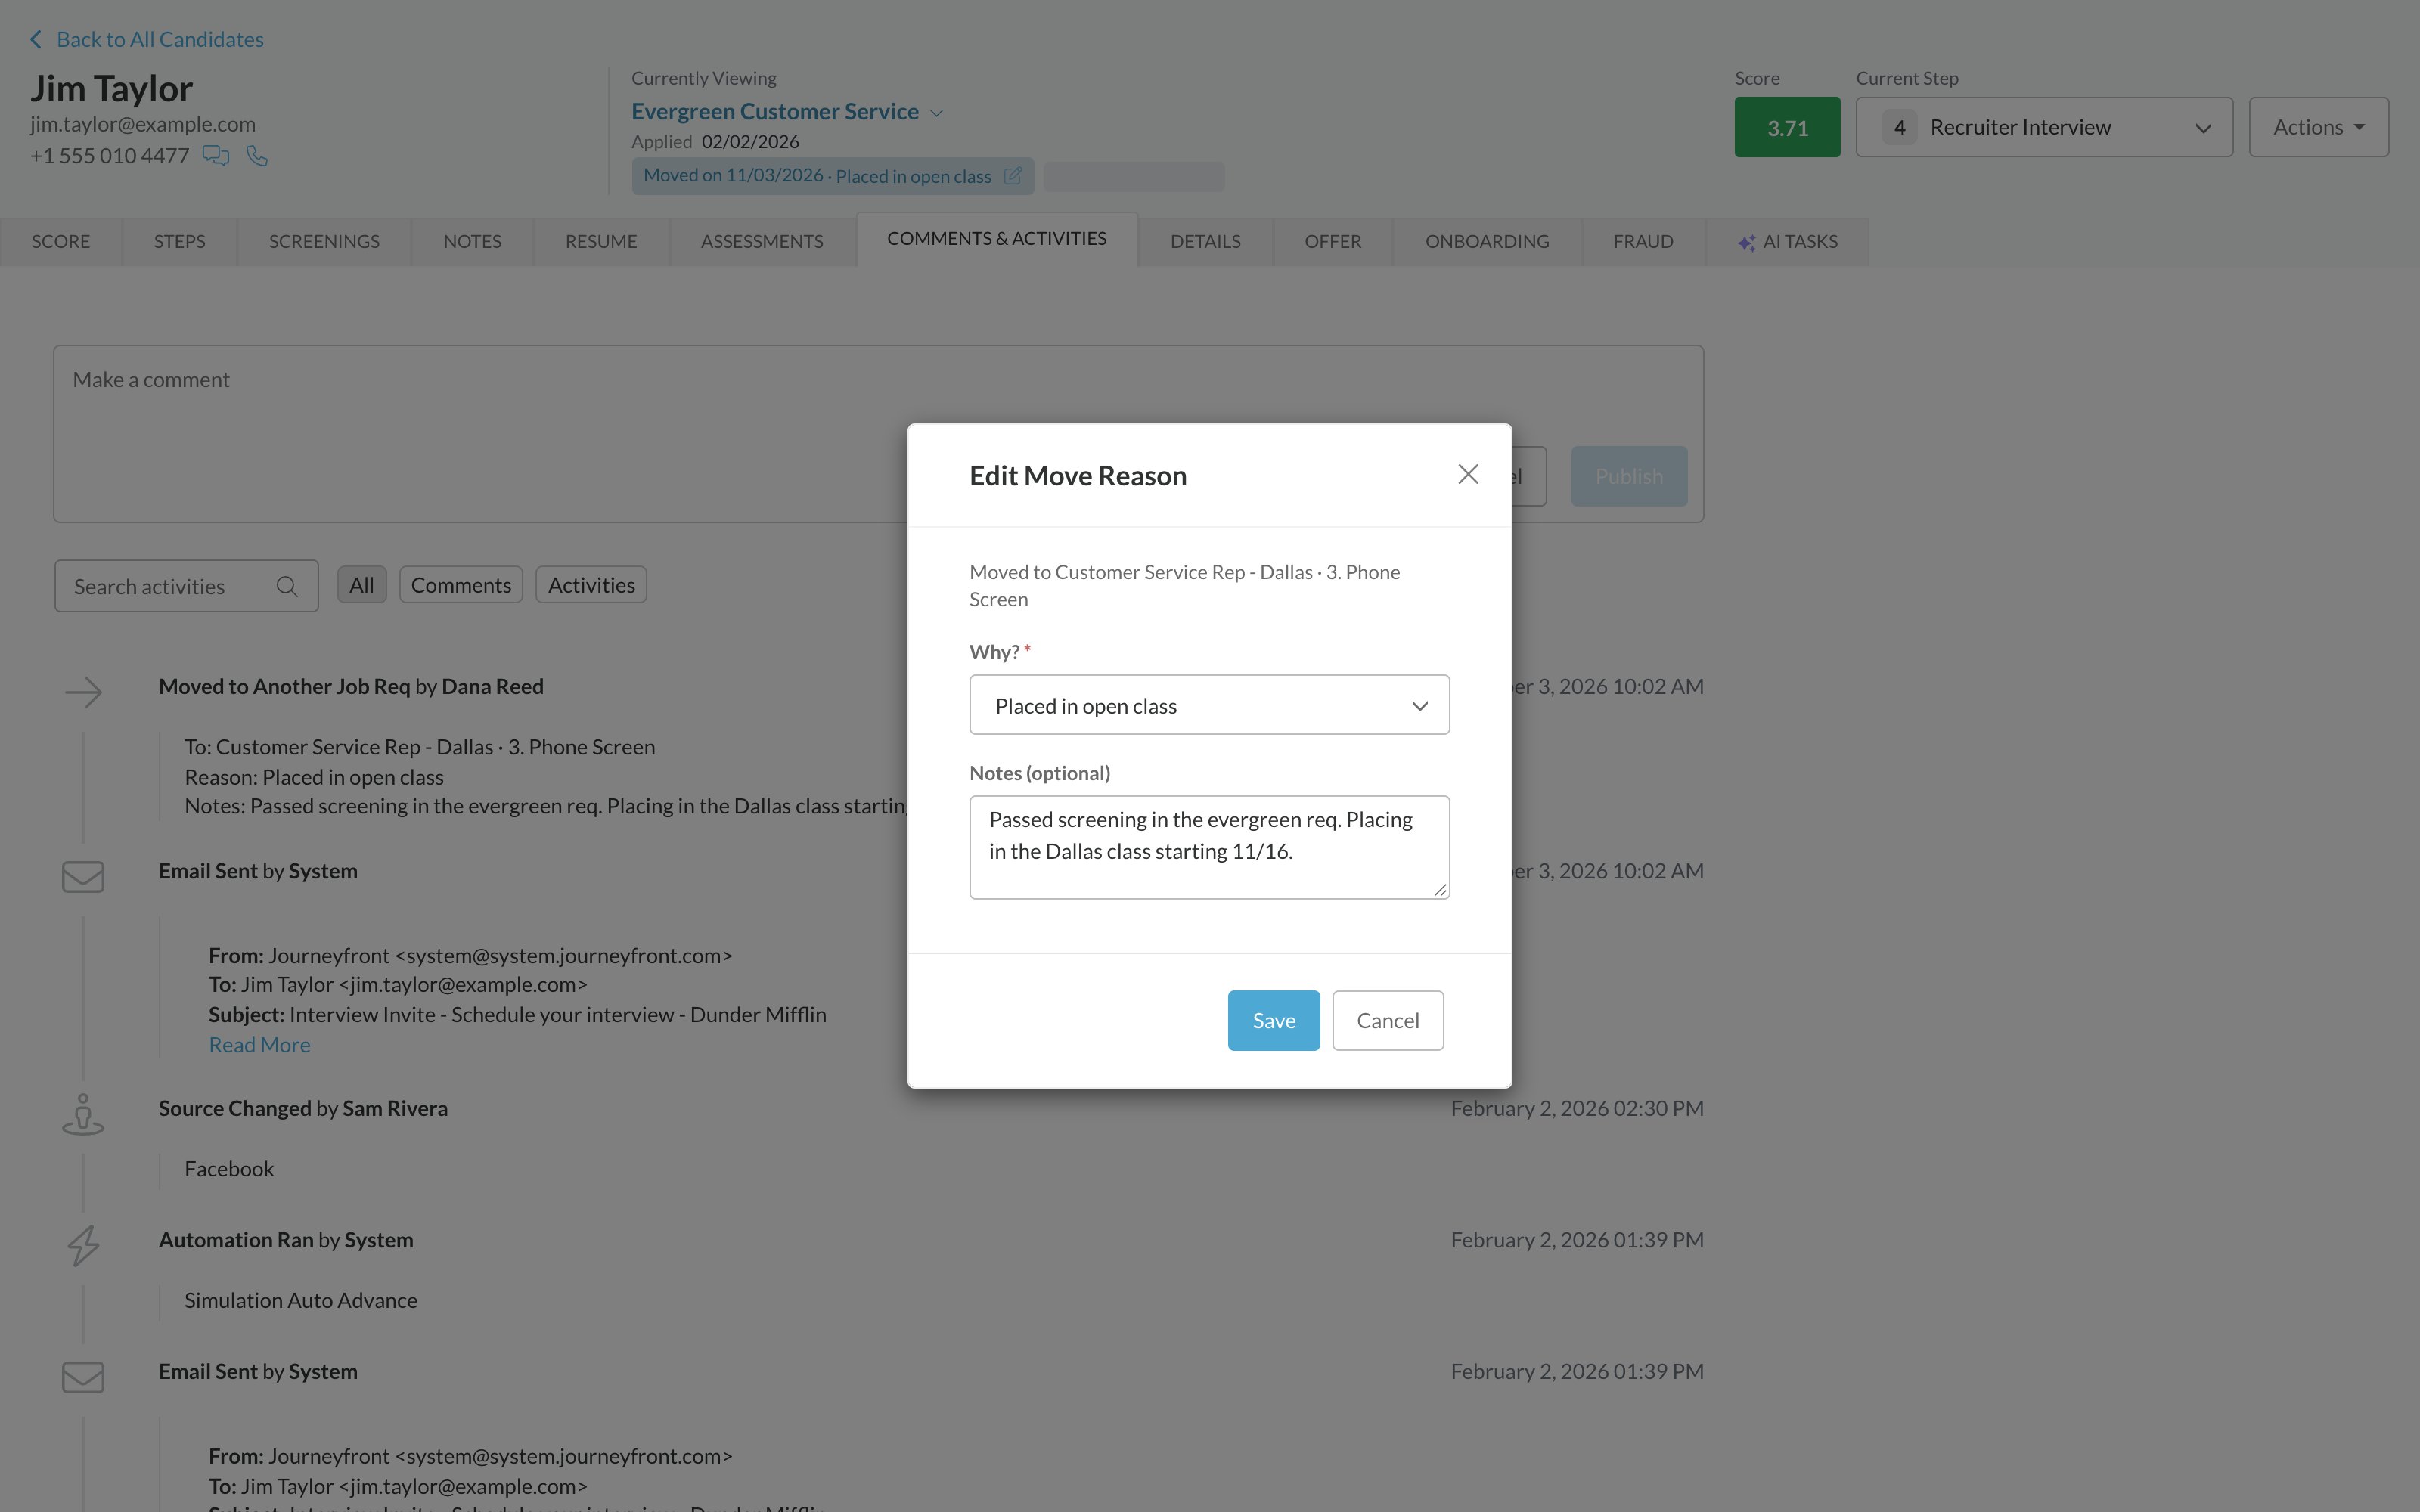
Click the pencil next to Moved
The Edit Move Reason window opens and shows where the candidate was moved to.
3
Change the reason or notes and click Save
The change is recorded in Comments & Activities on both applications, showing the old and new values.
Find moved candidates on the Candidates page
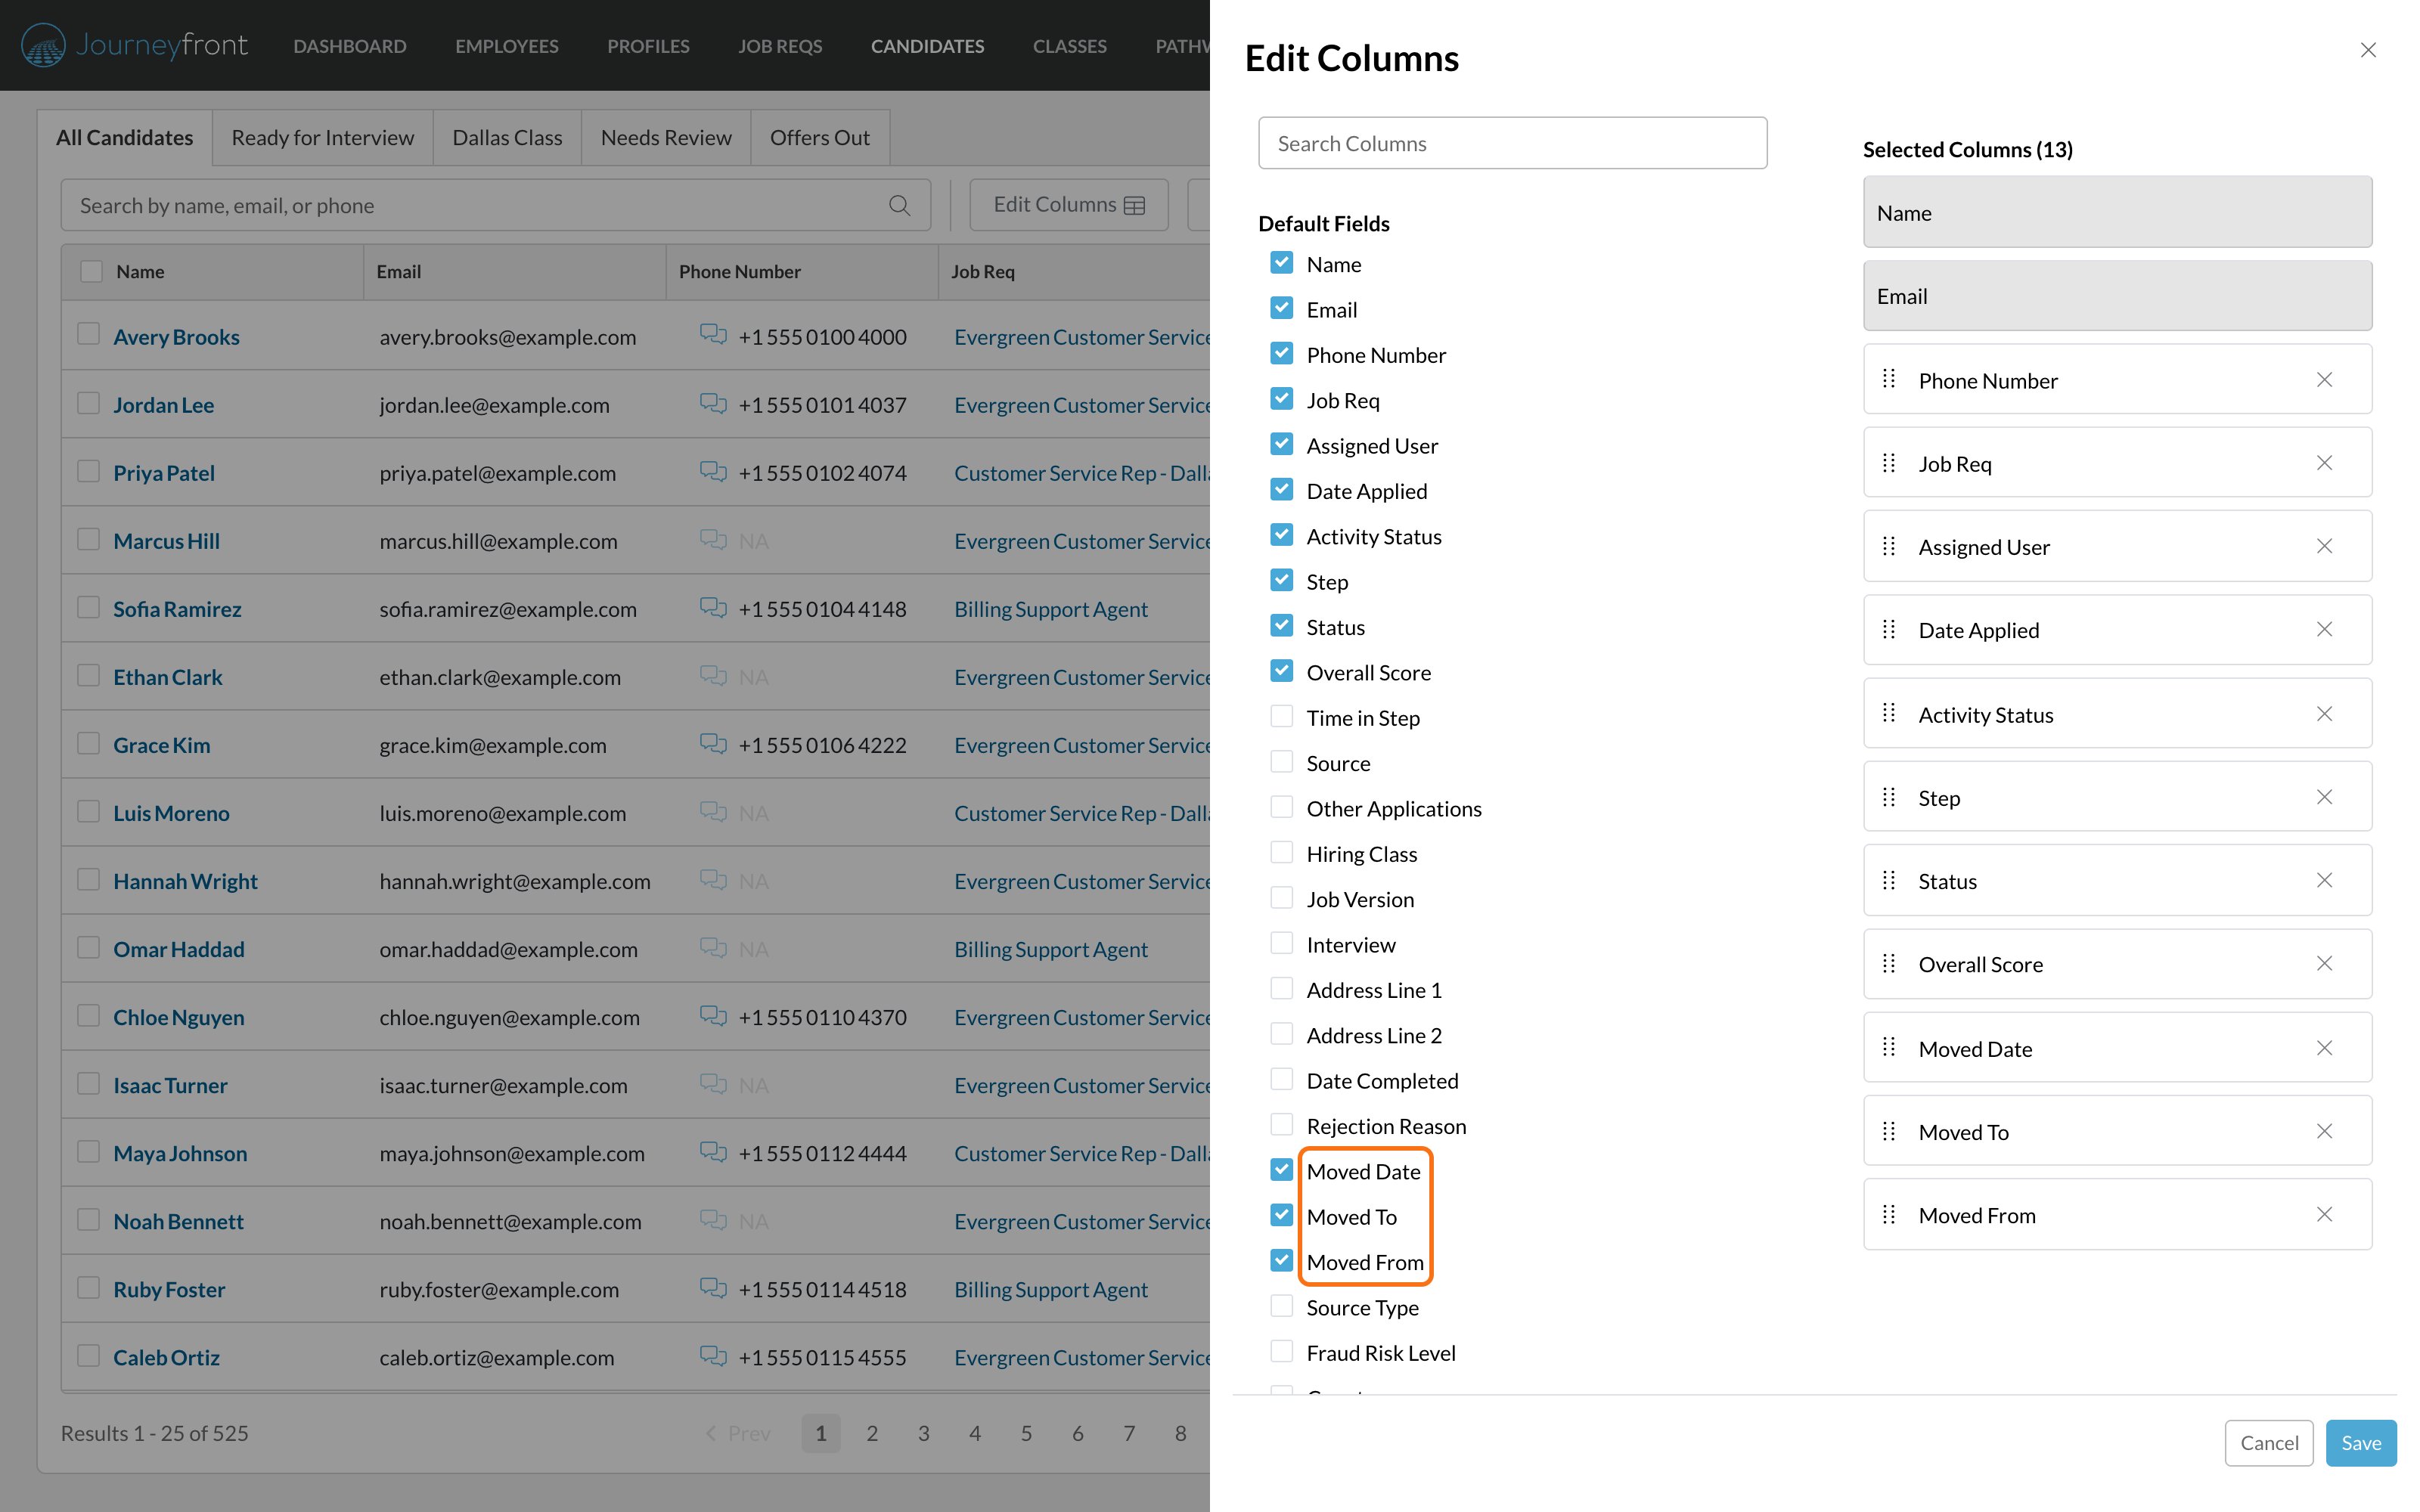
On the Candidates page, moved applications have the status Moved. Hover over it to see the move date, the job req and step they moved to, the reason and the notes. Three columns are available from Edit Columns:
You can sort and filter by all three, and they’re included when you export data.
Set up move reasons
Move reasons keep your team’s moves consistent and make it easy to see later why candidates moved. Go to Settings, then Custom Options, then Move Reasons.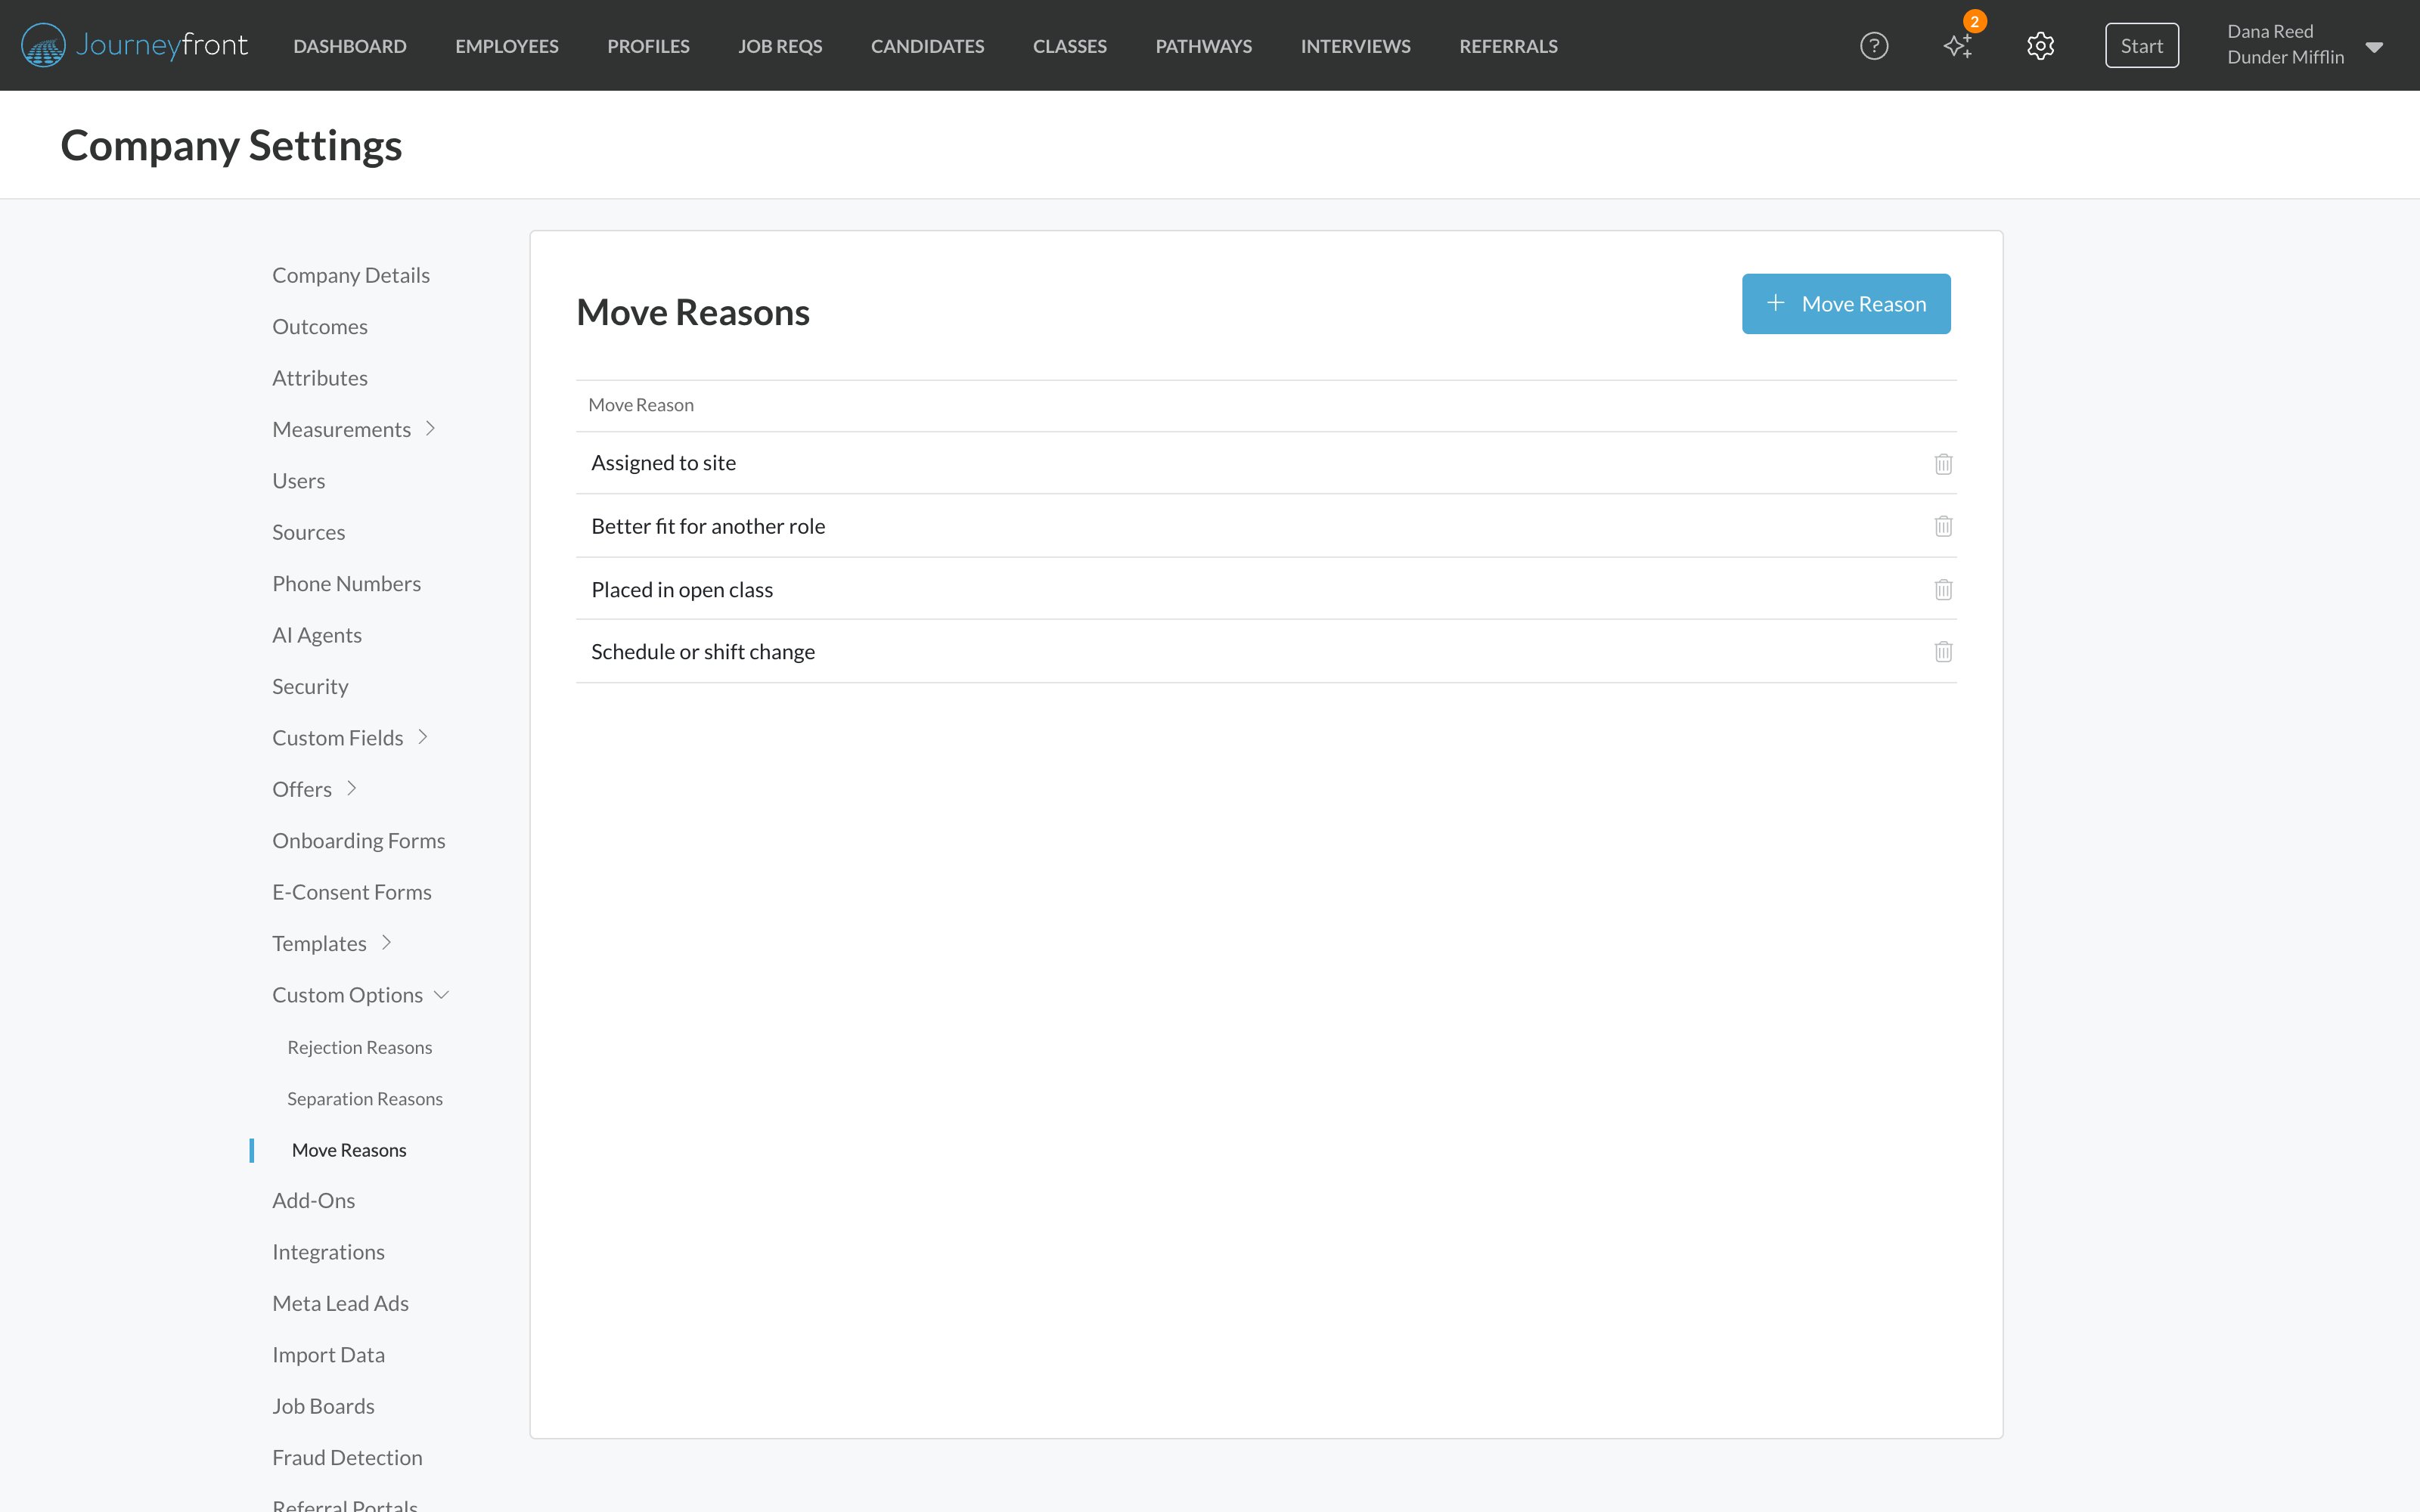
- Add: click + Move Reason, type the reason and click Save.
- Rename: click the reason, change it and click Save.
- Delete: click the trash icon and confirm. The reason is no longer offered when moving a candidate. Moves that already used it keep it.
FAQ
What's the difference between Move and Add to Job Req?
What's the difference between Move and Add to Job Req?
Move closes the candidate’s current application as Moved and continues their hiring process on the new job req. Add to Job Req leaves the current application as it is and gives them a second one, so both are on file. Move when the new job req is the next step in their journey; add when you’re starting something new. See Move or add to another job req?
The candidate didn't pass this job req. Should I move them or reject them?
The candidate didn't pass this job req. Should I move them or reject them?
If you want the rejection on their record, reject them, then add them to the other job req. Move them only when the new job req is simply a better place for them to continue, and a rejection wouldn’t tell the real story.
Can I move a rejected or past candidate?
Can I move a rejected or past candidate?
No. Move only works on open applications. To bring a past candidate into a new job req, use Add to Job Req, which works whatever the status of their earlier application.
I added a candidate when I meant to move them. Can I fix it?
I added a candidate when I meant to move them. Can I fix it?
You can’t turn an add into a move, and Move won’t work now because they already have an application on that job req. Their original application is still open, so close it the way your team normally would.
Does a moved candidate count as rejected?
Does a moved candidate count as rejected?
No. Moved is its own status, separate from Rejected, so your rejection numbers aren’t affected.
Does the candidate get an email?
Does the candidate get an email?
Only if you turn on Email Candidate. That email invites them to continue on the new job req. Moving never sends a rejection email.
Why isn't a job req in the list?
Why isn't a job req in the list?
The list only shows open job reqs you have access to, and leaves out the job req the candidate is already on. Inactive, closed and archived job reqs aren’t listed.
Why can't I move this candidate to a job req?
Why can't I move this candidate to a job req?
A candidate can’t be moved to a job req they already have an application on, including one they were moved out of. If that job req has Allow Re-Takes with a waiting period and the candidate applied there recently, the move is blocked until the waiting period passes.
Can I move several candidates at once?
Can I move several candidates at once?
Not with Move. You move one candidate at a time from their Candidate Application. To add a group to another job req without closing their current applications, use Add to Other Req in Bulk actions.
Can I undo a move?
Can I undo a move?
No. A moved application’s status can’t be changed, and the candidate can’t be moved back to the job req they came from, because they still have an application there. If the move was a mistake, you can move them on to a different job req, or reject the new application.
Which date does the new application use?
Which date does the new application use?
The one you chose under Application Date on New Job Req: today’s date, or the date of their original application. That date is used on the Candidates page, in exports and in reports.
Related
Add a candidate to another job req
Consider a candidate for a second role and keep both applications open.
Reject candidates
Close an application with a rejection reason.
Candidate Profiles and Candidate Applications
One person, many applications.
Hiring classes overview
Group hires who start together.