

Who can do this: Admins with Company Settings Access link and manage lead forms, under Settings, then Meta Lead Ads, or from a job req’s Setup tab (which also needs Manage Job Req Settings). Recruiters work with lead ad candidates like any other applicant.Availability: Lead ads need to be turned on for your account. Ask your Customer Success Manager.
Supported platforms
Journeyfront brings in lead ads from Meta: lead forms on your Facebook Pages, whether the lead was submitted on Facebook, Instagram, Messenger or the Audience Network. An admin connects your Meta Business account once, and your forms then appear under Settings, then Meta Lead Ads.Connect Meta Lead Ads
Connect your Meta Business account and choose the Pages whose lead forms come into Journeyfront.
How it works
- You build the lead form and ad in the platform’s ads manager, as you normally would.
- You link the form to a job req in Journeyfront and map its questions to your fields and screening questions.
- Someone submits the form. Journeyfront creates a Candidate Application on the linked job req. It starts at the beginning of the job req’s workflow, like any other applicant.
- The candidate gets one invitation email, if you turned it on, to finish the full application.
Link a lead form to a job req
Go to Settings, then Meta Lead Ads. Your lead forms appear automatically. Journeyfront checks for new forms every day; click Refresh from Meta to check now.1
Open the form's menu
Find the form and open its actions menu, then choose Connect to job req.
2
Pick the job req
In Job req, choose where new candidates should go. A form links to one job req at a time.
3
Check the source
By default, the source is set from where each lead was submitted. To use one of your own sources instead, click Add source override. See Sources for lead ad candidates.
4
Choose whether to send an invitation
Send application invitation email is on by default. Each new candidate gets one email with a link to finish their application.
5
Connect
Click Connect.
Link a form from the job req
You can also work from the job req. Open it, go to Setup, then Lead Ads. The tab lists every form linked to this job req with its status, Page, source, when it was linked and when it last synced, plus the Send application invitation email switch for each form.1
Open the picker
Click Link a form.
2
Find the form
Search by form name, ID or Page. Available lists forms that aren’t linked yet; Linked to other reqs lists forms already feeding another job req.
3
Link it
Click Link. For a form on another job req, click Link here, then Link to this job req to move it. Future leads come to this job req instead; leads already brought in on the other job req aren’t affected.
Map the form’s questions
Mapping tells Journeyfront where each answer on your lead form should go.1
Open the mapping
In the form’s actions menu, choose Edit field mapping.
2
Review the suggestions
Each form question is listed with a suggested destination. Contact questions like full name, email and phone are matched automatically, and questions whose wording matches a screening question on the job req are matched to that question.
3
Adjust anything that's off
Send an answer to a standard field, a personal or application field, a screening question on the job req, or choose Don’t import. For multiple-choice questions, match each form answer to a Journeyfront answer.
4
Save
Name and email must be mapped before you can save. Click Save mappings.
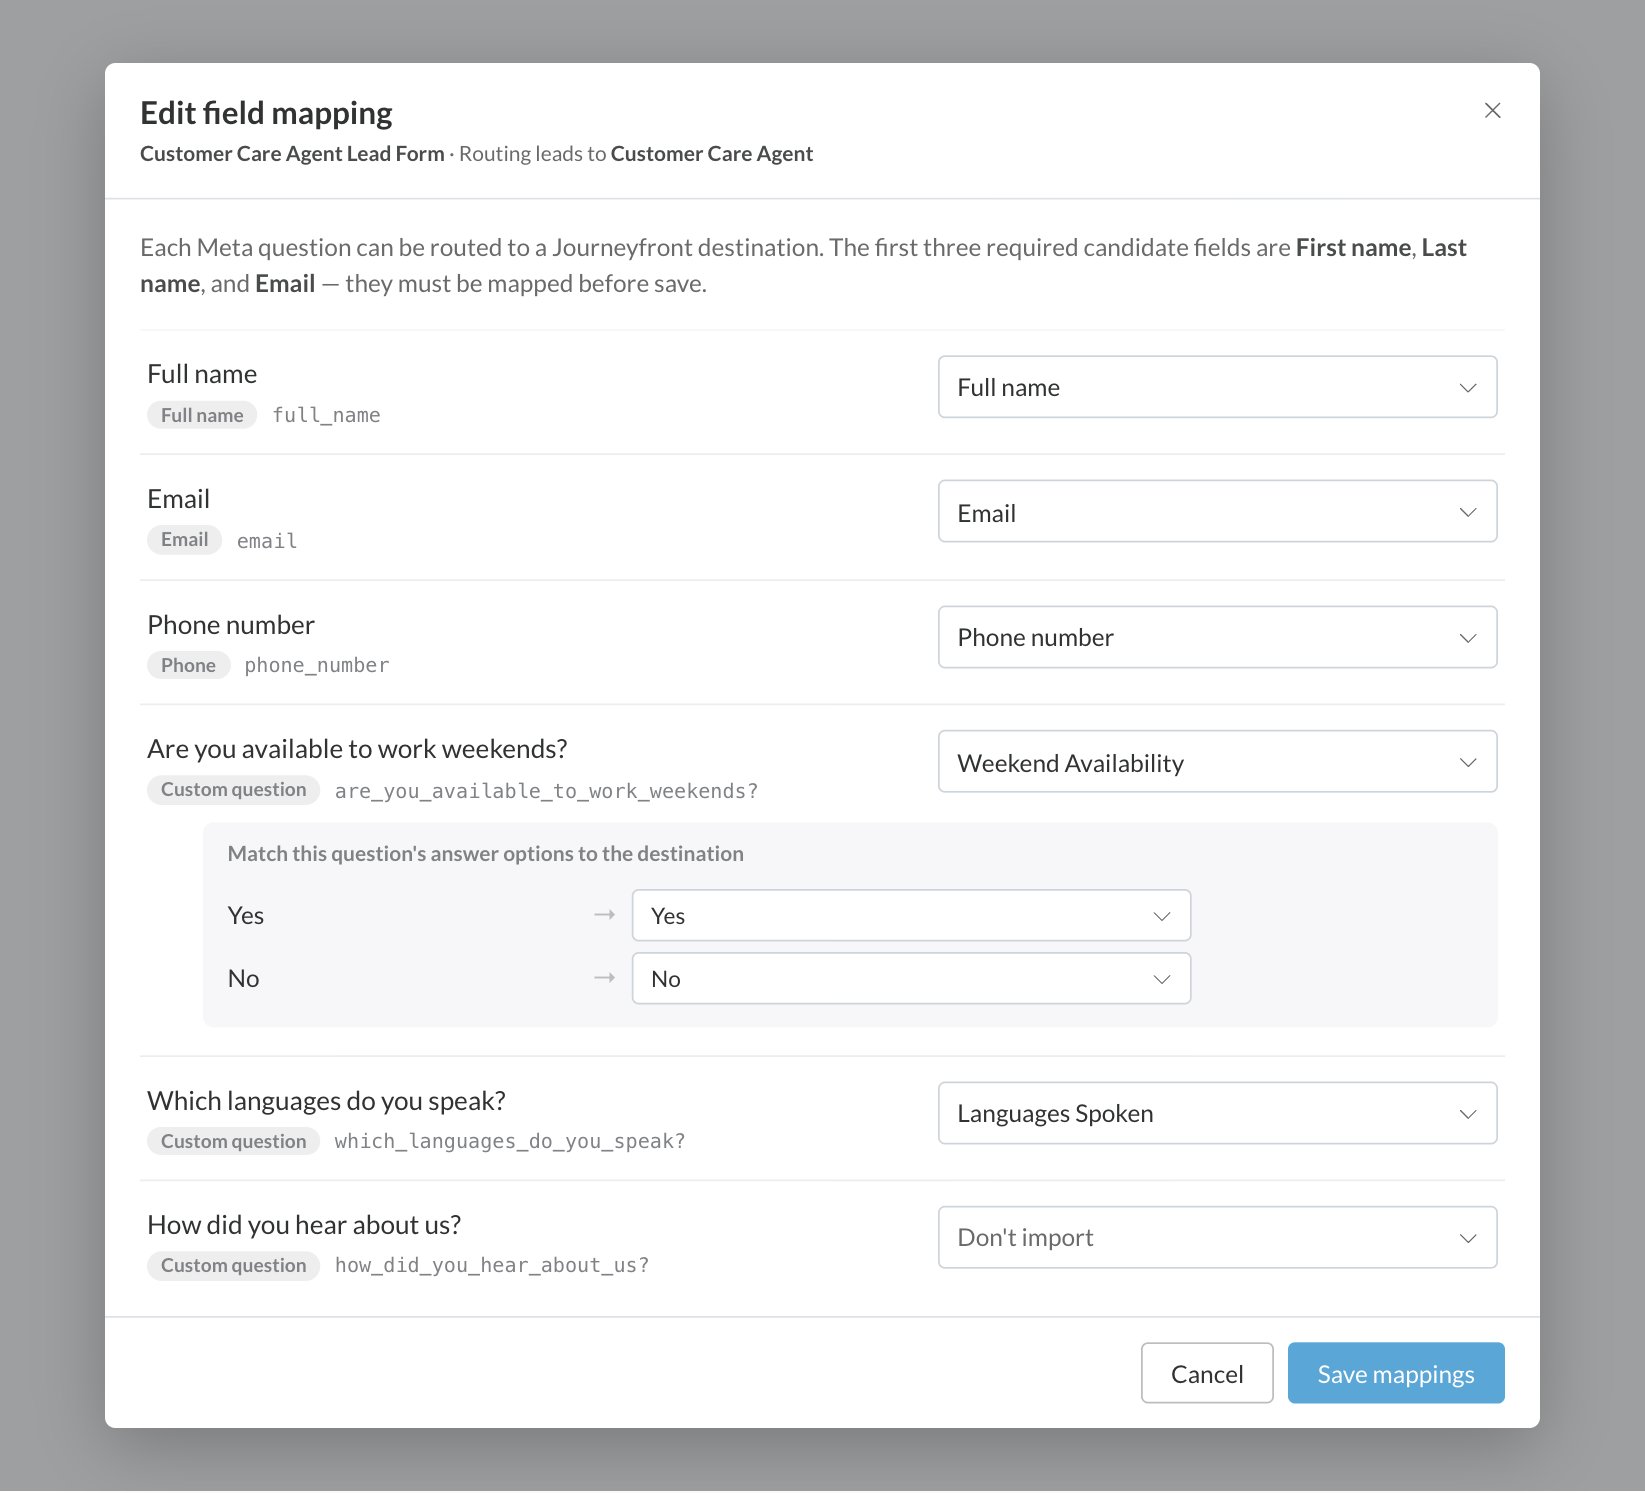
- Apply auto-map appears when your choices differ from the suggestions. Click it to go back to the suggestions.
- Click the info icon next to a screening question to preview the full question before you map to it.
- If a question changes on the lead form later, its row is flagged so you know to check it. The other rows stay as they are.
Sources for lead ad candidates
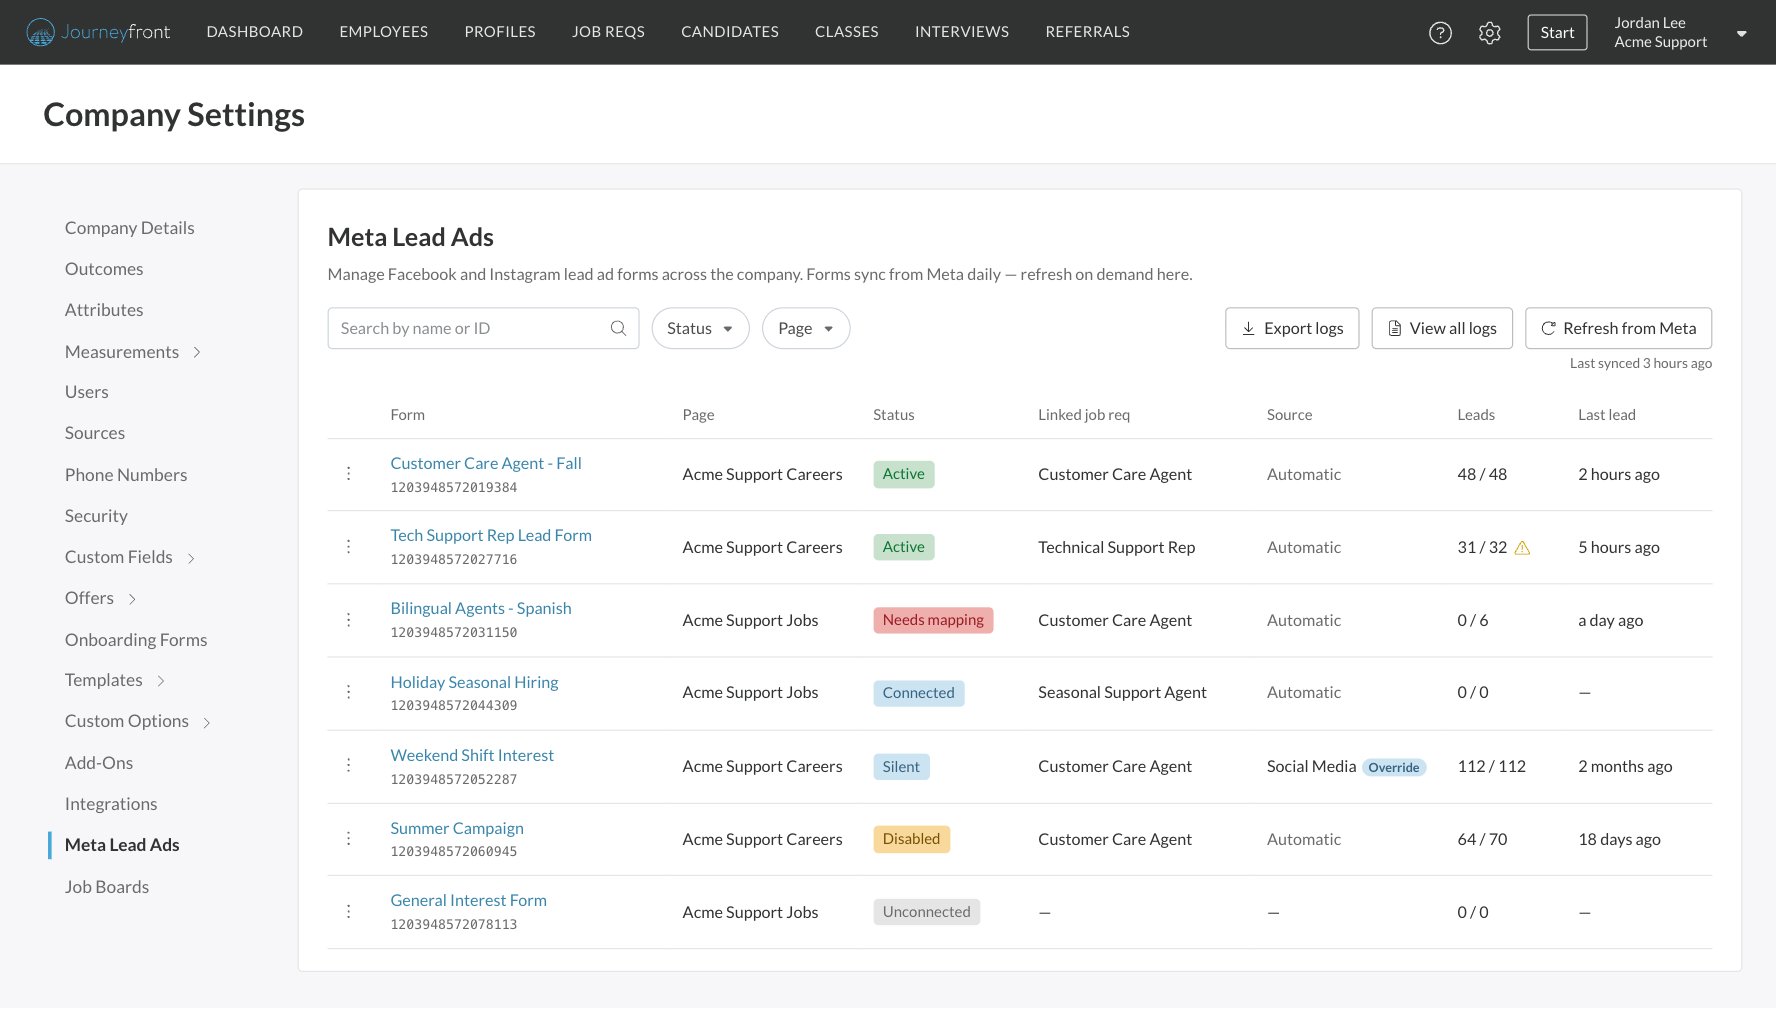
By default, each lead’s source is set from where it was submitted: Meta Lead Ad - Facebook, Meta Lead Ad - Instagram, Meta Lead Ad - Messenger or Meta Lead Ad - Audience Network. The form shows Automatic as its source. To give every lead from a form one source of your own, for example to compare two campaigns, choose Edit source from the form’s menu and pick it. The source then shows an Override badge. Sources are managed under Settings, then Sources.Sources
Add your own sources and see how a candidate’s source gets set.
Form statuses
The Meta Lead Ads page lists every form with its status. Hover over a status to see what it means for that form.
The list also shows each form’s Page and a Leads count (imported out of received). A warning icon on the count means some leads haven’t made it in; hover over it for details. Use the search box, the Status and Page filters, and Refresh from Meta to find what you need.
Check a form’s health
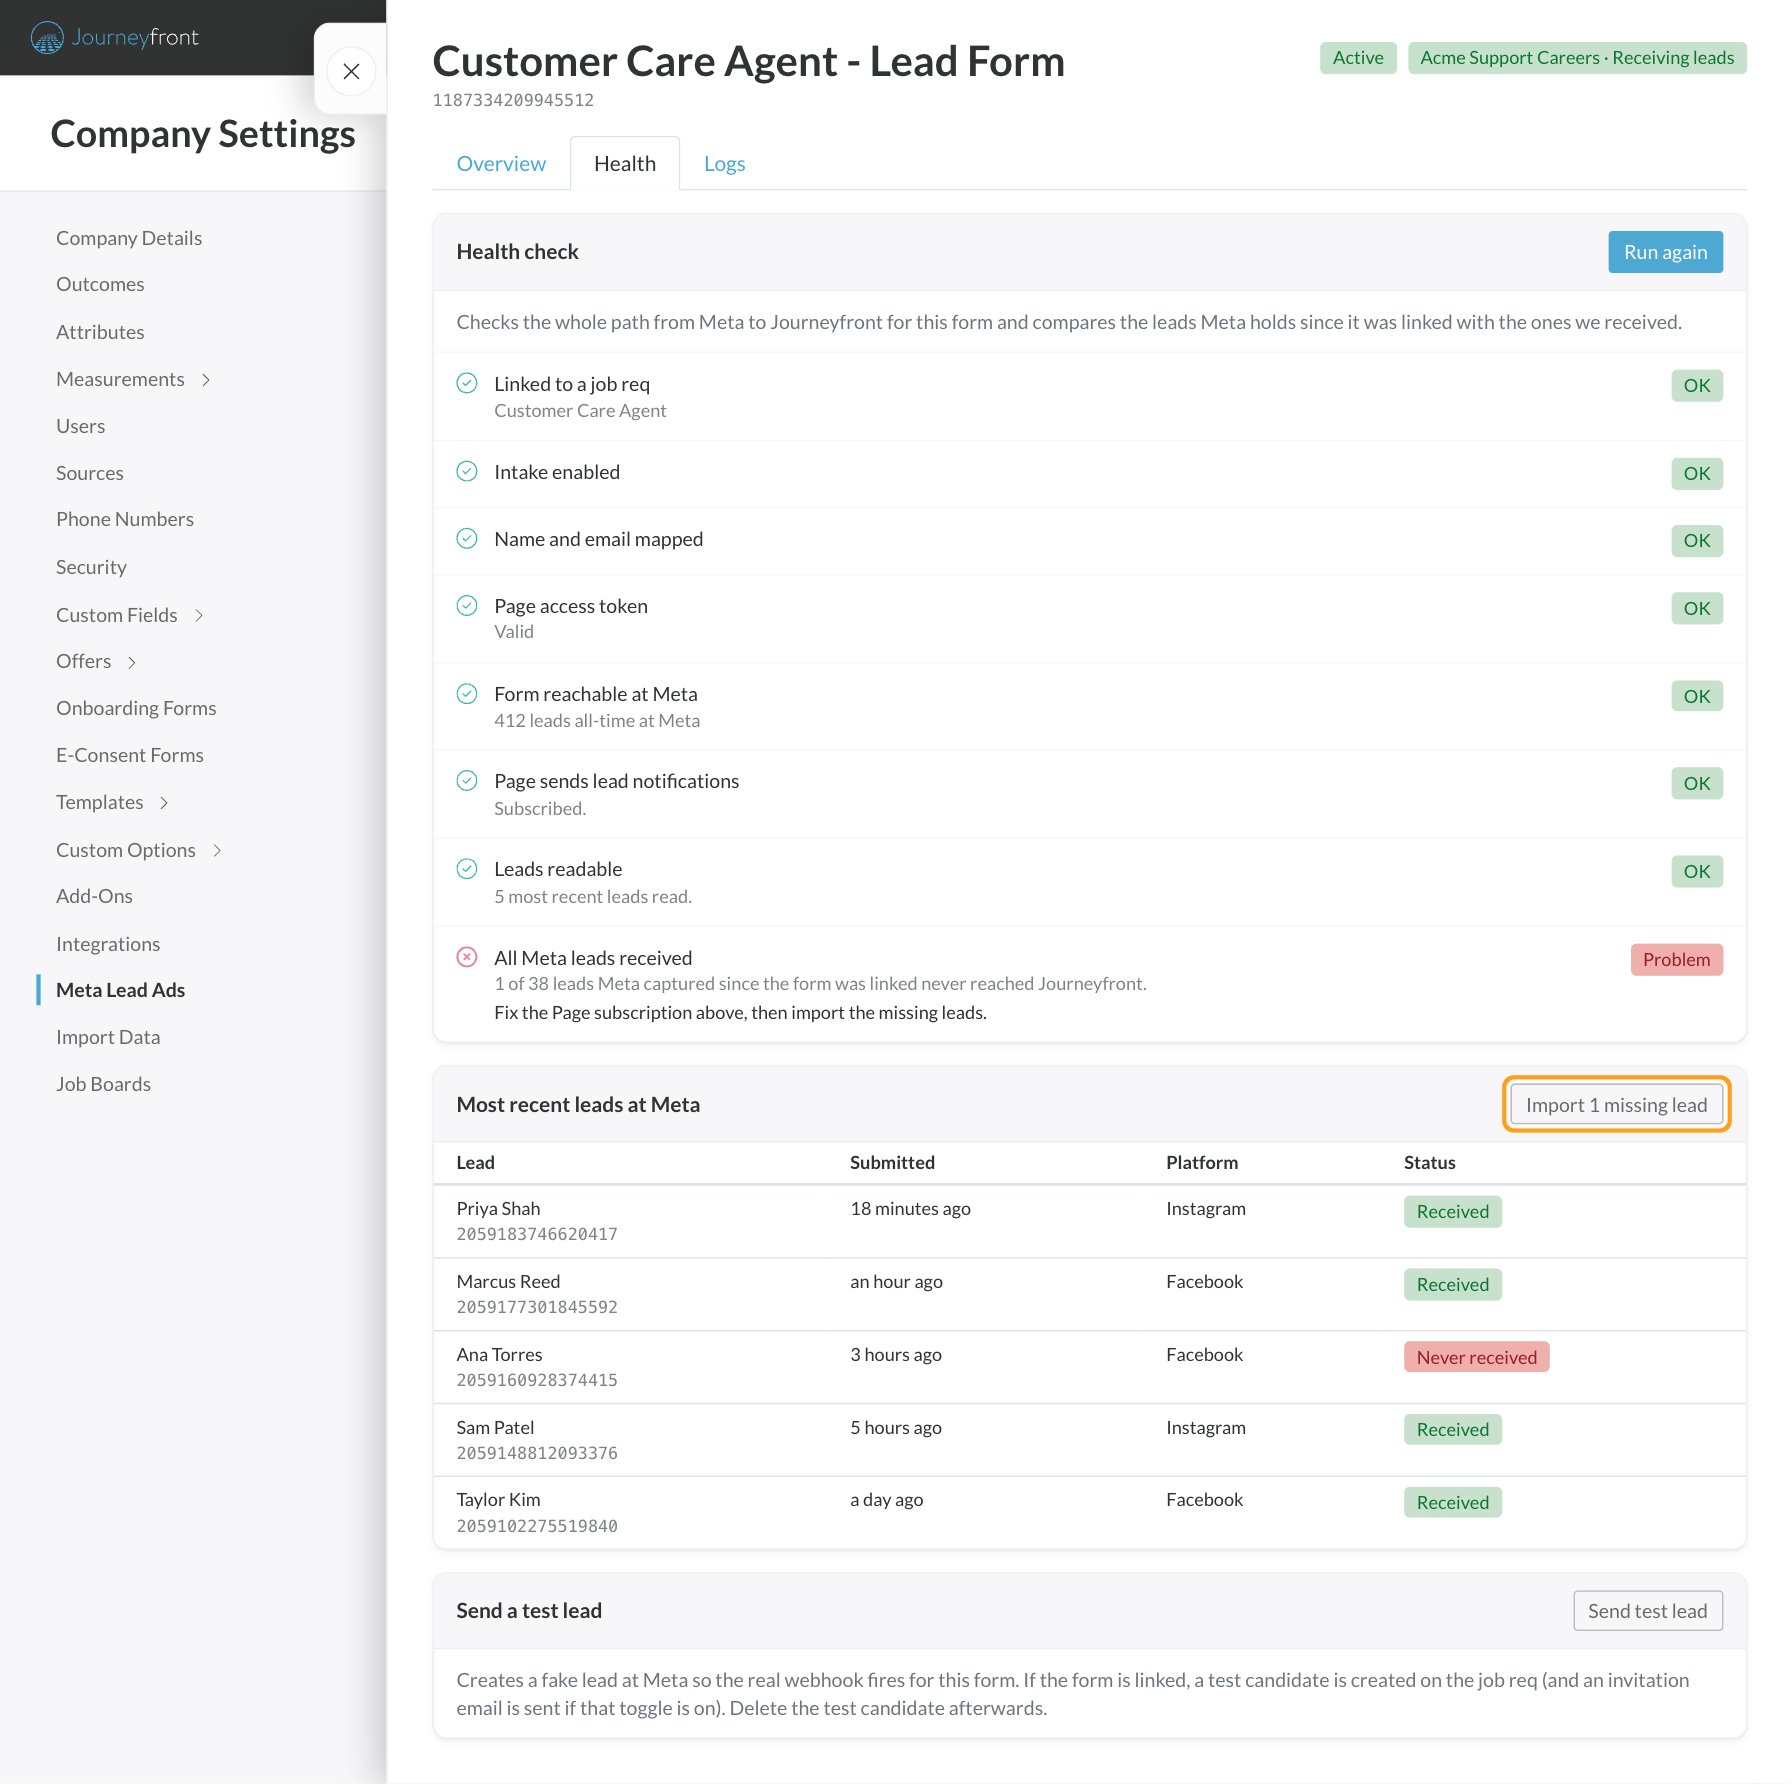
Click a form’s name (or Open form in its menu) to open its details panel. It has three tabs:- Overview: the linked job req, source and invitation setting, lead counts, and the form’s Page. Use Edit field mapping or Edit source from here.
- Health: click Run health check to check the whole path from the platform to Journeyfront for this form. Each check shows OK, Check, Problem or Skipped, with a suggested fix. The check also lists the most recent leads the platform has for the form and whether each one was received.
- Logs: the most recent lead deliveries for this form. Click View all logs for this form for the full log.
Fix common problems
Meta Lead Ads
Fix connection problems on the Meta side, such as Page subscriptions, permissions and Leads Access.
Review the lead log
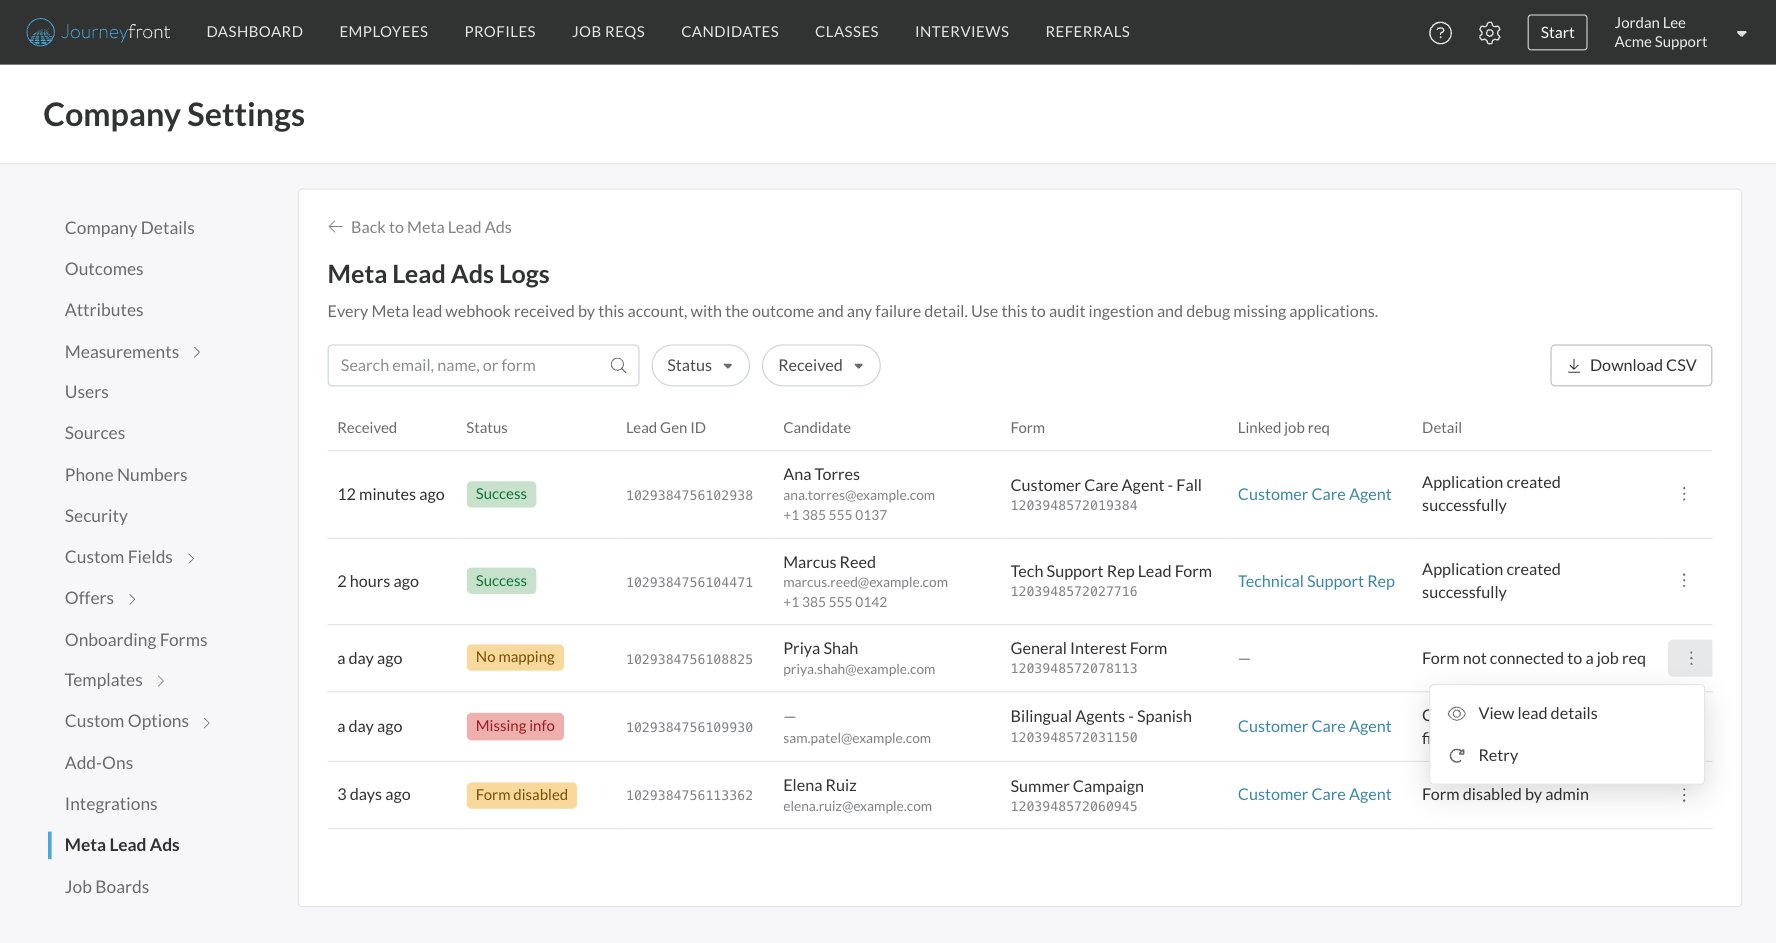
Go to Settings, then Meta Lead Ads, and click View all logs. Every lead delivered to Journeyfront is logged with its status, contact details, form and job req. To see one form’s leads, choose View Logs from that form’s menu.- Filter by status (successes or failures), by when the lead was received, or search by email, name or form.
- Click Download CSV to download the filtered log.
- Open a row’s actions menu and choose View lead details to see the lead’s answers, campaign, ad and platform, read live from the platform.
- Choose Retry to process a failed lead again once you’ve fixed the cause. It’s treated like a new submission: the candidate is created and gets the invitation email if that’s on.
Pause or unlink a form
To pause new leads from a form, for example while a campaign is on hold, choose Disable from its menu. New leads are logged as Form disabled and don’t become candidates. Choose Activate to start again. Disabling keeps the link to the job req. To remove the link, choose Unlink from job req from the form’s menu, or Unlink from the form’s menu on the job req’s Lead Ads tab. Future leads from the form stop creating candidates on that job req, and you can link it again any time.Where lead details show on a candidate
Lead ad candidates appear on the linked job req like any other applicant. On their Candidate Application’s Details tab you’ll see the Source and where the lead came from: the platform, lead form, campaign, ad set and ad, and when they submitted. Answers mapped to screening questions appear with the candidate’s other screening results.What candidates see
If the invitation email is on, the candidate gets one email (not a series) with a link to finish their application. The link works for 30 days and signs them in, and the answers they gave on the lead form are already filled in, so they only complete what’s left.FAQ
Does this work for Instagram lead ads too?
Does this work for Instagram lead ads too?
Yes. Instagram lead forms run on the same Meta lead ads system, so forms on your connected Pages come in the same way, whether the lead was submitted on Facebook, Instagram, Messenger or the Audience Network.
How quickly do candidates appear?
How quickly do candidates appear?
Usually within seconds. Each lead is sent to Journeyfront as soon as it’s submitted.
Will candidates get a lot of emails?
Will candidates get a lot of emails?
No. The invitation is a single email, and you choose for each form whether it’s sent.
What happens to leads from a form that isn't linked yet?
What happens to leads from a form that isn't linked yet?
They’re logged as No mapping and don’t become candidates. After you link the form, choose Retry failed leads from its menu to bring them in. Leads submitted before you connected Meta at all aren’t brought in.
Can one lead form feed more than one job req?
Can one lead form feed more than one job req?
Not at the same time. A form links to one job req. If you move it to a different job req, new leads go there.
What if we change a question on the lead form?
What if we change a question on the lead form?
Journeyfront checks your forms daily. Changed or new questions are flagged in the mapping editor so you can review them; the rest of the mapping stays in place.
Can Journeyfront create lead forms or ads for us?
Can Journeyfront create lead forms or ads for us?
No. You build lead forms and ads in the platform’s ads manager. Journeyfront brings in the forms from the Pages you connect, and can’t post to your Page or change your ads.
How is this different from job boards?
How is this different from job boards?
Job boards send your job postings out to people browsing job sites. Lead ads bring people in from the social ads you’re already running. Both end up as Candidate Applications on your job reqs.
Related
Meta Lead Ads
Connect your Meta Business account and Pages.
Social media
Every way candidates reach you from social media.
Custom fields
Create the personal fields you map lead form answers to.
Job boards
Post your job reqs where candidates are looking.
Employee referrals
Let employees refer people they know.
Integrations overview
Everything Journeyfront connects to.