

Who can do this: Admins with Company Settings Access.
{{SALARY}} or {{CANDIDATE_NAME}}, that place values into your offer letters and documents. Every offer field has a merge key, and so do the candidate, job req, hiring class and company details Journeyfront already knows, so your documents fill themselves in.
Offer fields
Offer fields appear on the offer form your team completes when sending an offer, and they’re what an offer package can pre-fill and lock. They apply to every job req in your account. Go to Settings, then Offers, then Offer Fields.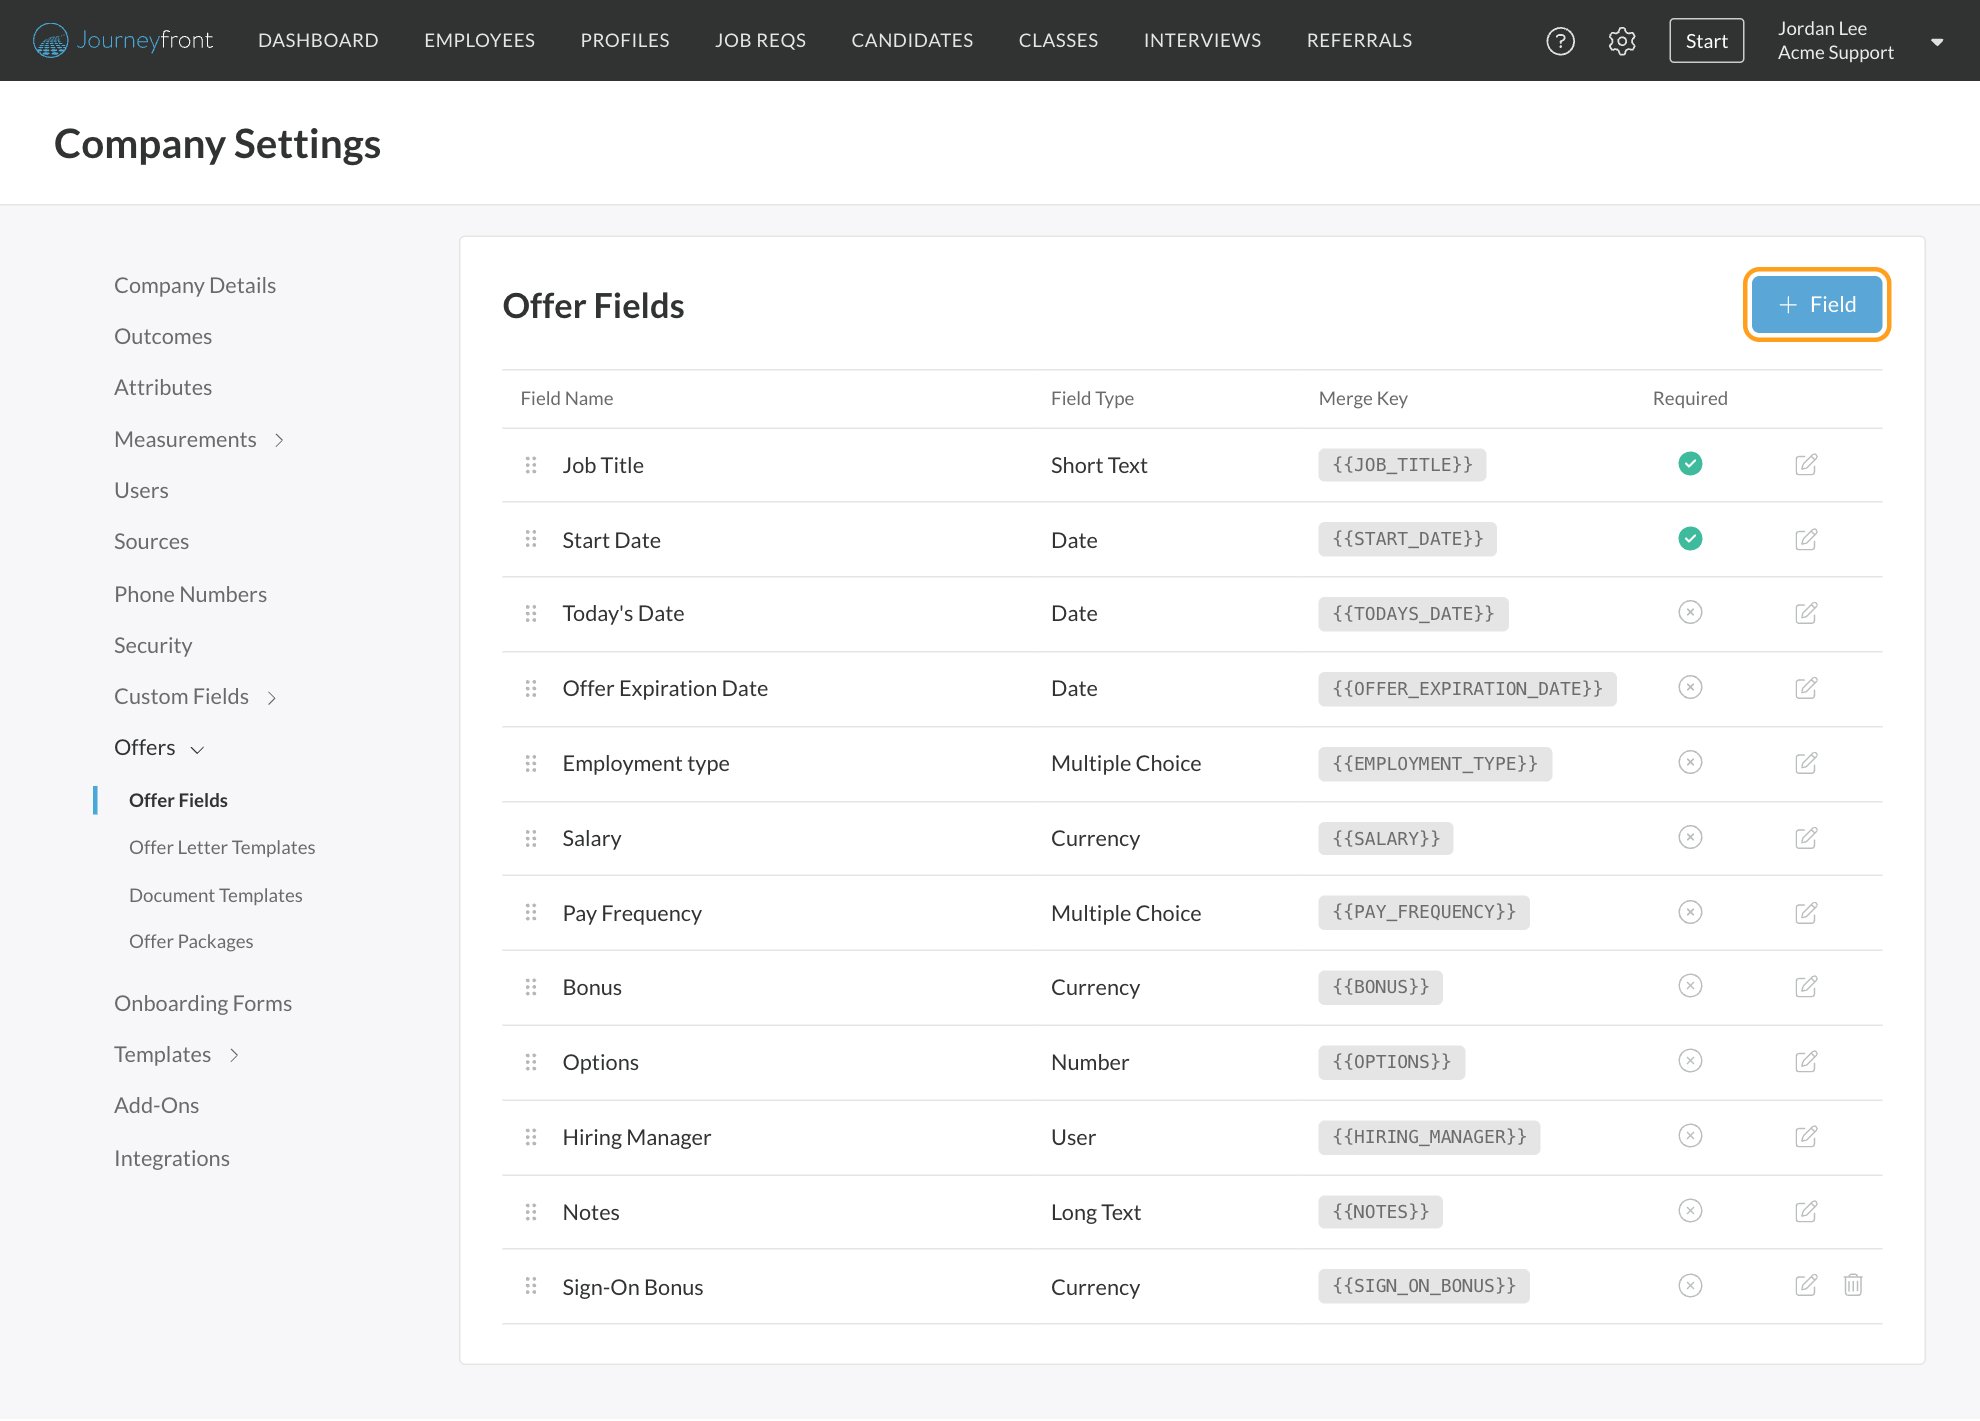
Default fields
Every account starts with these offer fields:
Job Title fills in from the job req (its external job title, if it has one) and Today’s Date from the day the offer is created, unless a package or recruiter sets them. In Send Offer, the Offer Expiration Date also becomes the default expiry for the e-signature request.
On a default field you can change the description and whether it’s required. Its label, type and options are fixed, and it can’t be deleted.
Add an offer field
1
Click + Field
It’s at the top right of the Offer Fields page.
2
Describe the field
Enter the Label your team sees (for example “Sign-On Bonus”), an optional Description, and the Field Type. For Multiple Choice, add the options.
3
Set the merge key
In Merge Key, type the key that goes between the braces, for example
SIGN_ON_BONUS. In your templates it becomes {{SIGN_ON_BONUS}}.4
Choose whether it's required
Turn on Required if recruiters must enter it on every offer, then click Save.
Field types
Edit, reorder or delete a field
- Click the edit icon on a row to change the label, description, required setting or options. The merge key can’t be changed once saved, because your templates may already use it.
- Drag the grip handle on the left of a row to reorder fields. Recruiters see fields in this order when they send an offer.
- Click the delete icon to remove a field you added. Default fields can’t be deleted.
Merge keys
A merge key is a key in double curly braces that you type into a Word template, like{{CANDIDATE_FIRST_NAME}}. When Journeyfront generates the document for a candidate, it replaces each key with the real value from that Candidate Application. The values that went into each document are saved with it, so you always have a record of exactly what the candidate received.
Built-in keys
These work in any template with no setup:
Your offer fields, and any personal or application fields you’ve given a key, use the key you chose.
Give a personal or application field a merge key
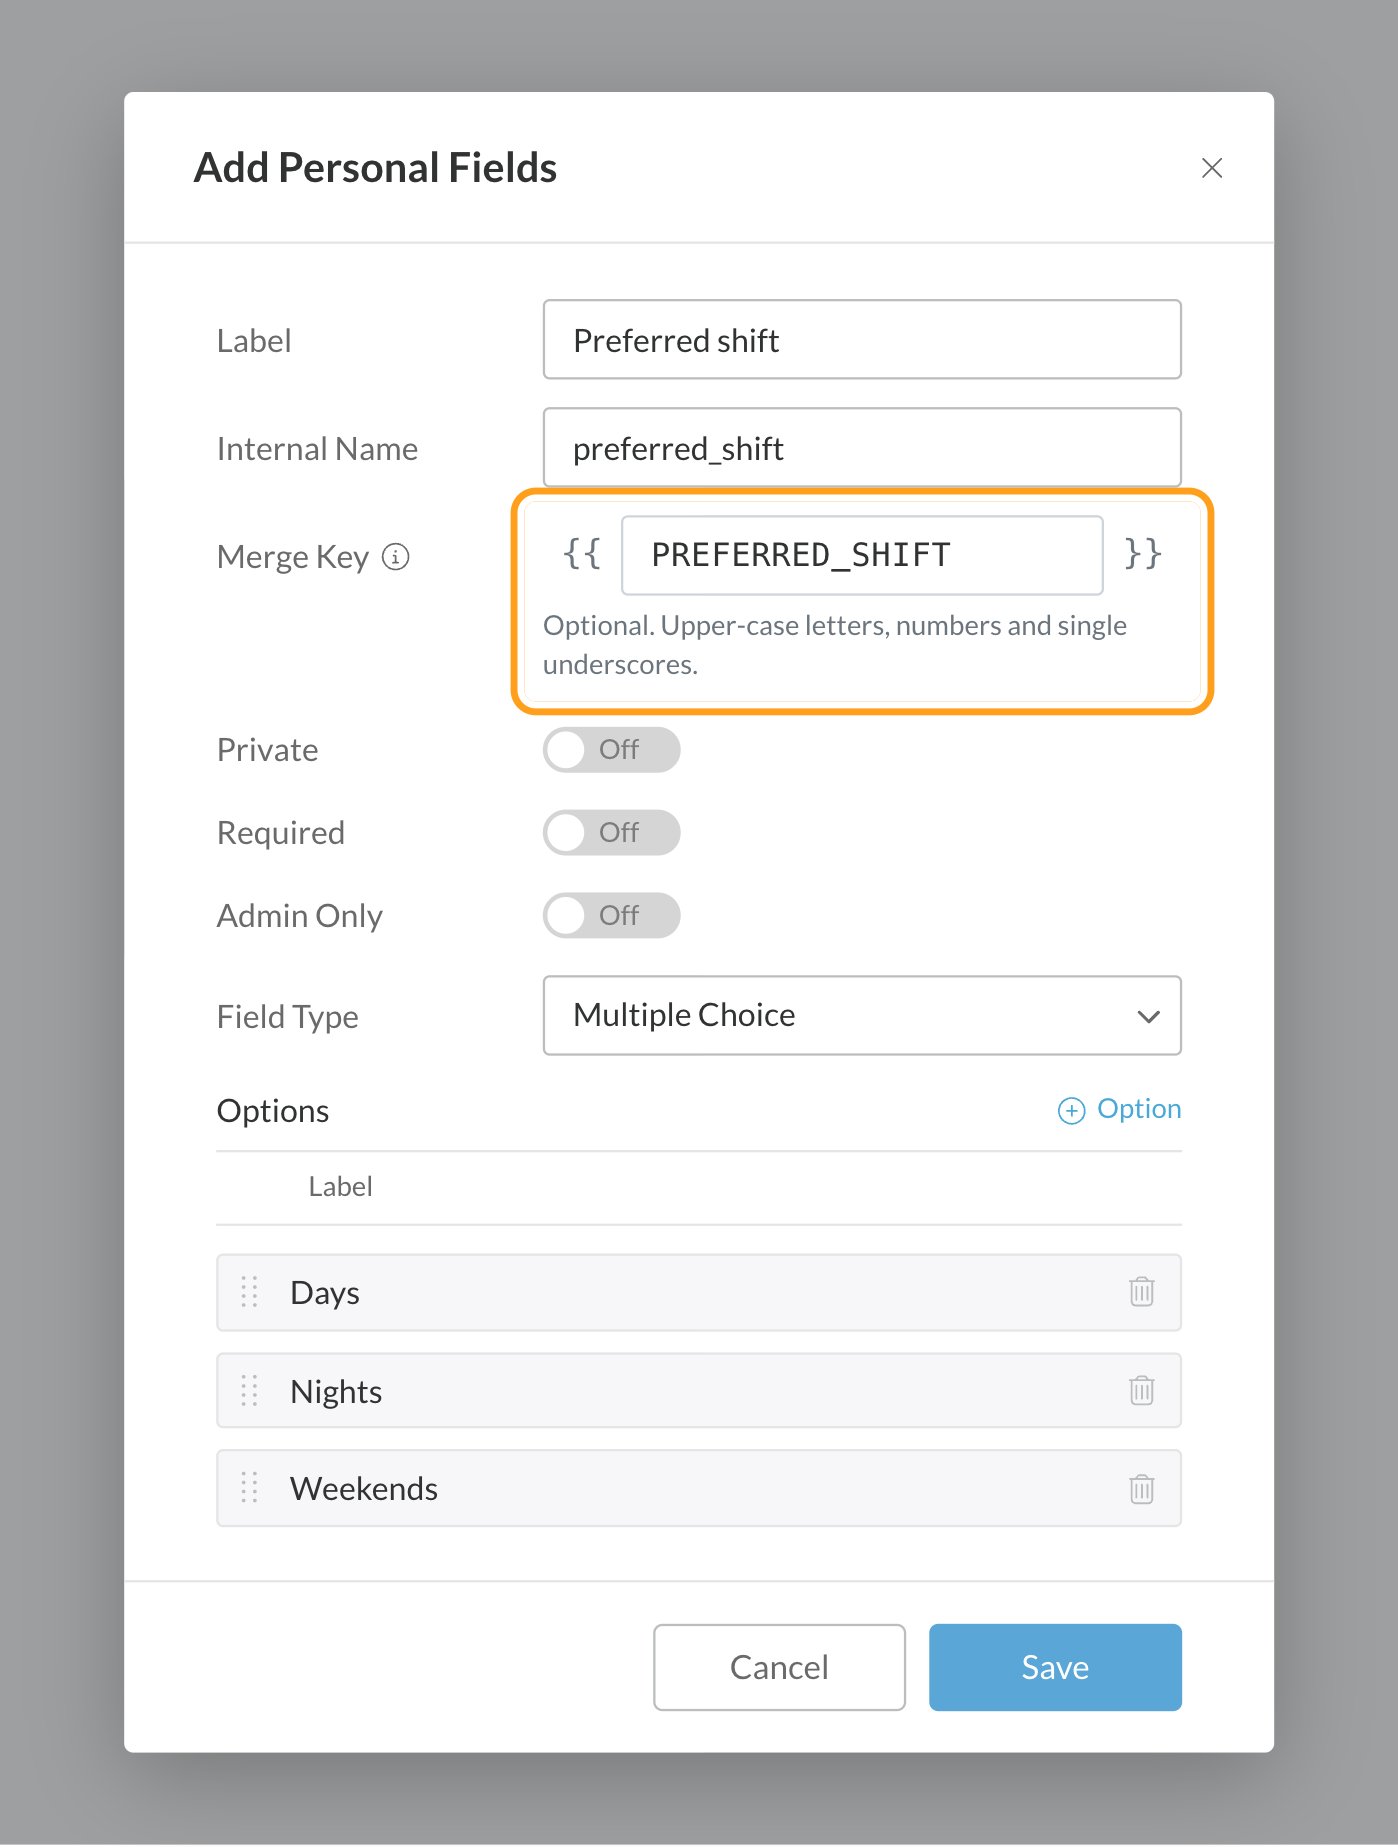
Personal and application fields only need a key if you want them in a document. For example, you can put the candidate’s preferred shift or their answer to a consent question straight into the offer letter.1
Open the field
Go to Settings, then Custom Fields, then Personal Fields or Application Fields. Add a field with + Field, or edit one that doesn’t have a key yet.
2
Enter the merge key
In Merge Key, type the key between the braces. When you add a field, Journeyfront suggests one from the label, so “Preferred shift” becomes
PREFERRED_SHIFT.3
Save
The key now appears in the merge key reference and works in any template.
- Upper-case letters, numbers and single underscores only.
- Unique across your account.
- Fixed once saved. You can change the field’s label any time.
Find the right key
Go to Settings, then Offers, then Offer Letter Templates, and open the Merge Fields reference. Keys are grouped by where their value comes from: Candidate, Job, Company, Hiring Class, Date, E-Signature, Offer Fields, and any custom fields you’ve given a key, such as Personal Fields and Application Fields. Search for a field and click its key to copy it, then paste it into your Word document.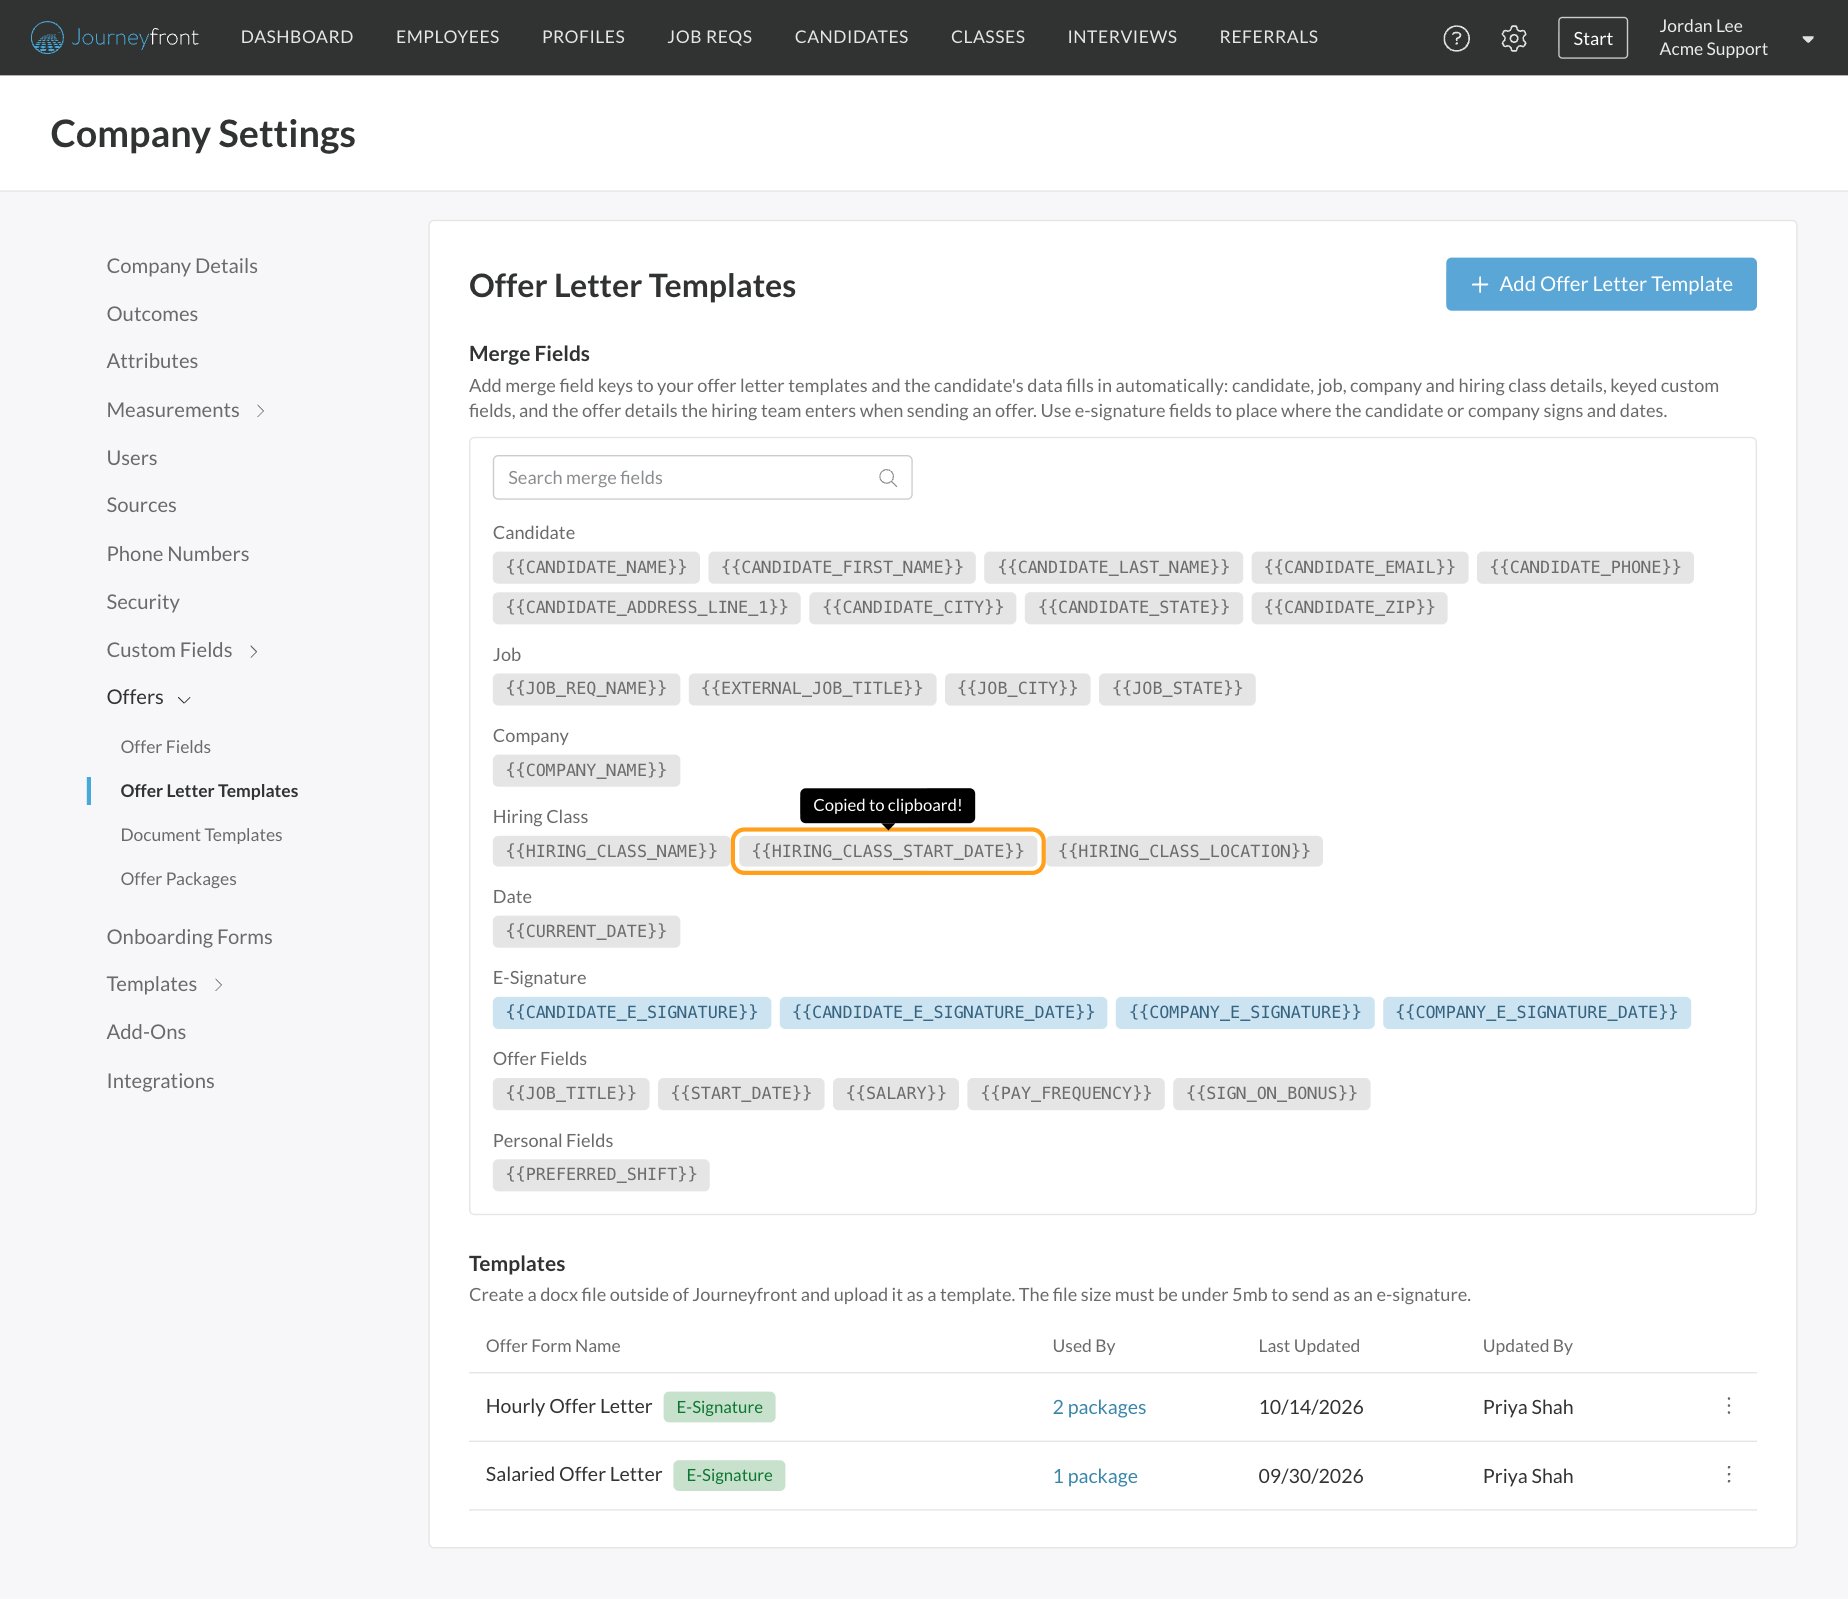
How values appear in documents
When a value is missing
Before any document is generated, Journeyfront shows every key the documents use and the value each candidate will get. Missing values are flagged. In Send Offer, candidate details such as phone, address and custom fields can be fixed right there and are saved to the Candidate Profile. Anything still missing has to be filled in, or you choose to leave it blank in the documents. Nothing is generated with a gap you didn’t see. See Send an offer.FAQ
What's the difference between a field's label and its merge key?
What's the difference between a field's label and its merge key?
The label is what your team sees on forms, for example “Sign-On Bonus”. The merge key is the token you type into documents, for example
{{SIGN_ON_BONUS}}. You can change a label any time; a key is fixed once saved. Personal and application fields also have an internal name, which is a free-text identifier and doesn’t need to follow the key format.Can I change a merge key after saving it?
Can I change a merge key after saving it?
No. Your templates may already use it, and changing it would break them. If you need a different key, create a new field.
Where did the candidate name and address offer fields go?
Where did the candidate name and address offer fields go?
Candidate name, phone and address are built-in merge keys now, filled from the Candidate Profile. Recruiters don’t type them on the offer form anymore. Use keys like
{{CANDIDATE_NAME}} and {{CANDIDATE_ADDRESS_LINE_1}} in your templates.Can I put a candidate's application answers in the offer letter?
Can I put a candidate's application answers in the offer letter?
Yes. Give the application field a merge key, then add
{{YOUR_KEY}} to the template. The candidate’s answer for that Candidate Application is merged in.I added a new offer field. Why isn't it in my letter?
I added a new offer field. Why isn't it in my letter?
Existing templates only use the keys typed into them. Add the new key to your Word file and re-upload it. The template’s Used By column shows which offer packages to check afterward.
Where do I set default values for offer fields?
Where do I set default values for offer fields?
On an offer package. A package can pre-fill any offer field and lock it so recruiters can’t change it.
Is there a limit on how many offer fields I can add?
Is there a limit on how many offer fields I can add?
No. Add as many as your offers need, and keep the required ones to what recruiters really have to enter.
Related
Offer letter and document templates
Put merge keys and signature fields into your Word files.
Offer packages
Set default values and lock them.
Custom fields
Personal and application fields, and where they appear.
Offers overview
How all the offer pieces fit together.