Connect your HR system so new hires, employee records and HR reference lists flow between it and Journeyfront without retyping.
Who can do this: Admins with the Company Settings Access permission connect and configure the integration. Users with the Hire Candidates permission create employees in your HR system when they hire.Availability: Your HR system needs to be on the supported list. If you don’t see it on the Integrations page, ask your Customer Success Manager.
Journeyfront connects to your human resources information system (HRIS) so hiring data moves without spreadsheets or copy and paste. You can create a new hire’s employee record in your HR system in one click, keep Journeyfront’s employee records in step with your HR system, and pick real HR records, like departments and work locations, in your custom fields.Journeyfront works with many HR systems, including Workday, BambooHR, ADP, Paylocity, Paychex and UKG, through one standard integration. Setup is the same whichever system you use.
What the integration does
Feature
Direction
What it does
Create employees
Journeyfront to your HR system
When you hire a candidate, create their employee record in your HR system, with documents attached.
Employee sync
Your HR system to Journeyfront
Bring your employees into the Journeyfront Employees page on a schedule, and optionally mark matching Candidate Applications as hired.
HRIS objects
Your HR system to Journeyfront
Pick records from your HR system in custom fields on job reqs, hiring classes and offers.
Connect your HR system
Before you start, make sure you have:
Sign-in details for your HR system. Depending on the system, you may also need an API key or client secret. Your HRIS administrator can help.
The right access in your HR system. The account you connect with needs permission to create employee records and to read the data Journeyfront uses, such as locations and departments.
1
Find your HR system
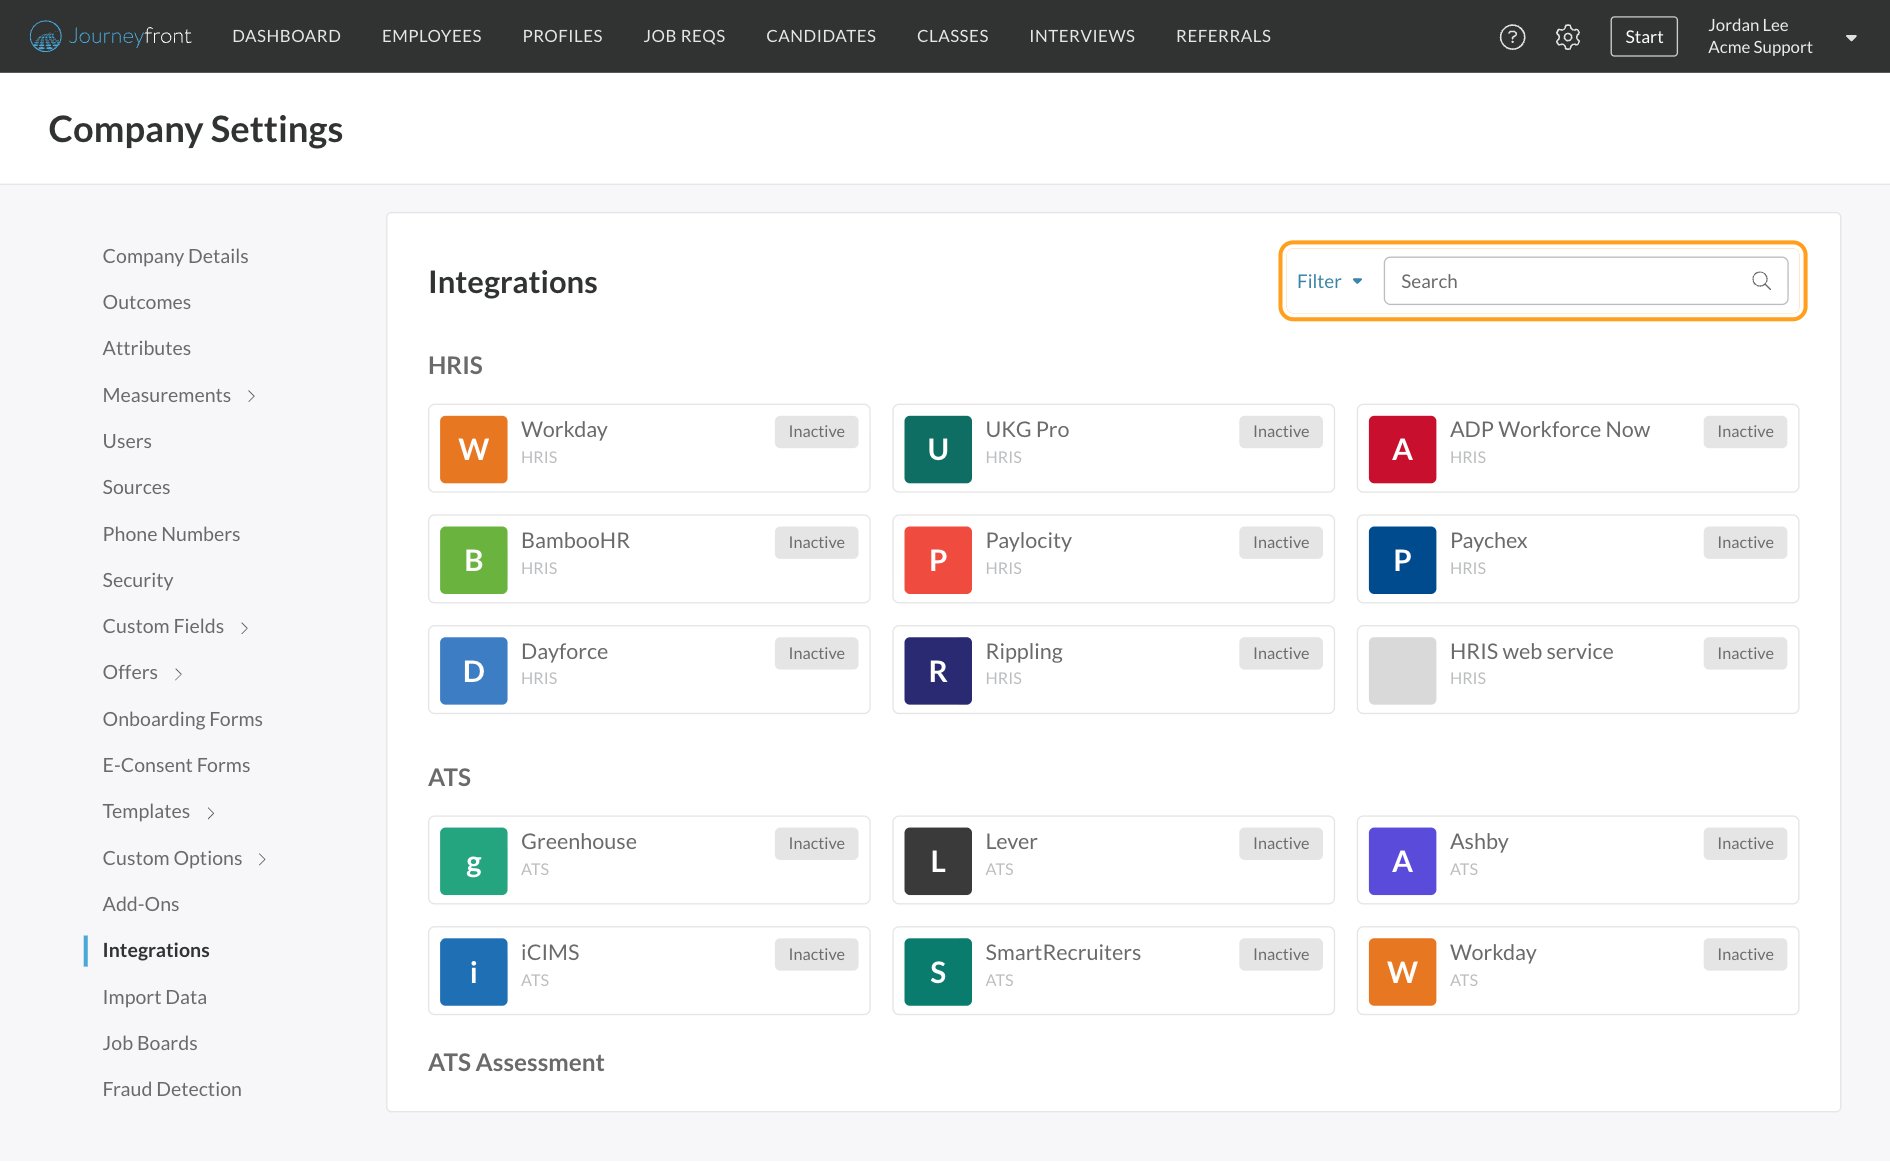
Go to Settings, then Integrations. HR systems are listed under HRIS. Use Filter or Search to find yours quickly.
2
Start the connection
Click your HR system’s tile, then click Connect to followed by its name.
3
Review permissions and sign in
A secure window lists the data Journeyfront is asking to access. Review it and continue. Then follow the steps for your HR system: sign in, or enter the key it asks for. A short guide at the bottom of the window explains where to find each value.
4
Confirm the connection
When you see Connection set up successfully!, close the window. The tile now shows Active, and the Details tab shows who connected it and when.
Once connected, your HR system’s page in Integrations has these tabs:
Tab
What it’s for
Details
Connection status, who connected it and when, and Disconnect
Create Employee Settings
Turn on employee creation at hire and map the fields it sends
Employee Sync Settings
Schedule the employee sync, choose how people are matched, and map synced fields
Job Profile Mapping
Match your HR system’s job titles to Journeyfront job profiles
Sync History
Preview a sync, run one now, and review past runs
HRIS Objects
See the HR records and lists available to your custom fields
Create employees when you hire
Turn on employee creation
1
Open Create Employee Settings
Go to Settings, then Integrations, open your HR system, and select the Create Employee Settings tab.
2
Turn it on
Turn on Enable Employee Creation and click Save. The Create Employee in option now appears in the hire window for your team.
3
Map your fields
Under Field Mappings, choose which Journeyfront field fills each field in your HR system. Add a Default Value for any field that should be filled in when the Journeyfront field is empty.
Two more settings appear once employee creation is on:
Pass JF Country Options and Pass JF State Options: if your HR system doesn’t supply its own country or state list, Journeyfront fills the dropdown from its own list. Turn these off if your HR system expects different codes; the field then becomes free text.
Set default values for fields your HR system requires but recruiters rarely know at the moment of hire, such as a standard work schedule. Recruiters then only fill in what’s different, and fewer sends stop on a missing field.
Send a new hire to your HR system
1
Hire the candidate
On the Candidate Application, click Actions, then Hire. In the hire window, make sure Create Employee in your HR system is checked (it’s checked for you when your HR system is connected), then complete the hire.
2
Review the mapped information
A window opens showing what Journeyfront filled in from the Candidate Application on the left, and your HR system’s fields on the right. Check the pre-filled values, such as name and email.
3
Fill in required fields
Fill in anything your HR system requires that Journeyfront doesn’t have, such as a start date, work location or manager. Required fields are marked with a red asterisk (*).
4
Attach documents and send
Choose any documents to include, such as the resume or signed offer letter, if your HR system accepts them. Then click Send.
The employee record is created in your HR system right away. Journeyfront records who sent it and when at the top of the Candidate Application and in Comments & Activities.
Some HR systems, such as ADP and Paychex, create the record as an in-progress or onboarding hire rather than an active employee. That’s decided by your HR system, not Journeyfront.
Sync employees from your HR system
The employee sync brings your employees from your HR system into the Journeyfront Employees page on a schedule. It updates people who already exist in Journeyfront, adds new ones, and can mark their Candidate Applications as hired.
Set up the sync
Go to Settings, then Integrations, open your HR system, and select Employee Sync Settings.
Setting
What it does
Enable Sync
Runs the sync on your schedule. Turn it off to pause syncing without losing your settings.
Sync Cadence
Daily, Weekly (pick the day) or Monthly (pick a day from 1 to 28).
Employee Identifier fields
How each employee in your HR system is matched to a person in Journeyfront. Choose the value your HR system holds (Personal Email, Work Email, Employee Number or Employee ID). Journeyfront compares an email with the person’s Email, and a number or ID with their External Employee Identifier. A match is updated; anyone without a match is added.
Auto-Mark as Hired
Finds the employee’s Candidate Application in the job req tied to their job profile and marks it Hired. Applications already hired or rejected are left alone.
When Multiple Applications Match
Mark most recent, Skip if multiple (leave it for a person to review), or Closest to hire date (window), which picks the application closest to the hire date within the number of days you set.
Configure Employee Filters
Limit which employees are pulled, for example by department, location or employment status. Changes apply on the next sync.
Click Save Configuration. Once the sync is on, the Field Mapping section appears below. Map the fields pulled from your HR system to Journeyfront fields, and choose Unknown Option Handling for dropdown fields: Auto-create adds a value that isn’t an option yet, and Skip leaves the field blank.
Pick an identifier both systems really share. If candidates apply with their personal email, Personal Email finds the most matches. Use Work Email only when work emails are reliably filled in your HR system, and Employee Number or Employee ID when Journeyfront already stores that number for your people.
Map job titles to job profiles
On the Job Profile Mapping tab, match each job title in your HR system to a Journeyfront job profile. Synced employees are assigned to that profile, and Auto-Mark as Hired uses it to find the right job req.
Match Strategy: use Job Title only for one profile per title. Use Job Title + Location or Job Title + Department when the same title maps to different profiles depending on where someone works.
Add Manual Mapping adds one mapping at a time. For many titles, click Download Template, fill it in, and use Import CSV.
Titles without a mapping are flagged when the sync runs.
Preview and review syncs
The Sync History tab lists every run with its date, status, who started it, and how many people were created, updated, unchanged or had errors. Click View to see the results of a run, or CSV to download them.
1
Preview first
Click Preview Sync to see what a sync would do without changing anything. A preview is required before your first sync.
2
Run the sync
When the preview looks right, click Run Sync Now and confirm. After that, the sync also runs on your schedule.
A sync can create, update and end employee records in Journeyfront based on your HR system’s data. Review a preview after any change to your matching, filters or mappings.
Pick HR records in custom fields (HRIS objects)
An HRIS Object custom field lets your team pick a record straight from your HR system, such as a work location, company, department, job code or employee, instead of typing its code by hand. The field keeps both the record’s name, so people can read it, and your HR system’s code for it, so your exports, offer letters and other systems get exactly what they expect.You can add HRIS Object fields to job reqs, hiring classes and offers. Candidates never see them; they aren’t available on application forms.
Create an HRIS Object field
1
Open the field settings
Go to Settings, then Custom Fields, then Job Req Fields or Hiring Class Fields. For offers, go to Settings, then Offers, then Offer Fields. Add a field.
2
Name it
Enter a Label, the name everyone sees on the form and as a column header, such as “Department”. The Key is suggested from the label. You can edit the key before you save, but not after.
3
Choose the list
Set Type to HRIS Object, then choose the HRIS Object list the field draws from. Lists are named the way your HR system names them, with a short description of each. If you picked a list of groups, set a Group Type to narrow it, for example so one field means Department and another means Division.
4
Check the preview and save
The Preview shows the real picker with your real records, so you can search it exactly as your team will. The Values row shows the two values the field produces and their merge fields. Click Save.
Name the field the way your business talks about it, like “Cost Center”, even if your HR system calls the list something else. And use the Preview before you save: it’s the quickest way to confirm you picked the right list when several sound alike.
Pick a value
Open the job req, hiring class or offer and click the field. A Recently used section shows the five records your team chose most recently for that field. To find anything else, start typing a name or a code; a full code matches exactly and comes first. The field shows the record’s name with its code beside it as a chip, so leading zeros like 0001 stay visible.
Records retired in your HR system don’t appear in the picker, so no one can choose one that no longer exists.
Use an HRIS Object field in offer letters
An HRIS Object offer field gives your templates two merge fields. Use the field’s key for the record’s name, for example {{WORK_LOCATION}}, and add _ID for your HR system’s code, for example {{WORK_LOCATION_ID}}. You can also set a default for the field on an offer package, so every offer from that package starts pre-filled.
Keep your lists up to date
Lists refresh automatically. Using the picker never calls your HR system; it reads what Journeyfront has already synced, so it stays fast and puts no load on your HR system.To pull a change right away, go to Settings, then Integrations, open your HR system, select the HRIS Objects tab and click Refresh now. The same tab shows every list, where it comes from, how many records it holds, whether a field uses it, and how the last sync went, including why a list couldn’t be read.
When a record is renamed in your HR system, the new name shows everywhere on the next sync. When one is retired, it stops appearing for new selections, but every job req, hiring class and offer already using it keeps its name and code.
Connect a web service for lists your integration doesn’t cover
If a list you need isn’t part of the standard integration, or your HR system isn’t supported by it, you can connect to your HR system’s own web services. You’ll need details from whoever manages your HR system.
1
Open the HRIS web service card
Go to Settings, then Integrations, and open HRIS web service in the HRIS section.
2
Enter the connection details
Fill in HRIS, Web services host, Service account username, Service account password, Company API key and User API key. Your HR team creates the service account with read access to the lists you want.
3
Test and save
Click Test and save. Journeyfront signs in once to check the details, and the connection only turns on if that works.
4
Add your lists
For each list, give it a name your admins will see, the service to call, and which response fields hold the code and the display name. Your HR team provides these. Each list then appears as an HRIS Object option when you create a field.
Credentials are stored encrypted and never shown again. You’ll see whether each one is set, not its value. A web service connection works with or without the standard integration.
Edit, archive or delete an HRIS Object field
Open the field’s menu on the settings page.
Edit: change the label and description at any time. The Key can’t change after the field is created, and the list can’t change once any record has a value for it. To use a different list, create a new field.
Archive: removes the field from forms but keeps every value already recorded. You can restore it later.
Delete: removes the field and its values permanently. Journeyfront shows how many records would be affected before you confirm.
Archive is almost always the better choice. It keeps your history and can be undone.
Disconnect your HR system
Go to Settings, then Integrations, open your HR system and click Disconnect on the Details tab. Employee records you already sent stay in your HR system, and data already synced into Journeyfront stays in Journeyfront. Disconnecting can’t be undone; to use the integration again, you connect from the start.
FAQ
Which HR systems are supported?
Every supported HR system is listed under HRIS on the Integrations page, including Workday, BambooHR, ADP, Paylocity, Paychex, UKG and many more. If yours isn’t listed, ask your Customer Success Manager.
Can I connect more than one HR system?
No. Each Journeyfront account connects to one HR system. To switch, disconnect the current one first.
What gets sent when I create an employee?
First name, last name and email are mapped automatically. Your admins can map more fields and set defaults in Create Employee Settings. Depending on your HR system, the window may also ask for things like home address, start date, work location, department and manager. You can attach documents such as the resume and signed offer letter if your HR system accepts them.
Does sending a hire update an employee who already exists?
No. Each send creates a new employee record in your HR system. Journeyfront shows a check mark once a candidate has been sent, so you don’t send them twice by accident.
I un-hired a candidate and am hiring them again. Will it create a second employee?
It can. If the candidate was sent before, the hire window shows when, with a warning that sending again may create a second employee in your HR system. Check your HR system before you send.
Can I create employees for a group of hires at once?
Yes. When you hire several candidates at once, the bulk hire window includes a section for your HR system. Fill in shared values once, adjust any candidate individually, and Journeyfront creates each employee.
What happens if a send fails?
You’ll see an error explaining why, usually a missing required field or a connection problem. Fix it and send again. A failed attempt doesn’t create a partial record, and Journeyfront doesn’t retry on its own.
Why is my HRIS Object list showing no records?
Usually the list hasn’t synced yet. Open the HRIS Objects tab on your integration to see when it last ran and whether anything went wrong. If a list couldn’t be read, the reason is shown there; often it’s a permission your service account needs in your HR system.
How is an HRIS Object field different from a multiple choice field?
A multiple choice field is a list you type and maintain by hand, and its value is just the option’s label. An HRIS Object field gets its options from your HR system, stays current on its own, and carries your HR system’s code alongside the name.
Is the connection secure?
Yes. Journeyfront connects through secure, authenticated APIs, and you approve exactly what it can access when you connect.
Related
Integrations overview
Everything Journeyfront connects to.
Custom fields
Add your own fields to job reqs, hiring classes and applications.
Offer fields
Fields that fill in your offer letters.
Hiring classes
Group hires who share a start date.
Was this page helpful?
{"docsConfig":{"theme":"mint","$schema":"https://mintlify.com/docs.json","name":"Journeyfront Help Center","description":"Guides, training and reference for hiring teams using Journeyfront.","colors":{"primary":"#0072D5","light":"#2AA8F2","dark":"#005AAB"},"logo":{"light":"https://mintcdn.com/journeyfront/Ki8OScNKQAoeTHdj/logo/light.svg?fit=max\u0026auto=format\u0026n=Ki8OScNKQAoeTHdj\u0026q=85\u0026s=b9cfa7f80c1e8537f151a84523c25a55","dark":"https://mintcdn.com/journeyfront/Ki8OScNKQAoeTHdj/logo/dark.svg?fit=max\u0026auto=format\u0026n=Ki8OScNKQAoeTHdj\u0026q=85\u0026s=47fd011873279dbf753d972cb3f36612"},"favicon":"https://mintcdn.com/journeyfront/61dBaB1hIRAsZpUl/favicon.svg?fit=max\u0026auto=format\u0026n=61dBaB1hIRAsZpUl\u0026q=85\u0026s=f02b5a6171cc5402119cd1ee0eb6d6c9","background":{"color":{"light":"#FFFFFF","dark":"#1F2935"}},"navbar":{"links":[{"href":"https://www.journeyfront.com/contact","label":"Contact support"},{"href":"https://www.journeyfront.com/office-hours","label":"Office hours"}],"primary":{"type":"button","label":"Log in to Journeyfront","href":"https://app.journeyfront.com"}},"footer":{"socials":{"linkedin":"https://www.linkedin.com/company/journeyfront","website":"https://www.journeyfront.com"}},"fonts":{"heading":{"family":"Plus Jakarta Sans","weight":700},"body":{"family":"Lato"}},"errors":{"404":{"redirect":true}},"contextual":{"options":["copy","view","chatgpt","claude","mcp","add-mcp"],"display":"header"},"markdown":{"instructions":"This is the Journeyfront Help Center for hiring teams. Journeyfront is an applicant tracking system (ATS). Use the Help Center's terms: job req, Candidate Profile (the person), Candidate Application (one person on one job req), hiring class. Link to the article you used in your answer."},"styling":{"latex":false},"navigation":{"pages":[]}},"deployment":{"deploymentMetadataValue":{"subdomain":"journeyfront","hasAudioNarration":false,"actualSubdomain":"journeyfront","customDomains":["help.journeyfront.com"],"gitSource":{"type":"github","owner":"journeyfront","repo":"help-center","deployBranch":"main","contentDirectory":"","isPrivate":true,"mountPath":"","label":"","_id":"6ad91d0df5684d6fcb2bcfab"},"feedback":{"thumbs":true},"entitlements":{"AI_CHAT":{"status":"DISABLED"},"WEB_MCP":{"status":"DISABLED"},"NARRATION":{"status":"DISABLED"}},"buildId":"6b008aa363864491a045460e","clientVersion":"0.0.4248","searchFilterCounts":[{"language":"default","tag":"Knowledge Base","count":159},{"language":"default","tag":"Candidates","count":27},{"language":"default","tag":"Source and Attract Candidates","count":26},{"language":"default","tag":"Referrals","count":16},{"language":"default","tag":"Integrations","count":14},{"language":"default","tag":"Offer \u0026 Hire","count":13},{"language":"default","tag":"Email \u0026 Texting","count":12},{"language":"default","tag":"Reporting \u0026 Analytics","count":12},{"language":"default","tag":"Interviews \u0026 Scheduling","count":10},{"language":"default","tag":"Assessments","count":8}],"searchSettings":{"maxResults":10,"showContentSnippets":true,"fullPageSearch":true}},"assistantConfig":{"enableAskAiButton":false,"enableStarterQuestions":false,"enableContextualStarterQuestions":false,"enableAskAiSearchBar":true},"basePath":"","hasChatPermissions":false,"hasWebMcpPermissions":false,"toggles":[{"name":"kill-isr","enabled":true,"variant":{"name":"disabled","enabled":false,"feature_enabled":true},"impressionData":false},{"name":"custom-rbac-roles","enabled":true,"variant":{"name":"disabled","enabled":false,"feature_enabled":true},"impressionData":false},{"name":"agent-mintlify-slack","enabled":true,"variant":{"name":"disabled","enabled":false,"feature_enabled":true},"impressionData":false},{"name":"agent-integrations-settings","enabled":true,"variant":{"name":"disabled","enabled":false,"feature_enabled":true},"impressionData":false},{"name":"rbac-expansion","enabled":true,"variant":{"name":"disabled","enabled":false,"feature_enabled":true},"impressionData":false},{"name":"automations-pr-grouping","enabled":true,"variant":{"name":"disabled","enabled":false,"feature_enabled":true},"impressionData":false},{"name":"custom-prefix","enabled":true,"variant":{"name":"disabled","enabled":false,"feature_enabled":true},"impressionData":false},{"name":"analytics-v7","enabled":true,"variant":{"name":"disabled","enabled":false,"feature_enabled":true},"impressionData":false},{"name":"user-flows-analytics","enabled":true,"variant":{"name":"disabled","enabled":false,"feature_enabled":true},"impressionData":false},{"name":"no-publish-flow","enabled":true,"variant":{"name":"disabled","enabled":false,"feature_enabled":true},"impressionData":false},{"name":"workos-onboarding","enabled":true,"variant":{"name":"disabled","enabled":false,"feature_enabled":true},"impressionData":false},{"name":"snapshot-serving-live","enabled":true,"variant":{"name":"disabled","enabled":false,"feature_enabled":true},"impressionData":false},{"name":"stripTemperatureMiddleware","enabled":true,"variant":{"name":"disabled","enabled":false,"feature_enabled":true},"impressionData":false},{"name":"support-platform-pylon-zendesk","enabled":true,"variant":{"name":"disabled","enabled":false,"feature_enabled":true},"impressionData":false},{"name":"snapshot-serving","enabled":true,"variant":{"name":"disabled","enabled":false,"feature_enabled":true},"impressionData":false},{"name":"instant-rollback","enabled":true,"variant":{"name":"disabled","enabled":false,"feature_enabled":true},"impressionData":false},{"name":"granular-notifications-server","enabled":true,"variant":{"name":"disabled","enabled":false,"feature_enabled":true},"impressionData":false},{"name":"granular-notifications","enabled":true,"variant":{"name":"disabled","enabled":false,"feature_enabled":true},"impressionData":false},{"name":"automations-fable","enabled":true,"variant":{"name":"disabled","enabled":false,"feature_enabled":true},"impressionData":false},{"name":"fixed-ai-action-pricing","enabled":true,"variant":{"name":"disabled","enabled":false,"feature_enabled":true},"impressionData":false},{"name":"site-roles","enabled":true,"variant":{"name":"disabled","enabled":false,"feature_enabled":true},"impressionData":false},{"name":"automation-resolve-merge-conflict","enabled":true,"variant":{"name":"disabled","enabled":false,"feature_enabled":true},"impressionData":false},{"name":"scoped-publishing","enabled":true,"variant":{"name":"disabled","enabled":false,"feature_enabled":true},"impressionData":false},{"name":"mintql","enabled":true,"variant":{"name":"disabled","enabled":false,"feature_enabled":true},"impressionData":false},{"name":"page-level-analytics","enabled":true,"variant":{"name":"disabled","enabled":false,"feature_enabled":true},"impressionData":false},{"name":"editor-version-history-v2","enabled":true,"variant":{"name":"disabled","enabled":false,"feature_enabled":true},"impressionData":false},{"name":"billing-page-v2","enabled":true,"variant":{"name":"disabled","enabled":false,"feature_enabled":true},"impressionData":false},{"name":"full-page-search","enabled":true,"variant":{"name":"disabled","enabled":false,"feature_enabled":true},"impressionData":false},{"name":"workspace-projects","enabled":true,"variant":{"name":"disabled","enabled":false,"feature_enabled":true},"impressionData":false},{"name":"assistant-v5","enabled":true,"variant":{"name":"disabled","enabled":false,"feature_enabled":true},"impressionData":false},{"name":"fork-pr-previews","enabled":true,"variant":{"name":"disabled","enabled":false,"feature_enabled":true},"impressionData":false},{"name":"revalidation-jwt","enabled":true,"variant":{"name":"disabled","enabled":false,"feature_enabled":true},"impressionData":false},{"name":"workos-sso-scim","enabled":true,"variant":{"name":"disabled","enabled":false,"feature_enabled":true},"impressionData":false},{"name":"hobby-abuse-scan","enabled":true,"variant":{"name":"disabled","enabled":false,"feature_enabled":true},"impressionData":false},{"name":"dashboard-inbox","enabled":true,"variant":{"name":"disabled","enabled":false,"feature_enabled":true},"impressionData":false},{"name":"workos-signup","enabled":true,"variant":{"name":"disabled","enabled":false,"feature_enabled":true},"impressionData":false},{"name":"turbopuffer-dual-write","enabled":true,"variant":{"name":"disabled","enabled":false,"feature_enabled":true},"impressionData":false},{"name":"workos-enabled","enabled":true,"variant":{"name":"disabled","enabled":false,"feature_enabled":true},"impressionData":false},{"name":"approve-review-flow","enabled":true,"variant":{"name":"disabled","enabled":false,"feature_enabled":true},"impressionData":false},{"name":"editor-metadata","enabled":true,"variant":{"name":"disabled","enabled":false,"feature_enabled":true},"impressionData":false},{"name":"sso-setup-deadline-banner","enabled":true,"variant":{"name":"disabled","enabled":false,"feature_enabled":true},"impressionData":false},{"name":"turbopuffer-serve","enabled":true,"variant":{"name":"disabled","enabled":false,"feature_enabled":true},"impressionData":false},{"name":"live-agents","enabled":true,"variant":{"name":"disabled","enabled":false,"feature_enabled":true},"impressionData":false},{"name":"starter-pricing","enabled":true,"variant":{"name":"control","enabled":true,"payload":{"type":"string","value":"control"},"feature_enabled":true},"impressionData":false},{"name":"llms-txt-v2","enabled":true,"variant":{"name":"disabled","enabled":false,"feature_enabled":true},"impressionData":false},{"name":"wildcard-email-auth","enabled":true,"variant":{"name":"disabled","enabled":false,"feature_enabled":true},"impressionData":false}],"googleFontsInlined":true},"customCss":[]}
{"page":{"pagePath":"integrations/hris","slug":"/integrations/hris","pageMetadata":{"title":"HRIS integrations","description":"Connect your HR system so new hires, employee records and HR reference lists flow between it and Journeyfront without retyping.","href":"/integrations/hris"},"description":{"compiledSource":"\"use strict\";\nconst {jsx: _jsx} = arguments[0];\nconst {useMDXComponents: _provideComponents} = arguments[0];\nfunction _createMdxContent(props) {\n const _components = {\n p: \"p\",\n ..._provideComponents(),\n ...props.components\n };\n return _jsx(_components.p, {\n children: \"Connect your HR system so new hires, employee records and HR reference lists flow between it and Journeyfront without retyping.\"\n });\n}\nfunction MDXContent(props = {}) {\n const {wrapper: MDXLayout} = {\n ..._provideComponents(),\n ...props.components\n };\n return MDXLayout ? _jsx(MDXLayout, {\n ...props,\n children: _jsx(_createMdxContent, {\n ...props\n })\n }) : _createMdxContent(props);\n}\nreturn {\n default: MDXContent\n};\n","frontmatter":{},"scope":{}},"pageType":"default","mdx":{"mdxSource":{"compiledSource":"\"use strict\";const{Fragment:_Fragment,jsx:_jsx,jsxs:_jsxs}=arguments[0];const{useMDXComponents:_provideComponents}=arguments[0];function _createMdxContent(props){const _components={code:`code`,em:`em`,li:`li`,p:`p`,strong:`strong`,tbody:`tbody`,td:`td`,th:`th`,thead:`thead`,tr:`tr`,ul:`ul`,..._provideComponents(),...props.components},{Accordion,AccordionGroup,Card,Columns,Frame,Heading,Info,Note,OptimizedFrame,OptimizedImage,Step,Steps,Table,Tip,Warning}=_components;if(!Accordion)_missingMdxReference(`Accordion`,true);if(!AccordionGroup)_missingMdxReference(`AccordionGroup`,true);if(!Card)_missingMdxReference(`Card`,true);if(!Columns)_missingMdxReference(`Columns`,true);if(!Frame)_missingMdxReference(`Frame`,true);if(!Heading)_missingMdxReference(`Heading`,true);if(!Info)_missingMdxReference(`Info`,true);if(!Note)_missingMdxReference(`Note`,true);if(!OptimizedFrame)_missingMdxReference(`OptimizedFrame`,true);if(!OptimizedImage)_missingMdxReference(`OptimizedImage`,true);if(!Step)_missingMdxReference(`Step`,true);if(!Steps)_missingMdxReference(`Steps`,true);if(!Table)_missingMdxReference(`Table`,true);if(!Tip)_missingMdxReference(`Tip`,true);if(!Warning)_missingMdxReference(`Warning`,true);return _jsxs(_Fragment,{children:[_jsxs(Info,{children:[_jsxs(_components.p,{children:[_jsx(_components.strong,{children:`Who can do this:`}),` Admins with the `,_jsx(_components.em,{children:`Company Settings Access`}),` permission connect and configure the integration. Users with the `,_jsx(_components.em,{children:`Hire Candidates`}),` permission create employees in your HR system when they hire.`]}),_jsxs(_components.p,{children:[_jsx(_components.strong,{children:`Availability:`}),` Your HR system needs to be on the supported list. If you don’t see it on the `,_jsx(_components.strong,{children:`Integrations`}),` page, ask your Customer Success Manager.`]})]}),`\n`,_jsx(_components.p,{children:`Journeyfront connects to your human resources information system (HRIS) so hiring data moves without spreadsheets or copy and paste. You can create a new hire’s employee record in your HR system in one click, keep Journeyfront’s employee records in step with your HR system, and pick real HR records, like departments and work locations, in your custom fields.`}),`\n`,_jsx(_components.p,{children:`Journeyfront works with many HR systems, including Workday, BambooHR, ADP, Paylocity, Paychex and UKG, through one standard integration. Setup is the same whichever system you use.`}),`\n`,_jsx(Heading,{level:`2`,id:`what-the-integration-does`,children:`What the integration does`}),`\n`,_jsxs(Table,{children:[_jsx(_components.thead,{children:_jsxs(_components.tr,{children:[_jsx(_components.th,{children:`Feature`}),_jsx(_components.th,{children:`Direction`}),_jsx(_components.th,{children:`What it does`})]})}),_jsxs(_components.tbody,{children:[_jsxs(_components.tr,{children:[_jsx(_components.td,{children:_jsx(_components.strong,{children:`Create employees`})}),_jsx(_components.td,{children:`Journeyfront to your HR system`}),_jsx(_components.td,{children:`When you hire a candidate, create their employee record in your HR system, with documents attached.`})]}),_jsxs(_components.tr,{children:[_jsx(_components.td,{children:_jsx(_components.strong,{children:`Employee sync`})}),_jsx(_components.td,{children:`Your HR system to Journeyfront`}),_jsxs(_components.td,{children:[`Bring your employees into the Journeyfront `,_jsx(_components.strong,{children:`Employees`}),` page on a schedule, and optionally mark matching Candidate Applications as hired.`]})]}),_jsxs(_components.tr,{children:[_jsx(_components.td,{children:_jsx(_components.strong,{children:`HRIS objects`})}),_jsx(_components.td,{children:`Your HR system to Journeyfront`}),_jsx(_components.td,{children:`Pick records from your HR system in custom fields on job reqs, hiring classes and offers.`})]})]})]}),`\n`,_jsx(Heading,{level:`2`,id:`connect-your-hr-system`,children:`Connect your HR system`}),`\n`,_jsx(_components.p,{children:`Before you start, make sure you have:`}),`\n`,_jsxs(_components.ul,{children:[`\n`,_jsxs(_components.li,{children:[_jsx(_components.strong,{children:`Sign-in details for your HR system.`}),` Depending on the system, you may also need an API key or client secret. Your HRIS administrator can help.`]}),`\n`,_jsxs(_components.li,{children:[_jsx(_components.strong,{children:`The right access in your HR system.`}),` The account you connect with needs permission to create employee records and to read the data Journeyfront uses, such as locations and departments.`]}),`\n`]}),`\n`,_jsxs(Steps,{children:[_jsxs(Step,{title:`Find your HR system`,children:[_jsxs(_components.p,{children:[`Go to `,_jsx(_components.strong,{children:`Settings`}),`, then `,_jsx(_components.strong,{children:`Integrations`}),`. HR systems are listed under `,_jsx(_components.strong,{children:`HRIS`}),`. Use `,_jsx(_components.strong,{children:`Filter`}),` or `,_jsx(_components.strong,{children:`Search`}),` to find yours quickly.`]}),_jsx(Frame,{children:_jsx(OptimizedImage,{src:`https://mintcdn.com/journeyfront/jgBPyq0oPVTYhwCy/images/integrations/hris/gen-integrations-tiles.png?fit=max\u0026auto=format\u0026n=jgBPyq0oPVTYhwCy\u0026q=85\u0026s=a70606f94e54434eca88ecb0d82fda93`,alt:`The Integrations page in Settings, with HR systems such as Workday, UKG Pro and BambooHR listed under HRIS, ATSs listed under ATS, and the Filter and Search boxes highlighted`,\"data-og-width\":`1890`,width:`1890`,\"data-og-height\":`1162`,height:`1162`,\"data-path\":`images/integrations/hris/gen-integrations-tiles.png`,\"data-optimize\":`true`,\"data-opv\":`3`,srcset:`https://mintcdn.com/journeyfront/jgBPyq0oPVTYhwCy/images/integrations/hris/gen-integrations-tiles.png?w=280\u0026fit=max\u0026auto=format\u0026n=jgBPyq0oPVTYhwCy\u0026q=85\u0026s=4080f9dd395419d836f2b652dc3e72b3 280w, https://mintcdn.com/journeyfront/jgBPyq0oPVTYhwCy/images/integrations/hris/gen-integrations-tiles.png?w=560\u0026fit=max\u0026auto=format\u0026n=jgBPyq0oPVTYhwCy\u0026q=85\u0026s=e8f28f767d3d983b8c7f94b71cb61db5 560w, https://mintcdn.com/journeyfront/jgBPyq0oPVTYhwCy/images/integrations/hris/gen-integrations-tiles.png?w=840\u0026fit=max\u0026auto=format\u0026n=jgBPyq0oPVTYhwCy\u0026q=85\u0026s=4924c28bba1138968391440e5ee56408 840w, https://mintcdn.com/journeyfront/jgBPyq0oPVTYhwCy/images/integrations/hris/gen-integrations-tiles.png?w=1100\u0026fit=max\u0026auto=format\u0026n=jgBPyq0oPVTYhwCy\u0026q=85\u0026s=667e89d802701601391df14455d1bd52 1100w, https://mintcdn.com/journeyfront/jgBPyq0oPVTYhwCy/images/integrations/hris/gen-integrations-tiles.png?w=1650\u0026fit=max\u0026auto=format\u0026n=jgBPyq0oPVTYhwCy\u0026q=85\u0026s=0283acc0efde3952da48dc2a2eb9e5ac 1650w, https://mintcdn.com/journeyfront/jgBPyq0oPVTYhwCy/images/integrations/hris/gen-integrations-tiles.png?w=2500\u0026fit=max\u0026auto=format\u0026n=jgBPyq0oPVTYhwCy\u0026q=85\u0026s=93c626d55855795c41d846f12db4faf0 2500w`})})]}),_jsxs(Step,{title:`Start the connection`,children:[_jsxs(_components.p,{children:[`Click your HR system’s tile, then click `,_jsx(_components.strong,{children:`Connect to`}),` followed by its name.`]}),_jsx(Frame,{children:_jsx(OptimizedImage,{src:`https://mintcdn.com/journeyfront/g7xdp16h6ZFRxhHy/images/integrations/hris/02-connect.png?fit=max\u0026auto=format\u0026n=g7xdp16h6ZFRxhHy\u0026q=85\u0026s=13c7035d6edb6370f89dbfcab6abf589`,alt:`An HR system's integration page, here UKG Pro, with an Inactive status and the Connect to UKG Pro button`,\"data-og-width\":`3200`,width:`3200`,\"data-og-height\":`2000`,height:`2000`,\"data-path\":`images/integrations/hris/02-connect.png`,\"data-optimize\":`true`,\"data-opv\":`3`,srcset:`https://mintcdn.com/journeyfront/g7xdp16h6ZFRxhHy/images/integrations/hris/02-connect.png?w=280\u0026fit=max\u0026auto=format\u0026n=g7xdp16h6ZFRxhHy\u0026q=85\u0026s=f8a07090c5692abe91c9228c3f5b21fc 280w, https://mintcdn.com/journeyfront/g7xdp16h6ZFRxhHy/images/integrations/hris/02-connect.png?w=560\u0026fit=max\u0026auto=format\u0026n=g7xdp16h6ZFRxhHy\u0026q=85\u0026s=29bf76595b581e081c1331e683868eea 560w, https://mintcdn.com/journeyfront/g7xdp16h6ZFRxhHy/images/integrations/hris/02-connect.png?w=840\u0026fit=max\u0026auto=format\u0026n=g7xdp16h6ZFRxhHy\u0026q=85\u0026s=7de9ab14f2db7453e4bcfca4160888ee 840w, https://mintcdn.com/journeyfront/g7xdp16h6ZFRxhHy/images/integrations/hris/02-connect.png?w=1100\u0026fit=max\u0026auto=format\u0026n=g7xdp16h6ZFRxhHy\u0026q=85\u0026s=283c73ca3ad80f3d38705a4669a8efd5 1100w, https://mintcdn.com/journeyfront/g7xdp16h6ZFRxhHy/images/integrations/hris/02-connect.png?w=1650\u0026fit=max\u0026auto=format\u0026n=g7xdp16h6ZFRxhHy\u0026q=85\u0026s=305386aa91be764b76be6a5ed8db831a 1650w, https://mintcdn.com/journeyfront/g7xdp16h6ZFRxhHy/images/integrations/hris/02-connect.png?w=2500\u0026fit=max\u0026auto=format\u0026n=g7xdp16h6ZFRxhHy\u0026q=85\u0026s=bffb1d5763f3ee68071b04dfe0f9cea2 2500w`})})]}),_jsxs(Step,{title:`Review permissions and sign in`,children:[_jsx(_components.p,{children:`A secure window lists the data Journeyfront is asking to access. Review it and continue. Then follow the steps for your HR system: sign in, or enter the key it asks for. A short guide at the bottom of the window explains where to find each value.`}),_jsx(Frame,{children:_jsx(OptimizedImage,{src:`https://mintcdn.com/journeyfront/jgBPyq0oPVTYhwCy/images/integrations/hris/08-connection-guide.png?fit=max\u0026auto=format\u0026n=jgBPyq0oPVTYhwCy\u0026q=85\u0026s=e52b2ea7a4a3909ae7ce964987c3bf39`,alt:`The secure connection window for Workday asking for the Workday REST API Endpoint, with the View Guide link for the connection guide highlighted at the bottom`,\"data-og-width\":`435`,width:`435`,\"data-og-height\":`762`,height:`762`,\"data-path\":`images/integrations/hris/08-connection-guide.png`,\"data-optimize\":`true`,\"data-opv\":`3`,srcset:`https://mintcdn.com/journeyfront/jgBPyq0oPVTYhwCy/images/integrations/hris/08-connection-guide.png?w=280\u0026fit=max\u0026auto=format\u0026n=jgBPyq0oPVTYhwCy\u0026q=85\u0026s=b8e2711f75f97a060311ba7ee0e82132 280w, https://mintcdn.com/journeyfront/jgBPyq0oPVTYhwCy/images/integrations/hris/08-connection-guide.png?w=560\u0026fit=max\u0026auto=format\u0026n=jgBPyq0oPVTYhwCy\u0026q=85\u0026s=15ebbebc2809329a7b0f6e8353fb6aef 560w, https://mintcdn.com/journeyfront/jgBPyq0oPVTYhwCy/images/integrations/hris/08-connection-guide.png?w=840\u0026fit=max\u0026auto=format\u0026n=jgBPyq0oPVTYhwCy\u0026q=85\u0026s=3078b44af0bb1905ce0eff42be98e2ed 840w, https://mintcdn.com/journeyfront/jgBPyq0oPVTYhwCy/images/integrations/hris/08-connection-guide.png?w=1100\u0026fit=max\u0026auto=format\u0026n=jgBPyq0oPVTYhwCy\u0026q=85\u0026s=f9555d236c5cececcd0af9e453ea390a 1100w, https://mintcdn.com/journeyfront/jgBPyq0oPVTYhwCy/images/integrations/hris/08-connection-guide.png?w=1650\u0026fit=max\u0026auto=format\u0026n=jgBPyq0oPVTYhwCy\u0026q=85\u0026s=6222220fecc28f615f04cb4a6e2d5cbe 1650w, https://mintcdn.com/journeyfront/jgBPyq0oPVTYhwCy/images/integrations/hris/08-connection-guide.png?w=2500\u0026fit=max\u0026auto=format\u0026n=jgBPyq0oPVTYhwCy\u0026q=85\u0026s=d08a0b23be81c803a3853675aee163f3 2500w`})})]}),_jsx(Step,{title:`Confirm the connection`,children:_jsxs(_components.p,{children:[`When you see `,_jsx(_components.strong,{children:`Connection set up successfully!`}),`, close the window. The tile now shows `,_jsx(_components.strong,{children:`Active`}),`, and the `,_jsx(_components.strong,{children:`Details`}),` tab shows who connected it and when.`]})})]}),`\n`,_jsxs(_components.p,{children:[`Once connected, your HR system’s page in `,_jsx(_components.strong,{children:`Integrations`}),` has these tabs:`]}),`\n`,_jsxs(Table,{children:[_jsx(_components.thead,{children:_jsxs(_components.tr,{children:[_jsx(_components.th,{children:`Tab`}),_jsx(_components.th,{children:`What it’s for`})]})}),_jsxs(_components.tbody,{children:[_jsxs(_components.tr,{children:[_jsx(_components.td,{children:_jsx(_components.strong,{children:`Details`})}),_jsxs(_components.td,{children:[`Connection status, who connected it and when, and `,_jsx(_components.strong,{children:`Disconnect`})]})]}),_jsxs(_components.tr,{children:[_jsx(_components.td,{children:_jsx(_components.strong,{children:`Create Employee Settings`})}),_jsx(_components.td,{children:`Turn on employee creation at hire and map the fields it sends`})]}),_jsxs(_components.tr,{children:[_jsx(_components.td,{children:_jsx(_components.strong,{children:`Employee Sync Settings`})}),_jsx(_components.td,{children:`Schedule the employee sync, choose how people are matched, and map synced fields`})]}),_jsxs(_components.tr,{children:[_jsx(_components.td,{children:_jsx(_components.strong,{children:`Job Profile Mapping`})}),_jsx(_components.td,{children:`Match your HR system’s job titles to Journeyfront job profiles`})]}),_jsxs(_components.tr,{children:[_jsx(_components.td,{children:_jsx(_components.strong,{children:`Sync History`})}),_jsx(_components.td,{children:`Preview a sync, run one now, and review past runs`})]}),_jsxs(_components.tr,{children:[_jsx(_components.td,{children:_jsx(_components.strong,{children:`HRIS Objects`})}),_jsx(_components.td,{children:`See the HR records and lists available to your custom fields`})]})]})]}),`\n`,_jsx(Heading,{level:`2`,id:`create-employees-when-you-hire`,children:`Create employees when you hire`}),`\n`,_jsx(Heading,{level:`3`,id:`turn-on-employee-creation`,children:`Turn on employee creation`}),`\n`,_jsxs(Steps,{children:[_jsx(Step,{title:`Open Create Employee Settings`,children:_jsxs(_components.p,{children:[`Go to `,_jsx(_components.strong,{children:`Settings`}),`, then `,_jsx(_components.strong,{children:`Integrations`}),`, open your HR system, and select the `,_jsx(_components.strong,{children:`Create Employee Settings`}),` tab.`]})}),_jsx(Step,{title:`Turn it on`,children:_jsxs(_components.p,{children:[`Turn on `,_jsx(_components.strong,{children:`Enable Employee Creation`}),` and click `,_jsx(_components.strong,{children:`Save`}),`. The `,_jsx(_components.strong,{children:`Create Employee in`}),` option now appears in the hire window for your team.`]})}),_jsx(Step,{title:`Map your fields`,children:_jsxs(_components.p,{children:[`Under `,_jsx(_components.strong,{children:`Field Mappings`}),`, choose which Journeyfront field fills each field in your HR system. Add a `,_jsx(_components.strong,{children:`Default Value`}),` for any field that should be filled in when the Journeyfront field is empty.`]})})]}),`\n`,_jsx(_components.p,{children:`Two more settings appear once employee creation is on:`}),`\n`,_jsxs(_components.ul,{children:[`\n`,_jsxs(_components.li,{children:[_jsx(_components.strong,{children:`Pass JF Country Options`}),` and `,_jsx(_components.strong,{children:`Pass JF State Options:`}),` if your HR system doesn’t supply its own country or state list, Journeyfront fills the dropdown from its own list. Turn these off if your HR system expects different codes; the field then becomes free text.`]}),`\n`]}),`\n`,_jsx(Tip,{children:_jsx(_components.p,{children:`Set default values for fields your HR system requires but recruiters rarely know at the moment of hire, such as a standard work schedule. Recruiters then only fill in what’s different, and fewer sends stop on a missing field.`})}),`\n`,_jsx(Heading,{level:`3`,id:`send-a-new-hire-to-your-hr-system`,children:`Send a new hire to your HR system`}),`\n`,_jsxs(Steps,{children:[_jsxs(Step,{title:`Hire the candidate`,children:[_jsxs(_components.p,{children:[`On the Candidate Application, click `,_jsx(_components.strong,{children:`Actions`}),`, then `,_jsx(_components.strong,{children:`Hire`}),`. In the hire window, make sure `,_jsx(_components.strong,{children:`Create Employee in`}),` your HR system is checked (it’s checked for you when your HR system is connected), then complete the hire.`]}),_jsx(Frame,{children:_jsx(OptimizedImage,{src:`https://mintcdn.com/journeyfront/jgBPyq0oPVTYhwCy/images/integrations/hris/gen-hire.png?fit=max\u0026auto=format\u0026n=jgBPyq0oPVTYhwCy\u0026q=85\u0026s=78dae7039751422716736dd6dab61064`,alt:`The Hire window for a candidate, with the HRIS Integration option Create Employee in UKG Pro checked`,\"data-og-width\":`1520`,width:`1520`,\"data-og-height\":`1434`,height:`1434`,\"data-path\":`images/integrations/hris/gen-hire.png`,\"data-optimize\":`true`,\"data-opv\":`3`,srcset:`https://mintcdn.com/journeyfront/jgBPyq0oPVTYhwCy/images/integrations/hris/gen-hire.png?w=280\u0026fit=max\u0026auto=format\u0026n=jgBPyq0oPVTYhwCy\u0026q=85\u0026s=5261b32a09c46deed69b1d0dfb22b8b2 280w, https://mintcdn.com/journeyfront/jgBPyq0oPVTYhwCy/images/integrations/hris/gen-hire.png?w=560\u0026fit=max\u0026auto=format\u0026n=jgBPyq0oPVTYhwCy\u0026q=85\u0026s=5fd12acdcf70c57bc72fd748f234097b 560w, https://mintcdn.com/journeyfront/jgBPyq0oPVTYhwCy/images/integrations/hris/gen-hire.png?w=840\u0026fit=max\u0026auto=format\u0026n=jgBPyq0oPVTYhwCy\u0026q=85\u0026s=3459564058f28e5dafd05da43c40ae61 840w, https://mintcdn.com/journeyfront/jgBPyq0oPVTYhwCy/images/integrations/hris/gen-hire.png?w=1100\u0026fit=max\u0026auto=format\u0026n=jgBPyq0oPVTYhwCy\u0026q=85\u0026s=87ad60bc46ebe15b566b81b7957fe7ea 1100w, https://mintcdn.com/journeyfront/jgBPyq0oPVTYhwCy/images/integrations/hris/gen-hire.png?w=1650\u0026fit=max\u0026auto=format\u0026n=jgBPyq0oPVTYhwCy\u0026q=85\u0026s=105d34794ec7c7312c2dd5abac055aee 1650w, https://mintcdn.com/journeyfront/jgBPyq0oPVTYhwCy/images/integrations/hris/gen-hire.png?w=2500\u0026fit=max\u0026auto=format\u0026n=jgBPyq0oPVTYhwCy\u0026q=85\u0026s=ef3c2a70075c7225005b4f0f0ff89d5a 2500w`})})]}),_jsx(Step,{title:`Review the mapped information`,children:_jsx(_components.p,{children:`A window opens showing what Journeyfront filled in from the Candidate Application on the left, and your HR system’s fields on the right. Check the pre-filled values, such as name and email.`})}),_jsx(Step,{title:`Fill in required fields`,children:_jsx(_components.p,{children:`Fill in anything your HR system requires that Journeyfront doesn’t have, such as a start date, work location or manager. Required fields are marked with a red asterisk (*).`})}),_jsx(Step,{title:`Attach documents and send`,children:_jsxs(_components.p,{children:[`Choose any documents to include, such as the resume or signed offer letter, if your HR system accepts them. Then click `,_jsx(_components.strong,{children:`Send`}),`.`]})})]}),`\n`,_jsxs(_components.p,{children:[`The employee record is created in your HR system right away. Journeyfront records who sent it and when at the top of the Candidate Application and in `,_jsx(_components.strong,{children:`Comments \u0026 Activities`}),`.`]}),`\n`,_jsx(Note,{children:_jsx(_components.p,{children:`Some HR systems, such as ADP and Paychex, create the record as an in-progress or onboarding hire rather than an active employee. That’s decided by your HR system, not Journeyfront.`})}),`\n`,_jsx(Frame,{children:_jsx(OptimizedImage,{src:`https://mintcdn.com/journeyfront/jgBPyq0oPVTYhwCy/images/integrations/hris/gen-send-to-hris.png?fit=max\u0026auto=format\u0026n=jgBPyq0oPVTYhwCy\u0026q=85\u0026s=822874009dbff9e259958b30ce567ec5`,alt:`The Send to UKG Pro window, with fields mapped from Journeyfront filled in, the required Start Date still empty, and the resume and signed offer letter selected as attachments`,\"data-og-width\":`1860`,width:`1860`,\"data-og-height\":`1253`,height:`1253`,\"data-path\":`images/integrations/hris/gen-send-to-hris.png`,\"data-optimize\":`true`,\"data-opv\":`3`,srcset:`https://mintcdn.com/journeyfront/jgBPyq0oPVTYhwCy/images/integrations/hris/gen-send-to-hris.png?w=280\u0026fit=max\u0026auto=format\u0026n=jgBPyq0oPVTYhwCy\u0026q=85\u0026s=b533853110cb4ff0ccfef1e893e9edad 280w, https://mintcdn.com/journeyfront/jgBPyq0oPVTYhwCy/images/integrations/hris/gen-send-to-hris.png?w=560\u0026fit=max\u0026auto=format\u0026n=jgBPyq0oPVTYhwCy\u0026q=85\u0026s=30d16b661b83739a906088df0a36cb4b 560w, https://mintcdn.com/journeyfront/jgBPyq0oPVTYhwCy/images/integrations/hris/gen-send-to-hris.png?w=840\u0026fit=max\u0026auto=format\u0026n=jgBPyq0oPVTYhwCy\u0026q=85\u0026s=46e9f47d4f85a92152f314d83fae7f10 840w, https://mintcdn.com/journeyfront/jgBPyq0oPVTYhwCy/images/integrations/hris/gen-send-to-hris.png?w=1100\u0026fit=max\u0026auto=format\u0026n=jgBPyq0oPVTYhwCy\u0026q=85\u0026s=b8eddb5e0265f79757c073ebb42ca1f7 1100w, https://mintcdn.com/journeyfront/jgBPyq0oPVTYhwCy/images/integrations/hris/gen-send-to-hris.png?w=1650\u0026fit=max\u0026auto=format\u0026n=jgBPyq0oPVTYhwCy\u0026q=85\u0026s=2291ecd26dfe8c34fd8fd3b30e774f03 1650w, https://mintcdn.com/journeyfront/jgBPyq0oPVTYhwCy/images/integrations/hris/gen-send-to-hris.png?w=2500\u0026fit=max\u0026auto=format\u0026n=jgBPyq0oPVTYhwCy\u0026q=85\u0026s=b11cc1576eb416a68652116839eaeb3f 2500w`})}),`\n`,_jsx(Heading,{level:`2`,id:`sync-employees-from-your-hr-system`,children:`Sync employees from your HR system`}),`\n`,_jsxs(_components.p,{children:[`The employee sync brings your employees from your HR system into the Journeyfront `,_jsx(_components.strong,{children:`Employees`}),` page on a schedule. It updates people who already exist in Journeyfront, adds new ones, and can mark their Candidate Applications as hired.`]}),`\n`,_jsx(Heading,{level:`3`,id:`set-up-the-sync`,children:`Set up the sync`}),`\n`,_jsxs(_components.p,{children:[`Go to `,_jsx(_components.strong,{children:`Settings`}),`, then `,_jsx(_components.strong,{children:`Integrations`}),`, open your HR system, and select `,_jsx(_components.strong,{children:`Employee Sync Settings`}),`.`]}),`\n`,_jsxs(Table,{children:[_jsx(_components.thead,{children:_jsxs(_components.tr,{children:[_jsx(_components.th,{children:`Setting`}),_jsx(_components.th,{children:`What it does`})]})}),_jsxs(_components.tbody,{children:[_jsxs(_components.tr,{children:[_jsx(_components.td,{children:_jsx(_components.strong,{children:`Enable Sync`})}),_jsx(_components.td,{children:`Runs the sync on your schedule. Turn it off to pause syncing without losing your settings.`})]}),_jsxs(_components.tr,{children:[_jsx(_components.td,{children:_jsx(_components.strong,{children:`Sync Cadence`})}),_jsxs(_components.td,{children:[_jsx(_components.strong,{children:`Daily`}),`, `,_jsx(_components.strong,{children:`Weekly`}),` (pick the day) or `,_jsx(_components.strong,{children:`Monthly`}),` (pick a day from 1 to 28).`]})]}),_jsxs(_components.tr,{children:[_jsxs(_components.td,{children:[_jsx(_components.strong,{children:`Employee Identifier`}),` fields`]}),_jsxs(_components.td,{children:[`How each employee in your HR system is matched to a person in Journeyfront. Choose the value your HR system holds (`,_jsx(_components.strong,{children:`Personal Email`}),`, `,_jsx(_components.strong,{children:`Work Email`}),`, `,_jsx(_components.strong,{children:`Employee Number`}),` or `,_jsx(_components.strong,{children:`Employee ID`}),`). Journeyfront compares an email with the person’s `,_jsx(_components.strong,{children:`Email`}),`, and a number or ID with their `,_jsx(_components.strong,{children:`External Employee Identifier`}),`. A match is updated; anyone without a match is added.`]})]}),_jsxs(_components.tr,{children:[_jsx(_components.td,{children:_jsx(_components.strong,{children:`Auto-Mark as Hired`})}),_jsxs(_components.td,{children:[`Finds the employee’s Candidate Application in the job req tied to their job profile and marks it `,_jsx(_components.strong,{children:`Hired`}),`. Applications already hired or rejected are left alone.`]})]}),_jsxs(_components.tr,{children:[_jsx(_components.td,{children:_jsx(_components.strong,{children:`When Multiple Applications Match`})}),_jsxs(_components.td,{children:[_jsx(_components.strong,{children:`Mark most recent`}),`, `,_jsx(_components.strong,{children:`Skip if multiple`}),` (leave it for a person to review), or `,_jsx(_components.strong,{children:`Closest to hire date (window)`}),`, which picks the application closest to the hire date within the number of days you set.`]})]}),_jsxs(_components.tr,{children:[_jsx(_components.td,{children:_jsx(_components.strong,{children:`Configure Employee Filters`})}),_jsx(_components.td,{children:`Limit which employees are pulled, for example by department, location or employment status. Changes apply on the next sync.`})]})]})]}),`\n`,_jsxs(_components.p,{children:[`Click `,_jsx(_components.strong,{children:`Save Configuration`}),`. Once the sync is on, the `,_jsx(_components.strong,{children:`Field Mapping`}),` section appears below. Map the fields pulled from your HR system to Journeyfront fields, and choose `,_jsx(_components.strong,{children:`Unknown Option Handling`}),` for dropdown fields: `,_jsx(_components.strong,{children:`Auto-create`}),` adds a value that isn’t an option yet, and `,_jsx(_components.strong,{children:`Skip`}),` leaves the field blank.`]}),`\n`,_jsx(Tip,{children:_jsxs(_components.p,{children:[`Pick an identifier both systems really share. If candidates apply with their personal email, `,_jsx(_components.strong,{children:`Personal Email`}),` finds the most matches. Use `,_jsx(_components.strong,{children:`Work Email`}),` only when work emails are reliably filled in your HR system, and `,_jsx(_components.strong,{children:`Employee Number`}),` or `,_jsx(_components.strong,{children:`Employee ID`}),` when Journeyfront already stores that number for your people.`]})}),`\n`,_jsx(Heading,{level:`3`,id:`map-job-titles-to-job-profiles`,children:`Map job titles to job profiles`}),`\n`,_jsxs(_components.p,{children:[`On the `,_jsx(_components.strong,{children:`Job Profile Mapping`}),` tab, match each job title in your HR system to a Journeyfront job profile. Synced employees are assigned to that profile, and `,_jsx(_components.strong,{children:`Auto-Mark as Hired`}),` uses it to find the right job req.`]}),`\n`,_jsxs(_components.ul,{children:[`\n`,_jsxs(_components.li,{children:[_jsx(_components.strong,{children:`Match Strategy:`}),` use `,_jsx(_components.strong,{children:`Job Title only`}),` for one profile per title. Use `,_jsx(_components.strong,{children:`Job Title + Location`}),` or `,_jsx(_components.strong,{children:`Job Title + Department`}),` when the same title maps to different profiles depending on where someone works.`]}),`\n`,_jsxs(_components.li,{children:[_jsx(_components.strong,{children:`Add Manual Mapping`}),` adds one mapping at a time. For many titles, click `,_jsx(_components.strong,{children:`Download Template`}),`, fill it in, and use `,_jsx(_components.strong,{children:`Import CSV`}),`.`]}),`\n`]}),`\n`,_jsx(_components.p,{children:`Titles without a mapping are flagged when the sync runs.`}),`\n`,_jsx(Heading,{level:`3`,id:`preview-and-review-syncs`,children:`Preview and review syncs`}),`\n`,_jsxs(_components.p,{children:[`The `,_jsx(_components.strong,{children:`Sync History`}),` tab lists every run with its date, status, who started it, and how many people were created, updated, unchanged or had errors. Click `,_jsx(_components.strong,{children:`View`}),` to see the results of a run, or `,_jsx(_components.strong,{children:`CSV`}),` to download them.`]}),`\n`,_jsxs(Steps,{children:[_jsx(Step,{title:`Preview first`,children:_jsxs(_components.p,{children:[`Click `,_jsx(_components.strong,{children:`Preview Sync`}),` to see what a sync would do without changing anything. A preview is required before your first sync.`]})}),_jsx(Step,{title:`Run the sync`,children:_jsxs(_components.p,{children:[`When the preview looks right, click `,_jsx(_components.strong,{children:`Run Sync Now`}),` and confirm. After that, the sync also runs on your schedule.`]})})]}),`\n`,_jsx(Warning,{children:_jsx(_components.p,{children:`A sync can create, update and end employee records in Journeyfront based on your HR system’s data. Review a preview after any change to your matching, filters or mappings.`})}),`\n`,_jsx(Heading,{level:`2`,id:`pick-hr-records-in-custom-fields-hris-objects`,children:`Pick HR records in custom fields (HRIS objects)`}),`\n`,_jsxs(_components.p,{children:[`An `,_jsx(_components.strong,{children:`HRIS Object`}),` custom field lets your team pick a record straight from your HR system, such as a work location, company, department, job code or employee, instead of typing its code by hand. The field keeps both the record’s `,_jsx(_components.strong,{children:`name`}),`, so people can read it, and your HR system’s `,_jsx(_components.strong,{children:`code`}),` for it, so your exports, offer letters and other systems get exactly what they expect.`]}),`\n`,_jsx(_components.p,{children:`You can add HRIS Object fields to job reqs, hiring classes and offers. Candidates never see them; they aren’t available on application forms.`}),`\n`,_jsx(Frame,{children:_jsx(OptimizedFrame,{src:`https://www.youtube.com/embed/6Xawbfedzss`,title:`HRIS objects in custom fields`,frameBorder:`0`,allow:`accelerometer; autoplay; clipboard-write; encrypted-media; gyroscope; picture-in-picture`,allowFullScreen:true,style:{width:`100%`,aspectRatio:`16 / 9`}})}),`\n`,_jsx(Heading,{level:`3`,id:`create-an-hris-object-field`,children:`Create an HRIS Object field`}),`\n`,_jsxs(Steps,{children:[_jsx(Step,{title:`Open the field settings`,children:_jsxs(_components.p,{children:[`Go to `,_jsx(_components.strong,{children:`Settings`}),`, then `,_jsx(_components.strong,{children:`Custom Fields`}),`, then `,_jsx(_components.strong,{children:`Job Req Fields`}),` or `,_jsx(_components.strong,{children:`Hiring Class Fields`}),`. For offers, go to `,_jsx(_components.strong,{children:`Settings`}),`, then `,_jsx(_components.strong,{children:`Offers`}),`, then `,_jsx(_components.strong,{children:`Offer Fields`}),`. Add a field.`]})}),_jsx(Step,{title:`Name it`,children:_jsxs(_components.p,{children:[`Enter a `,_jsx(_components.strong,{children:`Label`}),`, the name everyone sees on the form and as a column header, such as “Department”. The `,_jsx(_components.strong,{children:`Key`}),` is suggested from the label. You can edit the key before you save, but not after.`]})}),_jsx(Step,{title:`Choose the list`,children:_jsxs(_components.p,{children:[`Set `,_jsx(_components.strong,{children:`Type`}),` to `,_jsx(_components.strong,{children:`HRIS Object`}),`, then choose the `,_jsx(_components.strong,{children:`HRIS Object`}),` list the field draws from. Lists are named the way your HR system names them, with a short description of each. If you picked a list of groups, set a `,_jsx(_components.strong,{children:`Group Type`}),` to narrow it, for example so one field means Department and another means Division.`]})}),_jsxs(Step,{title:`Check the preview and save`,children:[_jsxs(_components.p,{children:[`The `,_jsx(_components.strong,{children:`Preview`}),` shows the real picker with your real records, so you can search it exactly as your team will. The `,_jsx(_components.strong,{children:`Values`}),` row shows the two values the field produces and their merge fields. Click `,_jsx(_components.strong,{children:`Save`}),`.`]}),_jsx(Frame,{children:_jsx(OptimizedImage,{src:`https://mintcdn.com/journeyfront/jgBPyq0oPVTYhwCy/images/integrations/hris/04-field-setup.png?fit=max\u0026auto=format\u0026n=jgBPyq0oPVTYhwCy\u0026q=85\u0026s=09145a96520421655440f4f6faa36726`,alt:`The Add Hiring Class Field window with Field Type set to HRIS Object and the HRIS Object list open, offering Location, Company, Group, Job and Employee`,\"data-og-width\":`1600`,width:`1600`,\"data-og-height\":`1112`,height:`1112`,\"data-path\":`images/integrations/hris/04-field-setup.png`,\"data-optimize\":`true`,\"data-opv\":`3`,srcset:`https://mintcdn.com/journeyfront/jgBPyq0oPVTYhwCy/images/integrations/hris/04-field-setup.png?w=280\u0026fit=max\u0026auto=format\u0026n=jgBPyq0oPVTYhwCy\u0026q=85\u0026s=c247b18514ee055e87fe5badc21f7d2e 280w, https://mintcdn.com/journeyfront/jgBPyq0oPVTYhwCy/images/integrations/hris/04-field-setup.png?w=560\u0026fit=max\u0026auto=format\u0026n=jgBPyq0oPVTYhwCy\u0026q=85\u0026s=9760429f254c62d15ed8838525b6c34c 560w, https://mintcdn.com/journeyfront/jgBPyq0oPVTYhwCy/images/integrations/hris/04-field-setup.png?w=840\u0026fit=max\u0026auto=format\u0026n=jgBPyq0oPVTYhwCy\u0026q=85\u0026s=f49ff58bb4e9433d8dede6c841356a14 840w, https://mintcdn.com/journeyfront/jgBPyq0oPVTYhwCy/images/integrations/hris/04-field-setup.png?w=1100\u0026fit=max\u0026auto=format\u0026n=jgBPyq0oPVTYhwCy\u0026q=85\u0026s=5e3d509fe32adb46450db6023159a03a 1100w, https://mintcdn.com/journeyfront/jgBPyq0oPVTYhwCy/images/integrations/hris/04-field-setup.png?w=1650\u0026fit=max\u0026auto=format\u0026n=jgBPyq0oPVTYhwCy\u0026q=85\u0026s=7bdddbb7cee6d8a7255b8e7ac4157d54 1650w, https://mintcdn.com/journeyfront/jgBPyq0oPVTYhwCy/images/integrations/hris/04-field-setup.png?w=2500\u0026fit=max\u0026auto=format\u0026n=jgBPyq0oPVTYhwCy\u0026q=85\u0026s=b1fd8a70c911bbeea750c042a1868d6a 2500w`})})]})]}),`\n`,_jsx(Tip,{children:_jsx(_components.p,{children:`Name the field the way your business talks about it, like “Cost Center”, even if your HR system calls the list something else. And use the Preview before you save: it’s the quickest way to confirm you picked the right list when several sound alike.`})}),`\n`,_jsx(Heading,{level:`3`,id:`pick-a-value`,children:`Pick a value`}),`\n`,_jsxs(_components.p,{children:[`Open the job req, hiring class or offer and click the field. A `,_jsx(_components.strong,{children:`Recently used`}),` section shows the five records your team chose most recently for that field. To find anything else, start typing a name or a code; a full code matches exactly and comes first. The field shows the record’s name with its code beside it as a chip, so leading zeros like `,_jsx(_components.code,{children:`0001`}),` stay visible.`]}),`\n`,_jsx(Frame,{children:_jsx(OptimizedImage,{src:`https://mintcdn.com/journeyfront/jgBPyq0oPVTYhwCy/images/integrations/hris/gen-picker.png?fit=max\u0026auto=format\u0026n=jgBPyq0oPVTYhwCy\u0026q=85\u0026s=b08427f2a8676e4f82c9200a4b5156e8`,alt:`A Work Location field on the Create Hiring Class window, open to show a search box, a Recently used section and all results, each location with its code beside it`,\"data-og-width\":`1600`,width:`1600`,\"data-og-height\":`1330`,height:`1330`,\"data-path\":`images/integrations/hris/gen-picker.png`,\"data-optimize\":`true`,\"data-opv\":`3`,srcset:`https://mintcdn.com/journeyfront/jgBPyq0oPVTYhwCy/images/integrations/hris/gen-picker.png?w=280\u0026fit=max\u0026auto=format\u0026n=jgBPyq0oPVTYhwCy\u0026q=85\u0026s=e812b9bb2071b80ec81d39afb0126927 280w, https://mintcdn.com/journeyfront/jgBPyq0oPVTYhwCy/images/integrations/hris/gen-picker.png?w=560\u0026fit=max\u0026auto=format\u0026n=jgBPyq0oPVTYhwCy\u0026q=85\u0026s=bf2c27910c3731bcfbe5e9efcfaa3901 560w, https://mintcdn.com/journeyfront/jgBPyq0oPVTYhwCy/images/integrations/hris/gen-picker.png?w=840\u0026fit=max\u0026auto=format\u0026n=jgBPyq0oPVTYhwCy\u0026q=85\u0026s=c7f5de7a216e64ee30e155fe3c4d90a9 840w, https://mintcdn.com/journeyfront/jgBPyq0oPVTYhwCy/images/integrations/hris/gen-picker.png?w=1100\u0026fit=max\u0026auto=format\u0026n=jgBPyq0oPVTYhwCy\u0026q=85\u0026s=b4d8b3df8dee203799ded1f5b8048a7d 1100w, https://mintcdn.com/journeyfront/jgBPyq0oPVTYhwCy/images/integrations/hris/gen-picker.png?w=1650\u0026fit=max\u0026auto=format\u0026n=jgBPyq0oPVTYhwCy\u0026q=85\u0026s=614ca09226f960e52cacb39793e89599 1650w, https://mintcdn.com/journeyfront/jgBPyq0oPVTYhwCy/images/integrations/hris/gen-picker.png?w=2500\u0026fit=max\u0026auto=format\u0026n=jgBPyq0oPVTYhwCy\u0026q=85\u0026s=4d0434293787f981937c9e9b0b27d68c 2500w`})}),`\n`,_jsx(_components.p,{children:`Records retired in your HR system don’t appear in the picker, so no one can choose one that no longer exists.`}),`\n`,_jsx(Heading,{level:`3`,id:`use-an-hris-object-field-in-offer-letters`,children:`Use an HRIS Object field in offer letters`}),`\n`,_jsxs(_components.p,{children:[`An HRIS Object offer field gives your templates two merge fields. Use the field’s key for the record’s name, for example `,_jsx(_components.code,{children:`{{WORK_LOCATION}}`}),`, and add `,_jsx(_components.code,{children:`_ID`}),` for your HR system’s code, for example `,_jsx(_components.code,{children:`{{WORK_LOCATION_ID}}`}),`. You can also set a default for the field on an offer package, so every offer from that package starts pre-filled.`]}),`\n`,_jsx(Heading,{level:`3`,id:`keep-your-lists-up-to-date`,children:`Keep your lists up to date`}),`\n`,_jsx(_components.p,{children:`Lists refresh automatically. Using the picker never calls your HR system; it reads what Journeyfront has already synced, so it stays fast and puts no load on your HR system.`}),`\n`,_jsxs(_components.p,{children:[`To pull a change right away, go to `,_jsx(_components.strong,{children:`Settings`}),`, then `,_jsx(_components.strong,{children:`Integrations`}),`, open your HR system, select the `,_jsx(_components.strong,{children:`HRIS Objects`}),` tab and click `,_jsx(_components.strong,{children:`Refresh now`}),`. The same tab shows every list, where it comes from, how many records it holds, whether a field uses it, and how the last sync went, including why a list couldn’t be read.`]}),`\n`,_jsx(Frame,{children:_jsx(OptimizedImage,{src:`https://mintcdn.com/journeyfront/jgBPyq0oPVTYhwCy/images/integrations/hris/gen-objects-tab.png?fit=max\u0026auto=format\u0026n=jgBPyq0oPVTYhwCy\u0026q=85\u0026s=841162a49c11fb1aa26ca9959743cb7a`,alt:`The HRIS Objects tab of an HR system integration, here UKG Pro, with the Refresh now button, when it last synced, each record type and chosen list with its record count, and whether a field uses it`,\"data-og-width\":`1890`,width:`1890`,\"data-og-height\":`1527`,height:`1527`,\"data-path\":`images/integrations/hris/gen-objects-tab.png`,\"data-optimize\":`true`,\"data-opv\":`3`,srcset:`https://mintcdn.com/journeyfront/jgBPyq0oPVTYhwCy/images/integrations/hris/gen-objects-tab.png?w=280\u0026fit=max\u0026auto=format\u0026n=jgBPyq0oPVTYhwCy\u0026q=85\u0026s=92a33e26168a6d692664ba04add42ec8 280w, https://mintcdn.com/journeyfront/jgBPyq0oPVTYhwCy/images/integrations/hris/gen-objects-tab.png?w=560\u0026fit=max\u0026auto=format\u0026n=jgBPyq0oPVTYhwCy\u0026q=85\u0026s=fb3fe97ebe504ab1ea067389fac2da93 560w, https://mintcdn.com/journeyfront/jgBPyq0oPVTYhwCy/images/integrations/hris/gen-objects-tab.png?w=840\u0026fit=max\u0026auto=format\u0026n=jgBPyq0oPVTYhwCy\u0026q=85\u0026s=75c5e0d60fac881dffbe0e927d59ccda 840w, https://mintcdn.com/journeyfront/jgBPyq0oPVTYhwCy/images/integrations/hris/gen-objects-tab.png?w=1100\u0026fit=max\u0026auto=format\u0026n=jgBPyq0oPVTYhwCy\u0026q=85\u0026s=6dc2a853f05e3b1e34525f3aad7e9375 1100w, https://mintcdn.com/journeyfront/jgBPyq0oPVTYhwCy/images/integrations/hris/gen-objects-tab.png?w=1650\u0026fit=max\u0026auto=format\u0026n=jgBPyq0oPVTYhwCy\u0026q=85\u0026s=5b1d535cf426eb659c0f69cec3bd8925 1650w, https://mintcdn.com/journeyfront/jgBPyq0oPVTYhwCy/images/integrations/hris/gen-objects-tab.png?w=2500\u0026fit=max\u0026auto=format\u0026n=jgBPyq0oPVTYhwCy\u0026q=85\u0026s=8810e8bdb7db3cd31860ecf864f9a542 2500w`})}),`\n`,_jsx(_components.p,{children:`When a record is renamed in your HR system, the new name shows everywhere on the next sync. When one is retired, it stops appearing for new selections, but every job req, hiring class and offer already using it keeps its name and code.`}),`\n`,_jsx(Heading,{level:`3`,id:`connect-a-web-service-for-lists-your-integration-doesn’t-cover`,children:`Connect a web service for lists your integration doesn’t cover`}),`\n`,_jsx(_components.p,{children:`If a list you need isn’t part of the standard integration, or your HR system isn’t supported by it, you can connect to your HR system’s own web services. You’ll need details from whoever manages your HR system.`}),`\n`,_jsxs(Steps,{children:[_jsx(Step,{title:`Open the HRIS web service card`,children:_jsxs(_components.p,{children:[`Go to `,_jsx(_components.strong,{children:`Settings`}),`, then `,_jsx(_components.strong,{children:`Integrations`}),`, and open `,_jsx(_components.strong,{children:`HRIS web service`}),` in the HRIS section.`]})}),_jsx(Step,{title:`Enter the connection details`,children:_jsxs(_components.p,{children:[`Fill in `,_jsx(_components.strong,{children:`HRIS`}),`, `,_jsx(_components.strong,{children:`Web services host`}),`, `,_jsx(_components.strong,{children:`Service account username`}),`, `,_jsx(_components.strong,{children:`Service account password`}),`, `,_jsx(_components.strong,{children:`Company API key`}),` and `,_jsx(_components.strong,{children:`User API key`}),`. Your HR team creates the service account with read access to the lists you want.`]})}),_jsx(Step,{title:`Test and save`,children:_jsxs(_components.p,{children:[`Click `,_jsx(_components.strong,{children:`Test and save`}),`. Journeyfront signs in once to check the details, and the connection only turns on if that works.`]})}),_jsxs(Step,{title:`Add your lists`,children:[_jsxs(_components.p,{children:[`For each list, give it a name your admins will see, the service to call, and which response fields hold the code and the display name. Your HR team provides these. Each list then appears as an `,_jsx(_components.strong,{children:`HRIS Object`}),` option when you create a field.`]}),_jsx(Frame,{children:_jsx(OptimizedImage,{src:`https://mintcdn.com/journeyfront/jgBPyq0oPVTYhwCy/images/integrations/hris/gen-web-service-list.png?fit=max\u0026auto=format\u0026n=jgBPyq0oPVTYhwCy\u0026q=85\u0026s=bf559a73dc1318d07e7ba0d304c837a9`,alt:`The Add web service list window, with a list name, the operation to call, where the rows are in the response, and the code and name fields filled in`,\"data-og-width\":`1760`,width:`1760`,\"data-og-height\":`1694`,height:`1694`,\"data-path\":`images/integrations/hris/gen-web-service-list.png`,\"data-optimize\":`true`,\"data-opv\":`3`,srcset:`https://mintcdn.com/journeyfront/jgBPyq0oPVTYhwCy/images/integrations/hris/gen-web-service-list.png?w=280\u0026fit=max\u0026auto=format\u0026n=jgBPyq0oPVTYhwCy\u0026q=85\u0026s=3a74a6ce9e8beb385d70d07e42cb74ce 280w, https://mintcdn.com/journeyfront/jgBPyq0oPVTYhwCy/images/integrations/hris/gen-web-service-list.png?w=560\u0026fit=max\u0026auto=format\u0026n=jgBPyq0oPVTYhwCy\u0026q=85\u0026s=fd2162a1eba2f9e96575090ff2dbae16 560w, https://mintcdn.com/journeyfront/jgBPyq0oPVTYhwCy/images/integrations/hris/gen-web-service-list.png?w=840\u0026fit=max\u0026auto=format\u0026n=jgBPyq0oPVTYhwCy\u0026q=85\u0026s=4ab87c06456f79bef258569533612d94 840w, https://mintcdn.com/journeyfront/jgBPyq0oPVTYhwCy/images/integrations/hris/gen-web-service-list.png?w=1100\u0026fit=max\u0026auto=format\u0026n=jgBPyq0oPVTYhwCy\u0026q=85\u0026s=a385c6090139d316614d36f0587486bb 1100w, https://mintcdn.com/journeyfront/jgBPyq0oPVTYhwCy/images/integrations/hris/gen-web-service-list.png?w=1650\u0026fit=max\u0026auto=format\u0026n=jgBPyq0oPVTYhwCy\u0026q=85\u0026s=0e85cf9f47006b7a59c513a5cc279700 1650w, https://mintcdn.com/journeyfront/jgBPyq0oPVTYhwCy/images/integrations/hris/gen-web-service-list.png?w=2500\u0026fit=max\u0026auto=format\u0026n=jgBPyq0oPVTYhwCy\u0026q=85\u0026s=44cea16df9293086d6664ad03a64593a 2500w`})})]})]}),`\n`,_jsx(_components.p,{children:`Credentials are stored encrypted and never shown again. You’ll see whether each one is set, not its value. A web service connection works with or without the standard integration.`}),`\n`,_jsx(Heading,{level:`3`,id:`edit-archive-or-delete-an-hris-object-field`,children:`Edit, archive or delete an HRIS Object field`}),`\n`,_jsx(_components.p,{children:`Open the field’s menu on the settings page.`}),`\n`,_jsxs(_components.ul,{children:[`\n`,_jsxs(_components.li,{children:[_jsx(_components.strong,{children:`Edit:`}),` change the label and description at any time. The `,_jsx(_components.strong,{children:`Key`}),` can’t change after the field is created, and the list can’t change once any record has a value for it. To use a different list, create a new field.`]}),`\n`,_jsxs(_components.li,{children:[_jsx(_components.strong,{children:`Archive:`}),` removes the field from forms but keeps every value already recorded. You can restore it later.`]}),`\n`,_jsxs(_components.li,{children:[_jsx(_components.strong,{children:`Delete:`}),` removes the field and its values permanently. Journeyfront shows how many records would be affected before you confirm.`]}),`\n`]}),`\n`,_jsx(Tip,{children:_jsx(_components.p,{children:`Archive is almost always the better choice. It keeps your history and can be undone.`})}),`\n`,_jsx(Heading,{level:`2`,id:`disconnect-your-hr-system`,children:`Disconnect your HR system`}),`\n`,_jsxs(_components.p,{children:[`Go to `,_jsx(_components.strong,{children:`Settings`}),`, then `,_jsx(_components.strong,{children:`Integrations`}),`, open your HR system and click `,_jsx(_components.strong,{children:`Disconnect`}),` on the `,_jsx(_components.strong,{children:`Details`}),` tab. Employee records you already sent stay in your HR system, and data already synced into Journeyfront stays in Journeyfront. Disconnecting can’t be undone; to use the integration again, you connect from the start.`]}),`\n`,_jsx(Heading,{level:`2`,id:`faq`,children:`FAQ`}),`\n`,_jsxs(AccordionGroup,{children:[_jsx(Accordion,{title:`Which HR systems are supported?`,id:`which-hr-systems-are-supported`,children:_jsxs(_components.p,{children:[`Every supported HR system is listed under `,_jsx(_components.strong,{children:`HRIS`}),` on the `,_jsx(_components.strong,{children:`Integrations`}),` page, including Workday, BambooHR, ADP, Paylocity, Paychex, UKG and many more. If yours isn’t listed, ask your Customer Success Manager.`]})}),_jsx(Accordion,{title:`Can I connect more than one HR system?`,id:`can-i-connect-more-than-one-hr-system`,children:_jsx(_components.p,{children:`No. Each Journeyfront account connects to one HR system. To switch, disconnect the current one first.`})}),_jsx(Accordion,{title:`What gets sent when I create an employee?`,id:`what-gets-sent-when-i-create-an-employee`,children:_jsxs(_components.p,{children:[`First name, last name and email are mapped automatically. Your admins can map more fields and set defaults in `,_jsx(_components.strong,{children:`Create Employee Settings`}),`. Depending on your HR system, the window may also ask for things like home address, start date, work location, department and manager. You can attach documents such as the resume and signed offer letter if your HR system accepts them.`]})}),_jsx(Accordion,{title:`Does sending a hire update an employee who already exists?`,id:`does-sending-a-hire-update-an-employee-who-already-exists`,children:_jsx(_components.p,{children:`No. Each send creates a new employee record in your HR system. Journeyfront shows a check mark once a candidate has been sent, so you don’t send them twice by accident.`})}),_jsx(Accordion,{title:`I un-hired a candidate and am hiring them again. Will it create a second employee?`,id:`i-un-hired-a-candidate-and-am-hiring-them-again-will-it-create-a-second-employee`,children:_jsx(_components.p,{children:`It can. If the candidate was sent before, the hire window shows when, with a warning that sending again may create a second employee in your HR system. Check your HR system before you send.`})}),_jsx(Accordion,{title:`Can I create employees for a group of hires at once?`,id:`can-i-create-employees-for-a-group-of-hires-at-once`,children:_jsx(_components.p,{children:`Yes. When you hire several candidates at once, the bulk hire window includes a section for your HR system. Fill in shared values once, adjust any candidate individually, and Journeyfront creates each employee. `})}),_jsx(Accordion,{title:`What happens if a send fails?`,id:`what-happens-if-a-send-fails`,children:_jsx(_components.p,{children:`You’ll see an error explaining why, usually a missing required field or a connection problem. Fix it and send again. A failed attempt doesn’t create a partial record, and Journeyfront doesn’t retry on its own.`})}),_jsx(Accordion,{title:`Why is my HRIS Object list showing no records?`,id:`why-is-my-hris-object-list-showing-no-records`,children:_jsxs(_components.p,{children:[`Usually the list hasn’t synced yet. Open the `,_jsx(_components.strong,{children:`HRIS Objects`}),` tab on your integration to see when it last ran and whether anything went wrong. If a list couldn’t be read, the reason is shown there; often it’s a permission your service account needs in your HR system.`]})}),_jsx(Accordion,{title:`How is an HRIS Object field different from a multiple choice field?`,id:`how-is-an-hris-object-field-different-from-a-multiple-choice-field`,children:_jsx(_components.p,{children:`A multiple choice field is a list you type and maintain by hand, and its value is just the option’s label. An HRIS Object field gets its options from your HR system, stays current on its own, and carries your HR system’s code alongside the name.`})}),_jsx(Accordion,{title:`Is the connection secure?`,id:`is-the-connection-secure`,children:_jsx(_components.p,{children:`Yes. Journeyfront connects through secure, authenticated APIs, and you approve exactly what it can access when you connect.`})})]}),`\n`,_jsx(Heading,{level:`2`,id:`related`,children:`Related`}),`\n`,_jsxs(Columns,{cols:2,children:[_jsx(Card,{title:`Integrations overview`,icon:`plug`,href:`/integrations/overview`,children:_jsx(_components.p,{children:`Everything Journeyfront connects to.`})}),_jsx(Card,{title:`Custom fields`,icon:`table-list`,href:`/account-setup/custom-fields`,children:_jsx(_components.p,{children:`Add your own fields to job reqs, hiring classes and applications.`})}),_jsx(Card,{title:`Offer fields`,icon:`file-invoice-dollar`,href:`/offers/offer-fields`,children:_jsx(_components.p,{children:`Fields that fill in your offer letters.`})}),_jsx(Card,{title:`Hiring classes`,icon:`users-rectangle`,href:`/hiring-classes/overview`,children:_jsx(_components.p,{children:`Group hires who share a start date.`})})]})]})}function MDXContent(props={}){const{wrapper:MDXLayout}={..._provideComponents(),...props.components};return MDXLayout?_jsx(MDXLayout,{...props,children:_jsx(_createMdxContent,{...props})}):_createMdxContent(props)}return{default:MDXContent};function _missingMdxReference(id,component){throw new Error(`Expected `+(component?`component`:`object`)+\" `\"+id+\"` to be defined: you likely forgot to import, pass, or provide it.\")}","frontmatter":{},"scope":{"config":{},"pageMetadata":{"title":"HRIS integrations","description":"Connect your HR system so new hires, employee records and HR reference lists flow between it and Journeyfront without retyping.","href":"/integrations/hris"}}},"mdxSourceWithNoJs":null},"mdxExtracts":{"tableOfContents":[{"title":"What the integration does","slug":"what-the-integration-does","depth":2,"children":[]},{"title":"Connect your HR system","slug":"connect-your-hr-system","depth":2,"children":[]},{"title":"Create employees when you hire","slug":"create-employees-when-you-hire","depth":2,"children":[{"title":"Turn on employee creation","slug":"turn-on-employee-creation","depth":3,"children":[]},{"title":"Send a new hire to your HR system","slug":"send-a-new-hire-to-your-hr-system","depth":3,"children":[]}]},{"title":"Sync employees from your HR system","slug":"sync-employees-from-your-hr-system","depth":2,"children":[{"title":"Set up the sync","slug":"set-up-the-sync","depth":3,"children":[]},{"title":"Map job titles to job profiles","slug":"map-job-titles-to-job-profiles","depth":3,"children":[]},{"title":"Preview and review syncs","slug":"preview-and-review-syncs","depth":3,"children":[]}]},{"title":"Pick HR records in custom fields (HRIS objects)","slug":"pick-hr-records-in-custom-fields-hris-objects","depth":2,"children":[{"title":"Create an HRIS Object field","slug":"create-an-hris-object-field","depth":3,"children":[]},{"title":"Pick a value","slug":"pick-a-value","depth":3,"children":[]},{"title":"Use an HRIS Object field in offer letters","slug":"use-an-hris-object-field-in-offer-letters","depth":3,"children":[]},{"title":"Keep your lists up to date","slug":"keep-your-lists-up-to-date","depth":3,"children":[]},{"title":"Connect a web service for lists your integration doesn’t cover","slug":"connect-a-web-service-for-lists-your-integration-doesn’t-cover","depth":3,"children":[]},{"title":"Edit, archive or delete an HRIS Object field","slug":"edit-archive-or-delete-an-hris-object-field","depth":3,"children":[]}]},{"title":"Disconnect your HR system","slug":"disconnect-your-hr-system","depth":2,"children":[]},{"title":"FAQ","slug":"faq","depth":2,"children":[]},{"title":"Related","slug":"related","depth":2,"children":[]}],"codeExamples":{}},"jsLinks":["/_mintlify/custom/journeyfront/1104ac0de6b41191/hubspot.js"],"subdomain":"journeyfront","siteName":"Journeyfront Help Center","title":"HRIS integrations - Journeyfront Help Center","navMaps":{"firstHrefInVersion":{},"firstHrefInLanguage":{}},"lastModified":"2026-11-19T17:05:25.934Z","originalFileLocation":"integrations/hris.mdx"},"headHtml":"\u003cscript data-mint-head>(function(){var d=document.documentElement,p=null;if(!p){try{p=localStorage.getItem(\"isDarkMode\")}catch(e){}if(p==='true')p='dark';else if(p==='false')p='light';if(p!=='light'\u0026\u0026p!=='dark'\u0026\u0026p!=='system')p=\"system\"}var r=p==='system'?(matchMedia(\"(prefers-color-scheme: dark)\").matches?'dark':'light'):p;d.classList.remove(r==='dark'?'light':'dark');d.classList.add(r);d.setAttribute(\"data-theme-preference\",p)})();\u003c/script>\u003cmeta data-mint-head name=\"description\" content=\"Connect your HR system so new hires, employee records and HR reference lists flow between it and Journeyfront without retyping.\">\u003cmeta data-mint-head name=\"application-name\" content=\"Journeyfront Help Center\">\u003cmeta data-mint-head name=\"generator\" content=\"Mintlify\">\u003clink data-mint-head rel=\"icon\" type=\"image/png\" sizes=\"192x192\" href=\"/mintlify-assets/_mintlify/favicons/journeyfront/dGZbwbhNUUJYTPlj/_generated/favicon/android-chrome-192x192.png\" media=\"(prefers-color-scheme: light)\">\u003clink data-mint-head rel=\"apple-touch-icon\" type=\"image/png\" sizes=\"180x180\" href=\"/mintlify-assets/_mintlify/favicons/journeyfront/dGZbwbhNUUJYTPlj/_generated/favicon/apple-touch-icon.png\">\u003clink data-mint-head rel=\"icon\" type=\"image/png\" sizes=\"16x16\" href=\"/mintlify-assets/_mintlify/favicons/journeyfront/dGZbwbhNUUJYTPlj/_generated/favicon/favicon-16x16.png\" media=\"(prefers-color-scheme: light)\">\u003clink data-mint-head rel=\"icon\" type=\"image/png\" sizes=\"32x32\" href=\"/mintlify-assets/_mintlify/favicons/journeyfront/dGZbwbhNUUJYTPlj/_generated/favicon/favicon-32x32.png\" media=\"(prefers-color-scheme: light)\">\u003clink data-mint-head rel=\"shortcut icon\" type=\"image/x-icon\" href=\"/mintlify-assets/_mintlify/favicons/journeyfront/dGZbwbhNUUJYTPlj/_generated/favicon/favicon.ico\" media=\"(prefers-color-scheme: light)\">\u003clink data-mint-head rel=\"icon\" type=\"image/png\" sizes=\"192x192\" href=\"/mintlify-assets/_mintlify/favicons/journeyfront/dGZbwbhNUUJYTPlj/_generated/favicon-dark/android-chrome-192x192.png\" media=\"(prefers-color-scheme: dark)\">\u003clink data-mint-head rel=\"icon\" type=\"image/png\" sizes=\"16x16\" href=\"/mintlify-assets/_mintlify/favicons/journeyfront/dGZbwbhNUUJYTPlj/_generated/favicon-dark/favicon-16x16.png\" media=\"(prefers-color-scheme: dark)\">\u003clink data-mint-head rel=\"icon\" type=\"image/png\" sizes=\"32x32\" href=\"/mintlify-assets/_mintlify/favicons/journeyfront/dGZbwbhNUUJYTPlj/_generated/favicon-dark/favicon-32x32.png\" media=\"(prefers-color-scheme: dark)\">\u003clink data-mint-head rel=\"shortcut icon\" type=\"image/x-icon\" href=\"/mintlify-assets/_mintlify/favicons/journeyfront/dGZbwbhNUUJYTPlj/_generated/favicon-dark/favicon.ico\" media=\"(prefers-color-scheme: dark)\">\u003cmeta data-mint-head property=\"og:title\" content=\"HRIS integrations - Journeyfront Help Center\">\u003cmeta data-mint-head property=\"og:description\" content=\"Connect your HR system so new hires, employee records and HR reference lists flow between it and Journeyfront without retyping.\">\u003cmeta data-mint-head property=\"og:site_name\" content=\"Journeyfront Help Center\">\u003cmeta data-mint-head property=\"og:url\" content=\"https://help.journeyfront.com/integrations/hris\">\u003cmeta data-mint-head property=\"og:type\" content=\"website\">\u003cmeta data-mint-head property=\"og:image\" content=\"https://journeyfront.mintlify.site/_mintlify/api/og/v2?division=Integrations\u0026amp;title=HRIS+integrations\u0026amp;description=Connect+your+HR+system+so+new+hires%2C+employee+records+and+HR+reference+lists+flow+between+it+and+Journeyfront+without+retyping.\u0026amp;theme=f4edfd646b57b2a2d76dfe1d\u0026amp;signature=3b10c4378040944550485598b6ab89f1f5fddc4440426bda0aa1c0a59b95a257\">\u003cmeta data-mint-head property=\"og:image:width\" content=\"1200\">\u003cmeta data-mint-head property=\"og:image:height\" content=\"630\">\u003cmeta data-mint-head name=\"twitter:card\" content=\"summary_large_image\">\u003cmeta data-mint-head name=\"twitter:title\" content=\"HRIS integrations - Journeyfront Help Center\">\u003cmeta data-mint-head name=\"twitter:description\" content=\"Connect your HR system so new hires, employee records and HR reference lists flow between it and Journeyfront without retyping.\">\u003cmeta data-mint-head name=\"twitter:image\" content=\"https://journeyfront.mintlify.site/_mintlify/api/og/v2?division=Integrations\u0026amp;title=HRIS+integrations\u0026amp;description=Connect+your+HR+system+so+new+hires%2C+employee+records+and+HR+reference+lists+flow+between+it+and+Journeyfront+without+retyping.\u0026amp;theme=f4edfd646b57b2a2d76dfe1d\u0026amp;signature=3b10c4378040944550485598b6ab89f1f5fddc4440426bda0aa1c0a59b95a257\">\u003cmeta data-mint-head name=\"twitter:image:width\" content=\"1200\">\u003cmeta data-mint-head name=\"twitter:image:height\" content=\"630\">\u003cmeta data-mint-head name=\"msapplication-config\" content=\"/mintlify-assets/_mintlify/favicons/journeyfront/dGZbwbhNUUJYTPlj/_generated/favicon/browserconfig.xml\">\u003cmeta data-mint-head name=\"apple-mobile-web-app-title\" content=\"Journeyfront Help Center\">\u003cmeta data-mint-head name=\"msapplication-TileColor\" content=\"#0072D5\">\u003clink data-mint-head rel=\"canonical\" href=\"https://help.journeyfront.com/integrations/hris\">\u003clink data-mint-head rel=\"alternate\" type=\"application/xml\" href=\"/sitemap.xml\">\u003clink data-mint-head rel=\"alternate\" type=\"text/markdown\" href=\"/integrations/hris.md\">\u003cscript data-mint-head type=\"application/ld+json\">{\"@context\":\"https://schema.org\",\"@graph\":[{\"@type\":\"Organization\",\"@id\":\"https://help.journeyfront.com/#organization\",\"name\":\"Journeyfront Help Center\",\"url\":\"https://help.journeyfront.com\",\"logo\":{\"@type\":\"ImageObject\",\"url\":\"https://mintcdn.com/journeyfront/Ki8OScNKQAoeTHdj/logo/light.svg?fit=max\u0026auto=format\u0026n=Ki8OScNKQAoeTHdj\u0026q=85\u0026s=b9cfa7f80c1e8537f151a84523c25a55\"}},{\"@type\":\"WebSite\",\"@id\":\"https://help.journeyfront.com#website\",\"name\":\"Journeyfront Help Center\",\"url\":\"https://help.journeyfront.com\",\"publisher\":{\"@id\":\"https://help.journeyfront.com/#organization\"}},{\"@type\":\"WebPage\",\"@id\":\"https://help.journeyfront.com/integrations/hris#webpage\",\"url\":\"https://help.journeyfront.com/integrations/hris\",\"name\":\"HRIS integrations\",\"description\":\"Connect your HR system so new hires, employee records and HR reference lists flow between it and Journeyfront without retyping.\",\"dateModified\":\"2026-11-19T17:05:25.934Z\",\"isPartOf\":{\"@id\":\"https://help.journeyfront.com#website\"},\"breadcrumb\":{\"@id\":\"https://help.journeyfront.com/integrations/hris#breadcrumb\"}},{\"@type\":\"BreadcrumbList\",\"@id\":\"https://help.journeyfront.com/integrations/hris#breadcrumb\",\"itemListElement\":[{\"@type\":\"ListItem\",\"position\":1,\"name\":\"Knowledge Base\",\"item\":\"https://help.journeyfront.com\"},{\"@type\":\"ListItem\",\"position\":2,\"name\":\"Integrations\",\"item\":\"https://help.journeyfront.com/integrations/overview\"},{\"@type\":\"ListItem\",\"position\":3,\"name\":\"HRIS integrations\",\"item\":\"https://help.journeyfront.com/integrations/hris\"}]},{\"@type\":[\"Article\",\"TechArticle\"],\"@id\":\"https://help.journeyfront.com/integrations/hris#article\",\"headline\":\"HRIS integrations\",\"name\":\"HRIS integrations\",\"description\":\"Connect your HR system so new hires, employee records and HR reference lists flow between it and Journeyfront without retyping.\",\"url\":\"https://help.journeyfront.com/integrations/hris\",\"mainEntityOfPage\":{\"@id\":\"https://help.journeyfront.com/integrations/hris#webpage\"},\"dateModified\":\"2026-11-19T17:05:25.934Z\",\"publisher\":{\"@id\":\"https://help.journeyfront.com/#organization\"},\"isPartOf\":{\"@id\":\"https://help.journeyfront.com#website\"}}]}\u003c/script>\u003cscript data-mint-head type=\"application/ld+json\">{\"@context\":\"https://schema.org\",\"@type\":\"WebSite\",\"name\":\"Journeyfront Help Center\",\"publisher\":{\"@type\":\"Organization\",\"name\":\"Journeyfront Help Center\"},\"provider\":{\"@type\":\"Organization\",\"name\":\"Mintlify\",\"url\":\"https://mintlify.com\"}}\u003c/script>","agentPointerHref":"/integrations/hris.md","siteName":"Journeyfront Help Center","nav":{"global":null,"groups":[{"group":"Knowledge Base","pages":[{"group":"Getting Started","icon":"flag","pages":[{"title":"Welcome to the Journeyfront Help Center","sidebarTitle":"Welcome","icon":"house","href":"/index"},{"title":"Key concepts","icon":"lightbulb","hidden":true,"href":"/key-concepts"},{"title":"How the pieces connect","sidebarTitle":"How the pieces connect","icon":"diagram-project","href":"/getting-started/how-the-pieces-connect"},{"title":"Finding your way around","icon":"compass","href":"/getting-started/navigating"},{"title":"Logging in","href":"/getting-started/logging-in"}]},{"group":"Guides by Role","icon":"users","expanded":true,"pages":[{"title":"Admin setup checklist","sidebarTitle":"Admins: setup checklist","href":"/getting-started/admin-setup-checklist"},{"title":"Getting started for TA leaders","sidebarTitle":"TA Leaders","href":"/getting-started/ta-leaders"},{"title":"Getting started for recruiters","sidebarTitle":"Recruiters","href":"/getting-started/recruiters"},{"title":"Getting started for hiring managers and interviewers","sidebarTitle":"Hiring managers and interviewers","href":"/getting-started/hiring-managers"},{"title":"Getting started for sourcing teams","sidebarTitle":"Sourcing Team","href":"/getting-started/sourcing-team"},{"title":"Getting started for onboarding teams","sidebarTitle":"Onboarding","href":"/getting-started/onboarding-team"}]},{"group":"Candidates","icon":"users","pages":[{"title":"Working with candidates","sidebarTitle":"Overview","icon":"users","href":"/candidates/overview"},{"title":"The Candidates page","href":"/candidates/candidates-page"},{"group":"The Candidate Application","icon":"id-card","expanded":false,"pages":[{"title":"The Candidate Application","href":"/candidates/candidate-application"},{"title":"Edit candidate details","href":"/candidates/edit-details"},{"title":"Comments and activity","href":"/candidates/comments-and-notes"},{"title":"Share and print","href":"/candidates/share-and-print"},{"title":"Compare and merge candidates","href":"/candidates/compare-and-merge"},{"title":"Do Not Hire","href":"/candidates/do-not-hire"}]},{"title":"Candidate Profiles and Candidate Applications","href":"/candidates/profiles-and-applications"},{"group":"Move \u0026 Disposition Candidates","icon":"arrow-right-arrow-left","expanded":false,"pages":[{"title":"Move candidates through steps","href":"/candidates/move-through-steps"},{"title":"Reject candidates","href":"/candidates/reject"},{"title":"Add a candidate to another job req","href":"/candidates/add-to-another-job"},{"title":"Move a candidate to another job req","href":"/candidates/move-to-another-job"}]},{"group":"Fraud Detection","icon":"shield-halved","expanded":false,"pages":[{"title":"Fraud flags","href":"/candidates/fraud-flags"}]},{"title":"Bulk actions","href":"/candidates/bulk-actions"},{"group":"Email \u0026 Texting","icon":"envelope","expanded":false,"pages":[{"title":"Team emails and system emails","href":"/communication/email-templates"},{"title":"Template variables","href":"/communication/template-variables"},{"title":"Reminder emails","href":"/communication/reminder-emails"},{"title":"Email candidates","href":"/communication/email-candidates"},{"title":"Text messages","href":"/communication/text-messages"},{"title":"Message templates","href":"/communication/message-templates"},{"title":"WhatsApp","href":"/communication/whatsapp"},{"title":"Calling candidates","href":"/communication/calling"},{"group":"Texting Providers","icon":"message","pages":[{"title":"Texting providers","sidebarTitle":"Overview","hidden":false,"href":"/integrations/texting-providers"},{"title":"Twilio","href":"/integrations/texting-providers/twilio"},{"title":"Webex Connect","href":"/integrations/texting-providers/webex-connect"},{"title":"WhatsApp","href":"/integrations/texting-providers/whatsapp"}]}]}]},{"group":"Account Setup","icon":"gear","pages":[{"title":"Company details","mode":"default","href":"/account-setup/company-details"},{"title":"Users","href":"/account-setup/users"},{"title":"Security roles and permissions","href":"/account-setup/security-roles"},{"title":"Custom fields","href":"/account-setup/custom-fields"},{"title":"Rejection and separation reasons","href":"/account-setup/rejection-reasons"},{"title":"Importing data","href":"/account-setup/importing-data"},{"title":"Add-ons and credits","href":"/account-setup/add-ons"}]},{"group":"Source and Attract Candidates","icon":"bullhorn","pages":[{"group":"Job Boards \u0026 Job Postings","icon":"bullhorn","expanded":false,"pages":[{"title":"Job boards (career site)","sidebarTitle":"Job boards (career site)","href":"/sourcing/job-boards"},{"title":"Job postings","href":"/sourcing/job-postings"}]},{"title":"Invite candidates","sidebarTitle":"Invite candidates","icon":"link","href":"/sourcing/invite-candidates"},{"title":"Magic links","sidebarTitle":"Magic links","icon":"wand-magic-sparkles","href":"/sourcing/magic-links"},{"title":"Sources","sidebarTitle":"Sources","icon":"signs-post","href":"/sourcing/sources"},{"title":"Add candidates","icon":"user-plus","href":"/sourcing/add-candidates"},{"title":"Import candidates","icon":"file-import","href":"/sourcing/import-candidates"},{"title":"Social media","sidebarTitle":"Social media","icon":"share-nodes","href":"/sourcing/social-media"},{"title":"Lead ads","sidebarTitle":"Lead ads","icon":"rectangle-ad","href":"/sourcing/lead-ads"},{"title":"External job boards","icon":"briefcase","href":"/sourcing/external-job-boards"},{"group":"Referrals","expanded":false,"pages":[{"title":"How referrals work","href":"/referrals/overview"},{"title":"Reward programs","href":"/referrals/reward-programs"},{"title":"Rewards on job reqs","href":"/referrals/job-req-rewards"},{"title":"The Referrals page","href":"/referrals/referrals-page"},{"title":"Review, credit and Reward Status","href":"/referrals/review-and-credit"},{"title":"Referral details and milestones","href":"/referrals/referral-details"},{"title":"Referrers","href":"/referrals/referrers"},{"group":"Payouts","pages":[{"title":"Payouts","href":"/referrals/payouts"},{"title":"Payout batches","href":"/referrals/payout-batches"}]},{"group":"Referral Portal","pages":[{"title":"Set up a referral portal","href":"/referrals/portal-setup"},{"title":"Employee sign-in and access","href":"/referrals/portal-access"},{"title":"Featured items and email notifications","href":"/referrals/featured-and-notifications"},{"title":"Using the referral portal","href":"/referrals/employee-portal"},{"title":"Badges","href":"/referrals/badges"}]},{"title":"Referrals dashboard","href":"/referrals/dashboard"},{"title":"Permissions and portal admins","href":"/referrals/permissions"}]}]},{"group":"Job Reqs","icon":"briefcase","expanded":false,"pages":[{"title":"Job reqs overview","href":"/job-reqs/overview"},{"title":"The Job Reqs page","href":"/job-reqs/job-reqs-page"},{"title":"Create a job req","href":"/job-reqs/create"},{"title":"Application form","href":"/job-reqs/application-form"},{"title":"Hiring team","href":"/job-reqs/hiring-team"},{"title":"Job settings","href":"/job-reqs/job-settings"},{"title":"Job req statuses","href":"/job-reqs/statuses"}]},{"group":"Workflows \u0026 Automation","icon":"diagram-project","expanded":false,"pages":[{"title":"Workflows overview","href":"/workflows/overview"},{"title":"Build a workflow","href":"/workflows/build"},{"title":"Activities you can add","href":"/workflows/activities"},{"title":"Publish workflow changes","href":"/workflows/publish"},{"title":"Automation rules","href":"/workflows/automation-rules"},{"title":"Candidate assignment","href":"/workflows/candidate-assignment"},{"title":"AI agents","href":"/workflows/ai-agents"}]},{"group":"Hiring Classes","icon":"users-rectangle","expanded":false,"pages":[{"title":"Hiring classes overview","href":"/hiring-classes/overview"},{"title":"Create and manage classes","href":"/hiring-classes/create"},{"title":"Working with a class","href":"/hiring-classes/working-with-a-class"}]},{"group":"Interviews \u0026 Scheduling","icon":"calendar-check","expanded":false,"pages":[{"title":"Interview guides","href":"/interviews/interview-guides"},{"title":"Set up an interview activity","href":"/interviews/interview-activity"},{"title":"Candidate self-scheduling","href":"/interviews/self-scheduling"},{"title":"Schedule an interview for a candidate","href":"/interviews/schedule-for-a-candidate"},{"title":"Your availability and calendar","href":"/interviews/availability"},{"title":"Calendars and video","href":"/integrations/calendars"},{"title":"Conduct an interview and submit feedback","href":"/interviews/conduct-an-interview"},{"title":"Interview notes","href":"/interviews/interview-notes"},{"title":"See who hasn't booked","href":"/interviews/who-hasnt-booked"},{"title":"Interview reminders","href":"/interviews/reminders"}]},{"group":"Scoring","icon":"chart-simple","expanded":false,"pages":[{"title":"How scoring works","href":"/scoring/how-scoring-works"},{"title":"Attributes","href":"/scoring/attributes"},{"title":"Reading a candidate's scores","href":"/scoring/reading-scores"},{"title":"AI resume scoring","href":"/scoring/ai-resume-scoring"},{"title":"AI-scored questions","href":"/scoring/ai-scored-questions"}]},{"group":"Assessments","icon":"clipboard-check","expanded":false,"pages":[{"title":"Assessments overview","href":"/assessments/overview"},{"title":"Screening questions","href":"/assessments/screening-questions"},{"title":"Typing test","href":"/assessments/typing-test"},{"title":"Skills tests","href":"/assessments/skills-tests"},{"title":"Language assessments","href":"/assessments/language-assessments"},{"title":"Internet speed test","href":"/assessments/internet-speed-test"},{"title":"System requirements test","href":"/assessments/system-requirements"},{"title":"Retakes and resetting scores","href":"/assessments/retakes"}]},{"group":"Offer \u0026 Hire","icon":"handshake","pages":[{"group":"Offers","icon":"file-signature","expanded":false,"pages":[{"title":"Offers overview","icon":"file-signature","href":"/offers/overview"},{"title":"Offer fields and merge keys","href":"/offers/offer-fields"},{"title":"Offer letter and document templates","href":"/offers/templates"},{"title":"Offer packages","href":"/offers/offer-packages"},{"title":"Send an offer","href":"/offers/send-offers"},{"title":"E-signatures","href":"/offers/e-signatures"},{"title":"E-signature setup and credits","href":"/integrations/e-signature"},{"title":"Send offers in bulk","href":"/offers/bulk-send"}]},{"group":"Hiring \u0026 Onboarding","icon":"user-check","expanded":false,"pages":[{"title":"Hire candidates","href":"/onboarding/hire-candidates"},{"title":"Bulk hire","href":"/onboarding/bulk-hire"},{"title":"Onboarding forms","href":"/onboarding/onboarding-forms"},{"title":"E-consent forms","href":"/onboarding/e-consent-forms"},{"title":"Background checks","href":"/onboarding/background-checks"}]}]},{"group":"Employees","icon":"id-badge","expanded":false,"pages":[{"title":"Employee records","href":"/employees/employee-records"},{"title":"Job profiles","href":"/employees/job-profiles"},{"title":"Performance reviews","href":"/employees/performance-reviews"}]},{"group":"Reporting \u0026 Analytics","icon":"chart-line","pages":[{"title":"Dashboards overview","href":"/reporting/dashboards"},{"title":"Job req dashboards","href":"/reporting/job-dashboards"},{"title":"Applicant volume and pipeline","href":"/reporting/candidate-overview"},{"title":"Funnel and drop-off","href":"/reporting/funnel-analytics"},{"title":"Time to hire","href":"/reporting/time-to-hire"},{"title":"Source effectiveness","href":"/reporting/source-effectiveness"},{"title":"Interview analytics","href":"/reporting/interview-analytics"},{"title":"Hiring process fidelity","href":"/reporting/hiring-process-fidelity"},{"title":"Recruiter productivity","href":"/reporting/recruiter-productivity"},{"title":"Quality of hire","sidebarTitle":"Quality of hire","href":"/reporting/turnover-and-performance"},{"title":"Screening question analytics","href":"/reporting/screening-questions-analytics"},{"title":"EEOC reporting","href":"/reporting/eeoc"}]},{"group":"Lists, Views \u0026 Exports","icon":"table-list","pages":[{"title":"Saved views","icon":"table-list","href":"/lists-and-exports/saved-views"},{"title":"Export data","href":"/lists-and-exports/export-data"}]},{"group":"Integrations","icon":"plug","pages":[{"title":"Integrations overview","sidebarTitle":"Overview","icon":"plug","href":"/integrations/overview"},{"group":"Job Boards","icon":"briefcase","pages":[{"title":"Job board integrations","sidebarTitle":"Overview","href":"/integrations/job-boards"},{"title":"Indeed","href":"/integrations/job-boards/indeed"},{"title":"JobTarget","href":"/integrations/job-boards/jobtarget"},{"title":"Appcast","href":"/integrations/job-boards/appcast"}]},{"group":"Social Media","icon":"share-nodes","expanded":false,"pages":[{"title":"Meta Lead Ads","sidebarTitle":"Meta Lead Ads","icon":"link","href":"/integrations/meta-lead-ads"}]},{"group":"Background Checks","icon":"shield-check","pages":[{"title":"Background check integrations","sidebarTitle":"Overview","href":"/integrations/background-checks"},{"title":"Checkr","description":"Connect your Checkr account so your team can order and track background checks from Journeyfront.","href":"/integrations/background-checks/checkr"}]},{"title":"HRIS integrations","href":"/integrations/hris"},{"title":"ATS integrations","description":"Use Journeyfront alongside another applicant tracking system: send candidates to it in one click, or launch Journeyfront assessments from it.","href":"/integrations/ats"},{"title":"Single sign-on (SSO)","sidebarTitle":"Single sign-on","href":"/integrations/single-sign-on"},{"group":"Calling","icon":"phone","pages":[{"title":"Calling","sidebarTitle":"Overview","href":"/integrations/calling"},{"title":"Webex Contact Center","href":"/integrations/calling/webex-contact-center"},{"title":"QUO","href":"/integrations/calling/quo"}]}]},{"group":"Other","pages":[{"title":"How Journeyfront uses AI","href":"/getting-started/ai"},{"title":"Use the Help Center with your AI assistant","sidebarTitle":"Use these docs with AI","href":"/getting-started/use-docs-with-ai"},{"title":"Glossary","icon":"book","href":"/getting-started/glossary"},{"group":"Predictive Models","icon":"brain","expanded":false,"pages":[{"title":"Predictive models","href":"/scoring/predictive-models"},{"title":"Behavioral assessment","href":"/assessments/behavioral-assessment"}]}]}]}]},"basePath":"","title":"HRIS integrations - Journeyfront Help Center","deploymentId":"dpl_2pTxFtyBudBMYZiCw1MyvoA1wxpd","buildId":"dpl_2pTxFtyBudBMYZiCw1MyvoA1wxpd","dynamics":["07c022d89b","a74be98ba7"],"chunks":["Frame-B0oVBAXA.js","DynamicMarkdown-BvJIe00T.js","zoom-image-lightbox-BXthlMNf.js","lightbox-handle-r17bVUz3.js"]}